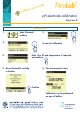
Shor t-For m Reminders Short-For t-Form Electrodes - Connect/Replace Reagents - Install/Replace Select method pH electrode calibration Reagent calibration Running methods Running sequences Direct measurements Maintenance recommendations Storage recommendations Spare parts & accessories Electrodes Calibration standards & solutions D21T066 • Printed by Radiometer Analytical SAS • 2008-09B Short-Form Reminders 1
Short-Form Reminders 2
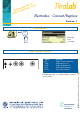
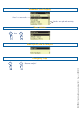
to ress u s e ! p key s in one c t r o d e y l On h e e l e ck t che Electrodes - Connect/Replace Form no. 1 Select method and 2 VW Electrodes to be connected P t -P t GND Temp Ref E1 Socket REF TEMP GND Pt-Pt E1/E2 Electrode Single reference electrode Temperature sensor Single metal electrode Double metal electrode Other electrode types Example: pHC2401-a to address TIM/E1 (socket E1 on rear panel).
D21T066 • Printed by Radiometer Analytical SAS • France • 2008-09B
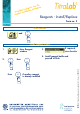
e se th e u , s ent dur r e a g n proce e c a o pl ati To re t install n e reag Reagents - Install/Replace Form no. 2 Select method and 2 VW Install reagent system 2. Enter Reagent window 2 VW then then 1 STU 1 3. If required, rinse burette 4. Install reagent bottle and press ✓ to flush STU if another reagent is already installed D21T066 • Printed by Radiometer Analytical SAS • France • 2008-09B 1.
D21T066 • Printed by Radiometer Analytical SAS • France • 2008-09B
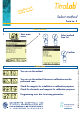
ard t f o r w tion h g i S t r a d selec o meth Select method Form no. 3 Select method Enter main menu 2. 2 VW Select method from list Confirm Check icons You can run the method You can run the method. However a calibration must be performed soon Check the reagents for installation or calibration purposes. Check the electrodes and reagents for calibration purposes Programming error due to missing parameters D21T066 • Printed by Radiometer Analytical SAS • France • 2008-09B 1.
D21T066 • Printed by Radiometer Analytical SAS • France • 2008-09B
ode rate Calib r elect your pH electrode calibration Form no. 4 Run calibration 1. 2. Enter Electrode window 3. 1 STU 4. 1 STU To run the calibration Enter User ID and temperature, if required, and confirm 1 STU 6. The measurement starts 5. Rinse electrode(s) and dip in beaker 1 STU Confirm Calibration can be performed on up to 5 buffers.
Automatic result display Press 1 to save results Results: zero pH and sensitivity View statistics 2 VW then 2 VW More cycles/End of analysis Emergency stop 1 STU “Resume analysis” D21T066 • Printed by Radiometer Analytical SAS • France • 2008-09B Stop
ent reag r u yo rate b i l a C Reagent calibration Form no. 5 Select reagent 1. Enter Reagent window 2. 1 STU 3. to select reagent from list then Confirm Run calibration 1. 1 STU 2.
3. Enter standard amount then confirm 1 STU 4. Rinse electrode(s) and dip in beaker 5. Confirm 1 6.
Run ses naly a r you Running methods Form no. 6 Run 1. To run your selected method 1 STU 2(*). Enter User ID and temperature, if required, and confirm 1 STU 3(*). Enter Sample ID, sample amount and confirm 1 STU 4(*). Rinse electrode(s) and dip electrode(s) in beaker then confirm 1 STU 5. The measurement starts (*) In “Run sample start = Shortcut” mode, steps 2, 3 and 4 and are chained automatically: 1. 2. Rinse and dip electrodes in beaker . 1 STU To start measurements.
Automatic result display (*) Press 1 to save results (*) In “Run sample end = Shortcut” mode, this window does not appear and the results are displayed. View statistics (*) 2 VW then 2 VW (*) In “Run sample end = Shortcut” mode, this window does not appear. More tests/End of analysis (*) Running new tests/samples in “Run Sample start = Shortcut” mode: 1 STU or 2 VW (*) In “Run sample end = Shortcut” mode, this window only appears if several sample replicates have been edited for the method.
stack e l p m ur Sa nalyses o y Use daily a for Running sequences Form no. 7 Preparing the sample stack 1. 3 XYZ + 1 STU 5. Place beaker no.1 onto the sample changer turntable. 6. 2. Repeat steps 2 to 5 for each beaker in the sequence Enter a new sample ID and confirm 7. 3. Check the sample test quantity or enter the sample test quantity to place in beaker no.1 + 4.
Run SAC sequence 1. 1 STU 2(*). Enter User ID and temperature, if required, confirm 1 STU (*) In “Run sample start = Shortcut” mode, step 2 is skipped. Emergency stop Stop Stop Del 1 STU 2 VW 2 VW “Resume analysis”. To repeat measurements in the same beaker. “Next analysis”. To start measurements in the next beaker. “End of analysis”. To stop the sequence. To end an analysis before the maximum titration time or the maximum volume have been reached. Calculations are performed, if result found.
? e tab d o r t ing lec the E ogramm n i r ” A “? your p k Chec Direct measurements Form no. 8 Live measurements and 1. Select method 2. Connect the electrode(s). See form no. 1 3. Dip electrode(s) in beaker 4. Enter Electrode menu and 2 VW Esc To stop measurements D21T066 • Printed by Radiometer Analytical SAS • France • 2008-09B To select an electrode and display measurements 5. 6.
, oval m e r bble r bu r o c e d u r e i a e p urett ush For b n t h e F l ru Maintenance recommendations Form no. 9 Daily Check and maintain electrodes according to manufacturer recommendations. Check that there is no crystallisation at piston level, if so rinse the burette using appropriate solvent to remove crystals. If not sufficient, dismount burette to remove crystals.
Annualy Replace burette stand, 1, 5, 10, 25, 50 ml and the anti-diffusion tip, part. no.956-309. Frequent use or use with aggressive or concentrated reagents occurring crystallisation risks may severely reduce the burette and anti-diffusion tip lifetime and may consequently require to replace them more frequently. Replace burette stand set of 3 tubing, (stands 5, 10, 25, 50 ml, part number X31T115 and stand 1 ml, part number X31T116). Replace damaged burette accessories: bottle stopper, desiccant tubing.
in em t s y ! rs you ndition p e Ke top co tip Storage recommendations Form no. 10 Daily Rinse electrodes and delivery tip throughly with distilled water after use. Store the electrode(s) following the instructions given in the respective operating instructions. Overnight and up to 1 week In case of spillages, clean the exterior surface of the instrument with a soft cloth and tepid water. Avoid the accumulation of excess water around the keyboard area.
D21T066 • Printed by Radiometer Analytical SAS • France • 2008-09B
at form n i e g erin glanc d r a O at ion Spare parts & accessories Form no. 11 Part no.
Part no.
at form n i e g erin glanc d r a O at ion Electrodes Form no. 12 Part no.
Part no. Type Description Pt-Pt Metal electrodes E32M001 M231Pt2 Double platinum wire, 2 banana plugs*** E32M002 M241Pt2-8 Double platinum staples, short cable *** For use with adapter, type BNC-f/2 Banana, part no.
at form n i e g erin glanc d r a O at ion Calibration standards & solutions Form no. 13 Part no. Type Description IUPAC Series pH Standards S11M001 pH 1.679 pH 1.679 ±0.010 at 25°C, 500 ml S11M002 pH 4.005 pH 4.005 ±0.010 at 25°C, 500 ml S11M003 pH 6.865 pH 6.865 ±0.010 at 25°C, 500 ml S11M004 pH 7.000 pH 7.000 ±0.010 at 25°C, 500 ml S11M005 pH 7.413 pH 7.413 ±0.010 at 25°C, 500 ml S11M006 pH 9.180 pH 9.180 ±0.010 at 25°C, 500 ml S11M007 pH 10.012 pH 10.012 ±0.
D21T066 • Printed by Radiometer Analytical SAS • France • 2008-09B