
User manual


53
Standard Operations
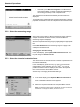
5.5.3.1 Change of the default setting of the chemical form
1. Insert the blank or sample cuvette/cell (depending on the
working procedure) into the cell compartment.
2. In the result display, press Options>More>Chemical Form.
3. A list of available evaluation forms appear. Select the new
default setting.
4. Press Save as Default.
The current result and all further measurements will be displayed in
the new chemical form.
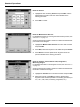
5.5.4 Basic test-specific and sample-specific data settings
Press Options to change test or sample specific settings.
Table 5 Barcode program options
Options Description
More For further Options
Store Off/On
With the Store On setting, all measurement data are stored automatically. With the Store Off
setting, no measurement data are stored.
Abs % Trans To switch to % transmittance or absorbance readings
Send Data icon /
Send Data
To send data to a printer, computer or USB memory stick (Type A)
Timer icon
This functions as a stopwatch. It helps to ensure that the steps of an analysis are correctly timed
(e.g. reaction times, wait times, etc., can be exactly specified). When the specified time has
elapsed, an acoustic signal is emitted. The use of the timer has no influence on the measurement
program.
Dilution Factor Off/On
A corrective dilution factor can be entered in order to take account of certain properties.
The number entered at the dilution factor prompt will be multiplied by the result to compensate for
the adjustment. For example, if the sample has been diluted by a factor of 2, enter 2. The default
setting of the dilution factor is turned off.
Note: When a dilution is in effect, the dilution icon will appear on the display.
Note: If undiluted samples are used, set the dilution factor off.
Chemical Form Some of the stored tests/methods allow to select the chemical form and the measuring range.
Edit To modify an existing program