LCD TV RECEIVER USER'S MANUAL Please read this manual carefully before using your television and keep this manual In a good place for future reference.
To users: Thank you for using our LCD-TV. Before connecting the LCD-TV and turning the power on, please read this book carefully. Please keep this book for later use. When it was loss of function by electrostatic shock, please switch the on/off button for restoring the function. CONTENT Safety Notice Items................................................................................... 1 Front Panel Controls..................................................................................
Safety Notice Items Incorrect usage will cause fire or electric shock. To prevent this, please do as required when you are installing, using and cleaning this machine.
Front Panel Controls L1510A-A, L15A10A,L1910A-A 2 3 L19A10A 4 TV/AV MENU VOL- 5 VOL+ CH- L1510B-A,L15A10B. L1910B-A, L19A10B 1 CH+ POWER 7 6 2 3 4 5 1 L2011W-A, L20A11W L1911W-A,L19A11W 6 7 L1509-A, L15A09A, L1709-A, L17A09A, L1909-A, L19A09A, L2009-A,L20A09A, TV/AV MENU VOL- VOL+ 6 7 CH- CH+ POWER 6 7 Control Panel Function 1. Power supply switch 2.TV/AV Select the input signals: SCART/PC/AV/SV/TV 3. MENU Press to select the main menu 4.
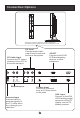
Connection Options ANT IN PC AUDIO IN R L AUDIO VIDEO IN S-VIDEO SCART VGA IN The figure is just for reference, please see the real. And the AC power supply switch is on the back of the set) AV Input Connect audio/video output from an external device to these jacks PC Audio Input Connect the PC output connector from a PC to the audio input port R ANT IN PC AUDIO IN Earphone port Antenna Input Connect cable or antenna signals to the TV, either directly or through your cable box.
Remote Control Key Functions When using the remote control, aim it towards the remote sensor on the TV Buttons on the remote control Stand By MUTE Display current input signal information SLEEP DISPLAY MUTE POWER TV channel number select Set time to change the TV into the NICAM PC AUTO AD TV/AV standby status after a period of preset time.
Remote Control Installing Batteries 1.Slide open the cover of the battery compartment on the back of the remote control. 2.Load two 5# alkaline batteries in the compartment. (plus and minus poles to respective mark) 3.Replace the cover of the battery compartment. 1 2 3 Precautions Make sure that there is no obstacle between the remote controller and television set. Keep the remote controller away from heat source or humid area to ensure effective performance of the remote controller.
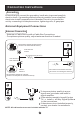
Connection Instructions Grounding Ensure that you connect the grounding / earth wire to prevent possible electric shock. If grounding methods are not possible, have a qualified electrician install a separate circuit breaker. Do not try to ground the unit by connecting it to telephone wires, lightening rods, or gas pipes. External Equipment Connections Antenna Connection - Antenna or Cable Service with a Cable Box Connections - For optimum picture quality, adjust antenna direction if needed.
Connection Instructions PC Setup You can use your LCD-TV as a monitor for your personal computer using a VGA cable (not supplied). Connection and use steps: 1.Read the user guide supplied with your computer and ensure that it has a VGA connector; 2.Make sure that the power of the LCD VGA IN -TV and the PC are off; 3.Connect a D type 15-pin VGA interface cable ( not supplied ) to the VGA video interface connector on the PC.
Connection Instructions VCR Setup - To avoid picture noise (interference), leave an adequate distance between the VCR and TV Connection and use steps: 1.Read the user guide supplied with your AV devices and ensure that it has Composite or S-Video connectors; 2.Make sure that the power of the LCD-TV and the AV device are off; Connection Option 1 Set VCR output switch to 3 or 4 and then tune TV to the same channel number. Connection Option 2 1.
Connection Instructions Cable TV Setup - After subscribing to a cable TV service from a local provider you can watch cable TV programming. The TV cannot display TV programming unless a TV tuner device or cable TV converter box is connected to the TV. - For further information regarding cable TV service, contact your local cable TV service provider(s). Connection Option 1 1. Select 3 or 4 with channel switch on cable box. 2. Tune the TV channel to the same selected output channel on cable box. 3.
Basic Operating Instructions Turn on the LCD-TV SLEEP DISPLAY MUTE POWER NICAM PC AUTO AD TV/AV PSM .SSM OK Q.VIEW P+ V- MENU V+ PINDEX TEXT SUBCODE MIX TIME HOLD SIZE Switch on the power button on the back of the set and the TV will in standby mode. When the POWER button on the remote control is pressed and the LCD-TV is turned on, the indicator light on the front of the LCD-TV changes from red to green.
Basic Operating Instructions Select the TV Channel You Want You can use the number keys on the remote control to directly select TV channels. The LCD-TV can store up to 100 channels , and you can press the keys on the remote control or on the panel to make a selection. 1.Press the relevant key on the remote control if you want to choose any channel from 0 to 9. for example: if you want to choose channel 8, just press the key number 0 and 8.
Menu Operations * In this manual, the OSD (On Screen Display) may be different from your TV s because it is just an example to help you with the TV operation. Press TV/AV to select the input source, and the menu in the different source is different . 1. Press MENU button to display the main menu, and V+/V-to select the main menu . 2. Press P+/P- to scroll through the options 3. Press V+/V- buttons to make changes to the parameters 4.
Menu Operations Picture Menu Options continued 2. Press P+/P- button to enter the picture menu and to go up and down to select the desired option . 3.Press V+/V- button to increase and decrease the level to adjust the selected option to your preference . 4. Repeat step 2 and step 3 until desired picture quality has been achieved . Function: BRIGHTNESS :Adjust the brightness of the picture .
Menu Operations Audio Menu Options continued You can adjust sound options to the levels you prefer. 2. Press P+/P- button to enter the audio menu and to go up and down to select the desired option . 3.Press V+/V- button to increase and decrease the level to adjust the selected option to your preference . 4. Repeat step 2 and step 3 until desired sound quality has been achieved . Function : VOLUME : Adjust the volume of your TV BALANCE : Adjust the balance of the audio output from left to right .
Menu Operations Function Menu Options Menu Language Selection : The menus can be shown on the screen in the selected language. First select your language. 1. Press MENU and V+/V- button until the following menu appears on the screen 2. Press P+/P- button to select LANGUAGE. 3. Press V+/V- button to select your desired language. From this point on, the on-screen menus will be shown in the language of your choice.
Menu Operations Function Menu Options Continued 2. TXT LANGUAGE: To switch the teletext languages. 3. TXT EAST/WEST: To select EAST or WEST . 4.DISPLAY MODE: To select the display mode between 4:3 and FULL SCREEN 5.BLUE SCREEN:To set On, the screen will be in blue screen after 3 seconds if there is no signal. 6. RESET : Press V+ to reset some settings to the factory default . Adjust Menu Options 1. Press MENU and V+/V- button until the following menu appears on the screen ADJUST AUTO SYNC.
Menu Operations Tuning Menu Options 1. Press MENU and V+/V- button until the following menu appears on the screen TUNING CHANNEL COLOR SYSTEM SOUND SYSTEM SKIP AFC FINE TUNE EXCHANGE MANUAL SEARCH AUTO SEARCH 1 AUTO DK OFF ON 143.65MHZ Note: This menu is only appears in TV mode . 2. Press P+/P- button to enter the tuning menu and to go up and down to select the desired option . 3.Press V+/V- button to increase and decrease the level to adjust the selected option to your preference . 4.
Menu Operations Tuning Menu Options Continued 7. EXCHANGE : Press V+ to display the menu as follows: EXCHANGE FROM : 1 TO : 9 EXCHANGE Press P+/- to select the item and then V+/- to adjust the channel and V+ to confirm.( For example: press P+/- to select FROM item, and then press V+/- to adjust the channel number to 1; then Press P+/- to select TO item, and V+/- to adjust the channel number to 9; press P+/- to select EXCHANGE item, and then V+ to confirm. The two channels will be exchanged) 8.
TELETEXT Some menu related function are not available in TELETEXT mode. MENU and AUTO AD control functions are not available in TELETEXT mode. If the TV is switched on by POWER after off in TELETEXT mode, or press TV/AV or PC button, the TELETEXT mode will disappear automatically. SLEEP DISPLAY MUTE POWER NICAM PC AUTO AD TV/AV PSM .SSM OK Q.VIEW Teletext features may vary depending on the Broadcasting Companies and is only available if the channel selected is transmitting Teletext.
TELETEXT SUBCODE Button When Teletext information exceeds more than one page , it may take some time for the automatic changing of the sub pages to reach the sub page you require . It is possible to enter your required sub page and continue watching the normal programme until the correct sub page is found . Select the required page number using buttons 0-9 . If the top of the page indicates that sub pages are being transmitted yet the page does not change .
Troubleshooting Guide To assist in location possible faults use help guide below. Troubleshooting No picture, no sound Verify if the television is properly plugged. Verify if the television is properly supplied power. Verify if electricity is available. Blank screen Verify if correct signals are input. Press TV/AV button to change signal input to TV input. Restart the television of power supply is interrupted. No sound Press MUTE button and verify if Mute mode is set.
Specifications Specifications of the television that you have just purchased may vary from the information in this table due to technical innovations. Model Picture, sound system L1510A-A, L15A10A, L1510B-A, L15A10B, L1509-A, L15A09A, PAL/SECAM-B/G,I,D/K,L,L Audio output External input port 1.5W+1.
ENGLISH