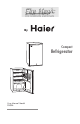
By ® Compact Refrigerator User Manual Model 3590A
SAFETY PRECAUTIONS Read all of the instructions before using this appliance. When using this appliance, always exercise basic safety precautions, including the following: 1) Use this appliance only for its intended purpose as described in this use and care guide. 2) This refrigerator must be properly installed in accordance with the installation instructions before it is used. See grounding instructions in the installation section. 3) Never unplug your refrigerator by pulling on the power cord.
DANGER Risk of child entrapment. Before you throw away your old refrigerator or freezer, take off the doors. Leave the shelves in place so that children may not easily climb inside. Thank you for using our Haier product. This easy-to-use manual will guide you in getting the best use of your refrigerator. Remember to record the model and serial number. They are on a label in back of the refrigerator. Model number Serial number Date of purchase Staple your receipt to your manual.
Table Of Contents PAGE Safety Precautions ..........................................................................1 Parts And Features ..........................................................................4 Installing Your Refrigerator ............................................................5 Unpacking Your Refrigerator ................................................................5 Leveling Your Refrigerator ....................................................................
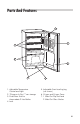
Parts And Features 1 2 7 6 3 5 4 1. Adjustable Temperature Control and Light 5. Adjustable Front Leveling Leg (not shown) 2. “Dispense-A-Can™” can storage 6. Crisper and Crisper Cover 3. Fixed Door Shelf to Accomodate 2 Liter Bottles 7. 1 Slide-Out Flip Shelf and 2 Slide-Out Glass Shelves 4.
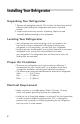
Installing Your Refrigerator Unpacking Your Refrigerator 1. Remove all packaging material. This includes the foam base and all adhesive tape holding the refrigerator accessories inside and outside. 2. Inspect and remove any remains of packing, tape or printed materials before powering on the refrigerator. Leveling Your Refrigerator • Your refrigerator has two leveling legs which are located in the front corners of your refrigerator.
Install Limitations • Do not install your refrigerator in any location not properly insulated or heated e.g. garage etc. Your refrigerator was not designed to operate in temperature settings below 55˚ Fahrenheit. • Select a suitable location for the refrigerator on a hard even surface away from direct sunlight or heat source e.g. radiators, baseboard heaters, cooking appliances etc. Any floor unevenness should be corrected with the leveling legs located on the front bottom corners of the refrigerator.
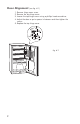
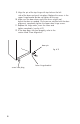
Door Alignment (see fig. # 1) 1. 2. 3. 4. Remove hinge cover screw. Remove the top hinge cover. Loosen the top hinge screws using a phillips head screwdriver. Adjust the door or put a spacer in between and then tighten the screws. 5. Replace the top hinge cover. fig.
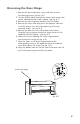
Reversing the Door Hinge 1. Remove the top hinge cover screw and then remove the top hinge cover. (see fig. # 1) 2. Using a Phillips Head Screwdriver, loosen and remove the screws holding the top hinge in place. (see fig. # 1) 3. Remove the top hinge and carefully lift off the door. 4. Remove the screw hole plug from the opposite side and insert the plug in the screw hole openings of the just removed screws. (see fig. # 2) 5.
9. Align the pin of the top hinge with top hole on the left side of the door and push into place. Replace the screws in the upper hinge bracket but do not tighten all the way. 10. Make sure the door closes easily but forms a tight seal. Adjust the door as needed. Once you are satisfied with the door alignment, completely tighten the upper door hinge screws. 11. Replace the hinge cover, insert the screw and tighten completely. (see fig. # 2) 12.
Refrigerator Features And Use General Features Adjustable temperature dial: Your refrigerator will automatically maintain the temperature level you select. The temperature control dial has 7 settings plus off. 1 is the warmest. 7 is the coldest. Turning the dial to OFF stops cooling in both the refrigeration and freezer sections. At first, set the dial to 4 and allow 24 hours to pass before adjusting the temperature to your needs.
Using the Dispense-A-Can™ • Your refrigerator is equipped with the convenient “Dispense-A-Can™” compartment. Each compartment will hold up to four cans. Simply load the cans from the top. To dispense a can, simply draw one out from the bottom. It is that easy. fig. # 5 Light • To replace burnt-out bulbs, remove the temperature control knob by pulling it out (see fig. #6a). Carefully pull the plastic light cover to the left and remove.
Food Storage Information Fresh Food • When storing fresh food, which is not prepackaged, be sure to wrap or store food in airtight and moisture proof material unless otherwise noted. This will ensure proper shelf life and prevent the transfer of odors and tastes. • Wipe containers before storing to avoid needless spills. • Eggs should be stored in an upright position in their original carton to maximize shelf life.
Proper Refrigerator Care and Cleaning Cleaning and Maintenance Warning: To avoid electric shock always unplug your refrigerator before cleaning. Ignoring this warning may result in death or injury. Caution: Before using cleaning products, always read and General: follow manufacturer’s instructions and warnings to avoid personal injury or product damage. • Prepare a cleaning solution of 3-4 tablespoons of baking soda mixed with warm water.
Power Interruptions • Occasionally there may be power interruptions due to thunderstorms or other causes. Remove the power cord from AC outlet when a power outage occurs. When power has been restored, replug power cord to AC outlet. If outage is for a prolonged period, inspect and discard spoiled or thawed food in freezer and refrigerator. Clean refrigerator before reusing.
TroubleShooting Refrigerator Does Not Operate • Check if thermostat control is not in the “OFF” position. • Check if refrigerator is plugged in. • Check if there is power at the ac outlet, by checking the circuit breaker. Food temperature appears too warm • • • • Frequent door openings. Allow time for recently added warm food to reach fresh food. Check gaskets for proper seal. Adjust temperature control to colder setting.
Limited Warranty What is covered and for how long? This warranty covers all defects in workmanship or materials for a period of: 12 months parts 5 years sealed system The warranty commences on the date the item was purchased and the original purchase receipt must be presented to the authorized service center before warranty repairs are rendered. What is covered. 1. The mechanical and electrical parts, which serve as a functional, purpose of this appliance for a period of 12 months.
Made in China