Haler What The World Comes Home To _ RoomAir Conditioner Dei_e HWF06XC5, E ,AM_) HWR06XC5, , ESA3055 (ESAM055/ESA3055 Only) @ Readi_s#ructions beforei_dalling. Call!-877-337-363_ for 9u_stiens onpurrsandservices LifeIesinsfructia_s avanfdepreceder a I'indailafi©_. P_orroutesquestions co_rernant lospi_(eset I'eatretien,_omposez le 1-877-337-3639.
Thank You for buying a dependable, energy saving and easy to operate HALER room air conditioner. This manual contains useful informalion [or you to maintain, operate, inslall and safely use your room air conditioner. Your air condi'rioner cleans, cools and dehumidifies the air in you," room to provide you with the ultimate level of comfort. Please read instructions care[_lly before using the product. Also, do not forgetto fill out and mail the Product Registration Card.
SAFETY PRECAUTIONS WARNING: Following these basic precautions risk fire, electrical shock, injury whenof using your air conditioner, will reduce the or death 1) Air conditioner must be connected to proper eledrical outlet with the correct electrical supply, lsee table) A 2) Proper grounding must be ensured to reduce the risk of shock and fire. DO NOT CUT OR REMOVE THE GROUNDING PRONG.
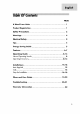
PAGE A Word From Product Registration Safety Haler .................................................................. 1 1 Precautions 2 Warnings 4 Electrical Safety 4 Tips 5 Energy Saving Features 5 ................................................................................... Operating Normal Guide Guide Operating Operating ................................................................. 8-13 Sounds 8 Instructions Installations 6-7 8-1 3 ............................
Following the sa_:etymessages is very important. These messages can save you from being injured or killed. Warning symbols alert you to be careful and means Danger. Always follow instructions to be safe and reduce chances of iniury or death. Warning Grounding: and Danger signs w;ll precede safety messages. This room air conditioner must be grounded. Grounding reduces the risk of el_tric shock by providing an escape wire for the electric current. The power cord has a grounding wire with a grounding plug.
• This Air Conditioner is designed for use in a double hung window. • While installing unit be sure to tilt air conditioner o degree outward to have the water drip outside the house. • Install the unit on the north side as normally that is the shaded side. This ,_,_ will enhance the operation of your unit. Window has to be strong for installalTon. Extra brackets and or support may be required depending on your window.
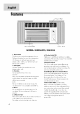
easv access filtens MODEL: cont-o HWR06XCS, I. Thermostat o[ []:r. Ir1_ :n_bles Th_ Iow_.r th_ s_llirlg. Fie ::o_'_ erline _;ii I_lnpf_tatul,g eYel Y¢_J ,:at sol Ihe le'rpe_cl cependiqg on _lre 7. Remote BMv_een 6 I°k and g6%. 2. fa_ Instoll Kit _,au -o n.ctoll the aPcordtione_ your _v:ndo_v. ¢ontr_l Tqis :ul Sure" oral Speed _vire ess ,en_o,e allows you to ape-ate yo_,r air condi
easy access-'ilters MODEL: centre HWF06XC5, 1. Temperature Sel Knob This kr_obadjusts the temperature oFthe ain The Higher the setting the cooler II_eair temperaiure. With this knob you can set the temperature to your desired comfort level, Min, Cool being the warmest and Max. Cool being the coldest. 2. MODE 5el Switch W;I_ this knob you can co_trolthe Ibr_speed as well as the cooling speed. You have 2 Fall speedsto choose from HI _:,ndLO. pane ESAM055 3.
Nor aJ Operating Sounds The following sounds are normally heard during the operation of an air conditioner. • Thermostat clicks. As the thermostat cycles on/off you will hear this sound. ° Cool airflow movement as dictated by the set fan speed. ° Water sounds. This is normal since your air conditioner acts as a dehumidifier also. Thus you will hear water sounds from water drops falling on the condenser. ° As the refrigera,lt flows through the i,lner sealed tubing a rushing noise may be heard.
After you plug inthe unit it will pertorrn a self test, All the display lights will turn on for 3 seconds. The LED display will read "88". If any display light fails to lure on you may need service on the unit. Al:ter the 3 seconds self test the unit will automatically go to the stand by mode. Now all lights will be off and you will have to turn "ON" by pressing the On/Off key. After pressing "On/Off", the unit starts to work and enters the status of "Fan" with low setting.
Fig, # 3 Control Panel. I f _1 :;,I I D _IIR ®@ 0 _,an ©u. L_"/ @o,_ IVL @ _ovJ_ J O'lce lhe fundior" m,:,d_ is aecidecl you wil hclve o sel Ive far' speed.(SBe fig. i¢4) I-ve,y time you press the SPEll3 bdtor', ton speed will cnonge between _OW. HIOH. ) I[ vou dToc-se Ihe COOL nlod_ you can run he rat, :r, ore of Ihe 2 speecs I IIGI I, LOW. 2) F¢ cool days you rr'uv wunt o rur' Ihe 'FAN unclio,1. Here InB run ru,ls ul one d ? spe0ds, HIGH or -QW.
Fig, # 4 Control Panel. I @ _VPFIIM_ o l imer on o, limer al[ mode is used to p,e-start or shut o;[/our unit in advance. Yo_J_r_n program this up to 24 l_ot_rsin advnnc_,_You cr_n usa the Timer in lun_ions .e. COOL, FAN . a Timer on (See Fig° # ,_i ,Jni- mus- be on t,-, se- the tHner. Ur:t will sl_ut down outoma-icallv Mte_ it accep-s -he settings in 5 secor'ds. Use Ihis "naoe Io pfe-sel Ihe slat lime o[ I_e ,rail 24 haurs in odvar'ce.
Fg. #5 Control Panel. I @@ @_,_ @_ ©_, o J Operating MODEL: instructions HWF06XC5 ESAM055 [See f;g. # 1) TEMPERATURE 5 6 4 7 ..... lo _i__ 3 big.
After installing your air condilioner, plug it into the proper electrical ouzel in the wall. POWER Turns air conditioner SPEED "LOW" SPEED "HI" off. Low speed fan operation High speed fan operation This automatically controls the temperature with cooling with cooling or not. or not, air. Turn the knob of indoor so that arrow points to the cooler marks for more moderate Normal Fan cooling. 1. Turn the SPEED mode switch to the "HI' or the "LOW' setting. 2.
Before you install your air conditioner check the following: The unit is free of all obslructions inside and outside the room e.g. drapes, curl'ains, furniture, plants, shrubs, bushes, trees, other structures like building, garage etc. Air conditioner must have clear unobstructed airltow through the condenser to remove the heat. 2>The window is strong enough to hold the weight of the air conditioner. Extra brackets or supports may be needed depending on your windows.
Parts Supplied wood screws 31/32' op "all side curtains skert screws 13132' Mode :k Wk 06XC,b, ESAM0a_ "_ ' wirdow sea 9ask_l short sc_e_vs13/32' _ "<_mrJt_ corhd Model:l IWRO6XCS, :5_3055 Youwill need to havefl_efollowing tools to help you in lhe installation of your air conditioner.
InstallingUnit into A Window Window Opening Requirements The air conditioner is designed to fit into double or single hung sash type windows. Each of the units comes with an installation kit that provides adjustable mounting louvers, to fill the gaps between lhe sides of lhe unit, and lJ_ewindow frame. The chart below reflecls the dimensions of Ifle units with, and wilhc_t installation kits.
PREPARE WINDOW FOR INSTALLATION SILL I lqi_. Jril i_ oc'_gnd fc,r insla lalior if" _ cH'd(Fd do,.b_ Funl_ wi_'claw_ _
INSTALL THE AIR CONDITIONER IN THE WINDOW _,PPERGd (':m'_÷Jlly i_ the oi< _r_ild_lioi'ei d,_d _licJeif iqt_ tqe.
Always unplug The air filter cleaned your air behlnd at least conditioner the front once every grille 2 weeks before cleaning. should be checked or more often and if necessary. To remove: 1, Open the inle.f grille downward by pulling out l,he fop of the inle.f grille. 2, Remove l,he air'iil.fer "from"the fron.f grille assembly by pulling t'he air'hi"for up sligly"fly, 3, Clean the fill,er with warm, soapy water below 40"C(104°F). 4.
To store your air conditioner, after the season, remove the unit from the window as per the installation guide, Repack the unit in its original box and store away, If you do hal intend to remove if from the window then cover the outside wilh a winter cover. This can be purchased from the retailer where you purchased your air conditioner or from your local hardware store_ Before putting away your unit make sure any water left in the pan is removed and drained away.
Air conditioner working but room • Room may have appliances remove • Redirect excess not cooling: that produce heat. Use an exhaust fan to heal, the airflow. Remove any obslacles. • All doors and windows need to be closed so cool air does not escape the room, • Air filter may need cleaning. low for the required cooling area. • Unit BTU may be too • On extreme hot & humid days air conditioners may take a little longer to cool.
This warranty in workmanship for: covers all defects or materials 1. The mechanical and electrical parts (including labor costs) contained in this Haier product, for a period of 12 months, from the date of purchase, (commercial or rental application, the warranty is 90 days). 2. The sealed system and compressor contained in this Haier product is for a period of 5 years, from the date of purchase (excluding labor costs after the initial 12 month period).