Wine Cooler Rafraîchisseur à Vin Enfriador de Vino User Manual- Model #’s BC112G Guide de l’Utilisateur- Modèles Manual del Usuario- Para Modelos de
English English SAFETY PRECAUTIONS Read all of the instructions before using this appliance. When using this appliance, always exercise basic safety precautions, including the following: 1) Use this appliance only for its intended purpose as described in this use and care guide. 2) This wine cooler must be properly installed in accordance with the installation instructions before it is used. See grounding instructions in the installation section.
English English For Future Reference Please SAVE THESE INSTRUCTIONS DANGER Risk of child entrapment. Before you throw away your old wine cooler, take off the doors. Leave the shelves in place so that children may not easily climb inside. As per UL 250 11.2.6 Thank you for using our Haier product. This easy-to-use manual will guide you in getting the best use of your wine cooler. Remember to record the model and serial number. They are on a label in back of the wine cooler.
English English Table Of Contents PAGE Safety Precautions ..........................................................................1 Parts And Features ..........................................................................4 Installing Your Wine Cooler ..........................................................5 Unpacking Your Wine Cooler ..................................................................5 Leveling Your Wine Cooler ......................................................................
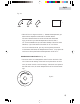
English English Parts And Features Electronic Unit Mechanical Unit + White Red F Set Light 5 3 1 6 4 2 12 Electronic Controlled Unit Only 11 8 7 White Coldest 10 Mid Range OFF Red Mechanical Control Unit Only 9 1 2 3 4 5 6 7 8 9 10 11 12 HVFM30A HVF030A 1. White Wine Button (-) 7. Door Handle 2. Red Wine Button (+) 8. Temperature Control 3. Interior Light Button (set) 9. Adjustable Leveling Legs (not shown) 4. LED Temperature Display 5. Light On/Off Switch 10.
English English Installing Your Wine Cooler Unpacking Your Wine Cooler 1. Remove all packaging material. This includes the foam base and all adhesive tape holding the wine cooler accessories inside and outside. Slide out and remove plastic or foam guard used to secure the compressor from shipping damage due to vibration and shock. 2. Inspect and remove any remains of packing, tape or printed materials before powering on the wine cooler.
English English Electrical Requirement • Make sure there is a suitable power Outlet (115 volts, 15 amps outlet) with proper grounding to power the wine cooler. • Avoid the use of three plug adapters or cutting off the third grounding in order to accommodate a two plug outlet. This is a dangerous practice since it provides no effective grounding for the wine cooler and may result in shock hazard. Install Limitations • Do not install your wine cooler in any location not properly insulated or heated e.g.
English English Wine Cooler Features And Use Initial Setup Electronic Controlled Units: Once you have plugged the unit into an electrical outlet, let the unit run for at least 30 minutes to acclimate itself before making any adjustments. During this time the Red Wine light may stay on. Mechanical Controlled Units: The control for this is on the back of the unit. There are 6 settings plus 0 (OFF). Initially set the temperature setting to 3.
English English fig. # 1 + Light Red White F Set • There will be a 3 degree variance +/- between the temperature you select and the temperature indicated on the LED readout. This occurs because the wine cooler activates and deactivates trying to maintain your desired temperature. There is often a 10˚ variance between the top and bottom shelves of the wine cooler.
English English Shelving • The shelves are designed for flexibility and easy cleaning. To accommodate different sized bottles the shelves slide out and can be moved up or down into any of the tracks molded into the cooler cabinet. Larger bottles or Magnums can be more easily accommodated on the cross shelves of the bottom basket of the cooler. You will notice that the shelves are designed so the bottles do not line-up directly over one another. This allows free air movement and provides more space.
English English Proper Wine Cooler Care and Cleaning Cleaning and Maintenance Warning: To avoid electric shock always unplug your wine cooler before cleaning. Ignoring this warning may result in death or injury. Caution: Before using cleaning products, always read and follow manufacturer’s instructions and warnings to avoid personal injury or product damage. General: • Prepare a cleaning solution of 3-4 tablespoons of baking soda mixed with warm water.
English English Power Interruptions • Occasionally there may be power interruptions due to thunderstorms or other causes. Remove the power cord from AC outlet when a power outage occurs. When power has been restored, replug power cord to AC outlet. Vacation and Moving Care • For long vacations or absences, unplug the wine cooler and clean the wine cooler and door gaskets according to "General cleaning" section. Prop doors open, so air can circulate inside.
English English TroubleShooting Wine Cooler Does Not Operate • Check if wine cooler is plugged in. • Check if there is power at the ac outlet, by checking the circuit breaker. Wine appears too warm • • • • • Frequent door openings. Allow time for recently added wine to reach desired temperature. Check gaskets for proper seal. Clean condenser coils. Adjust temperature control to colder setting. Wine temperature is too cold • If temperature control setting is too cold, adjust to a warmer setting.
English English Limited Warranty What is covered and for how long? This warranty covers all defects in workmanship or materials for a period of: 12 months labor 12 months parts 5 years sealed system The warranty commences on the date the item was purchased and the original purchase receipt must be presented to the authorized service center before warranty repairs are rendered.
IMPORTANT Do Not Return This Product To The Store If you have a problem with this product, please contact the "Haier Customer Satisfaction Center" at 1-877-337-3639. DATED PROOF OF PURCHASE REQUIRED FOR WARRANTY SERVICE IMPORTANT Ne pas Réexpédier ce Produit au Magasin Pour tout problème concernant ce produit, veuillez contacter le service des consommateurs ‘Haier Customer Satisfaction Center’ au 1-877-337-3639. UNE PREUVE D’ACHAT DATEE EST REQUISE POUR BENEFICIER DE LA GARANTIE.