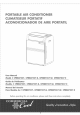
User Manua_ M@d÷_ # CPRiB@TX¢7_ CPRB@TX¢7oB, CPRB@TX¢7oW_ CPRB@TX¢7oE Manual d÷_ Usuar_o P@r@ M@d÷l@ d÷ # CPRBOTX¢7_ CPRBOTX¢7oB, ¢_TX¢7°rwI CPRBOTX¢7oE Befo_e ope;x:_tingthis air conditioneb please read these in@uctions completely°
@ @ Thank you for buying a dependable, energyosaving and _sy_toooperate CommericaU Cod air conditioner. This manual contains use@Jinformation for you to maintain, operate, in,stall and safdy use your air conditioner. Your air conditioner deans, cools and dehumidifies the air in your room to provide you with the ultimate Jevd of comfort. Please read instructions care@JJybefore using be product. Also, do not forget to fiJJout and mail the P_duct Regis_ti@n Card.
Air conditioner must _ connected to proper eJectricai outlet with He correct dedricd supply. (s_ table previous page) 2) Proper grounding must be ensured to reduce the risk of shock and fire. DO NOT CUT OR REMOVE THE GROUNDING PRONG. If you do not have a three-prong elecwic: receptacle outlet in the wall, have a certified eiectrician in4aH the proper receptacle. The wall receptacle MUST be properly grounded. Do not operate air conditioner if _wer cord is frayed or otherwise damaged.
• Phase keep this manual in a sa_ place. • Do not use liquid or a spray to dean this product. Use a damp cloth. o Do not place the product on an unstabJe surface or devoted place as it may fall and cause damage or injury. o Never spi,lJliquid on the control_panel; it may cause dectrical disable them or cause them to function improperly.
1. This model is easy to operate. The electronic contrd panel has a timer, thermostat, three speed coding spas, three fan spe_s and one spe_ dehumidification function (dry). 2. This portable air conditioner does not require water _0 j be added. 3.
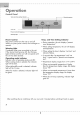
]. Contrd Pand 2. Air OutWet (To be opened manually] 3. Handle Hole 4_ Caster 2 5. Air Filter 6. Air OutJet (Heat Exhaust_ 7. Air intake (Condenser) 8. Remote Contrd Storage FaciJi? 9. Water OutJet Drain 10. Power Supply Cord 8 k TEST: WHEN THiS BU_ON iS PRESSED OR WHEN THE_ _S iA CURREN_ LEAK, THE UNiT WiLL NOT RUN, [] RESET:AFER SOLVING THE PROBLEM, PLE_.SEPRESSTHE BUTTON AND THE UNiT WiLL START OPERaTiNG. g 4 Note: PJease manually open the air outlet jJtem2) to desired position.
@ Accessories include © i. Plastic panel ° 3 pieces From 20" (50°5cm)u,p to 46" (1 i 6.8cm) 2. Window Pond adapter ° i piece 3. Screws° 4 pieces 4_ Heat Exhaust hose connector - 2 pieces. 5. Heat Exhaust hose o 1 piece ® ® ,£ 6. Cover ° 1 pieces ................. 1. Push the round Window Panel .Adapter through the rear of the Plastic Panel. Line up the hales and tighten the Adapter with 4 screws that are included in the kit. (Tighten screws from the front.) 2.
@ ¢@n_r@!Pan÷J Temp and time setting Receiving sensor Mod_ light Power Control (Eme_ency) Warning Light Power ¢ont_J The power control turns the unit on and off_ When you press power controJ, the unit begins to operate. Warning LigB_ Condensed water may accurnuJate in the unit. if the internal tank becomes fuji, the Warning Light wiJl shine and the unit wiJJ not operate untiJ the unit has been drained.
O Dehu_idi_ Mode Air is dehumidified as it passes through air conditioner, without being in fuji coding mode_ if room temperature is greater than 77°B fan speed can be adjusted; otherwise fan speed is fixed to "bw." Fan Mode Air is circulating throughout the room with no coding. N@te: Unit does not need to be vented in Fan Mode. Fan Speed ¢ont_J The Fan Speed Contrd has 3 settings: High, Medium and Low. P@wer ¢@nt_J The power control turns the unit on and off:.
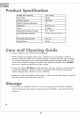
@ _@ @ Voltage and Frequency 1t5V / 60Hz input: Power 800 W Cooling Capacity 7000 BTU Moisture Removal (pints/day) 70 R-22/12.70z° Timer 24 Hours Operating Temperature Unit Dimensions Range 61 °F- 100°F (WxDxH) 17-15/16"x 13-_/8,'x 24-3/8" Net Weight (approximate) 55.1 Ibso Exhaust Hose 5 Feet @ Always unplug your air conditioner before c_aning° 0 Air filter needs b be dleaned at least once a week for your unit b operate at optimum efficiency.
@ If air conditioner does not o o Check if unit _i plugged in,_The pUug may have o Press "Reset" bu#on on €he plug fo resume opera_iono _' Check if the ebctrical wall receptacle is of proper voltage_ ei Check if the circuit breaker needs to be reset or if the fuse needs to be replace& oi Check if the unit is in "Off" mode.
@ @ ?his _arran_/covers aim defects _n _ork_anship or _a_ria_s for: . 2_ The mechanical and electrical parts (including labor costs) c@ntained in this product for a period of 12 months, from the date of purchase (commerda[ or rental application, the warranty is 90 days).