Domestic Dishwasher DW9-AFM DW9-AFMS DW9-AFM ME GB DE FR IT ES PT NL =`çÇÉW=MNOMRMRNOV
Safety Is a Good Habit to Get Into GB NOTICE * If the appliance is not operating properly or maintenance must Carefully read the instructions contained in this manual, as they provide important information which is essential to safe and be performed, disconnect the appliance from the power supply. - Keep detergents out of the reach of children, who must also be proper installation, use and maintenance of the appliance. kept away from the dishwasher when it is open.
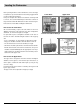
GB Close-up View (Interior) A B C D Upper Rack Rack Height Adjustor E F G H Top Spray Arm Lower Rack Washing Filter Bottom Spray Arm Detergent and Rinse Aid Dispenser Salt Container Cap Technical characteristics Width 45 cm Depth 60 cm Height 85 cm 9 standard place settings Capacity 0.03-0.6 MPa Mains water pressure Power voltage 220-240V~ 50Hz Total absorber power 1900W .2.
S a l t GB Salt Adjusting Salt Consumption The hardness of the water varies from place to place. If hard The dishwasher is equipped with a system to adjust the level of water is used in the dishwasher, deposits will form on the dishes utensils.
Detergent and Rinse Aid GB Detergent Rinse Aid Detergent specifically intended for use with dishwashers must This product makes dishes sparkle and helps them to dry with- be used. The dispenser must be refilled before the start of each wash cycle following the instructions provided in the "Wash Cycle out spotting. The dispenser is located on the inside panel of the door and should be filled after every 80 wash cycles. Table". The detergent dispenser is located on the inside panel of the door.
Loading the Dishwasher GB Before placing the dishes in the dishwasher, remove the large food particle to prevent the filter from becoming clogged, which results in reduced performance. Lower Rack Upper Rack If the pots and pans have baked-on food that is extremely hard to remove, we recommend that they be allowed to soak before they are washed. This will eliminate the need for extra wash cycle. Pull out the rack to facilitate loading the dishwasher.
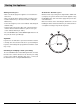
Starting the Appliance GB Starting a wash cycle At the end of the wash cycle - Make sure that the plug for the appliance is inserted into the wall socket. When the knob stops turning and is aligned with a STOP mark (see figure), the cycle has finished. Turn off the appliance using - Make sure that the water supply is turned on to full pressure. - Load the dishwasher (see the section entitled, "Loading the the ON-OFF button, turn off the water supply and open the door of the dishwasher.
Wash Cycle Table Cycle Cycle Selection Information GB Description of cycle Detergent Rinse Aid 30 g 25+5g ERF Pre-wash with hot water. Heavy Duty Very dirty dishes,pots and pans . Extended wash at 55 (not to be used with delicate items). Rinse with cold water. Normally dirty dishes,pots and Normal Wash pans .Standard daily cycle. IEC-EN 5MOQO Rinse with cold water. Rinse with hot water. Drying. Rinse with cold water.
Energy Saving Tips GB - Use the right amount of detergent: if you use too much detergent, - It is important to try and run the dishwasher when it is fully the result will not be cleaner dishes, but, rather, a greater negative impact on the environment. loaded to save on energy. In order to prevent odors from forming and food from caking onto the dishes, you can run the soak cycle. - There is no utility in rinsing dishes, cookware and untensils before placing them in the dishwasher.
Cleaning and Special Maintenance GB Filter Assembly Cleaning the Spray Arms For the best performance and results, the filter assembly must It may happen that food particle become encrusted on the sprayer be cleaned. The filter efficiently removes food particles from the wash water, arms and block the hole. Check the sprayer arms periodically and clean them when needed. (See "Close up view [interior]" , allowing it to be recirculated during the cycle.
GB Installation Positioning the Appliance Drain Hose Connection Position the appliance in the desired location. The back should Insert the drain hose into a drain pipe with a minimum diameter of rest against the wall behind it, and the sides, along the adjacent cabinets or wall. The dishwasher is equipped with water supply 4cm, or let it run into the sink, making sure to avoid bending or crimping it.
Gute Sicherheit ist eine Gewohnheitssache DE - Lehnen Sie oder setzen Sie sich niemals auf die offene Tür, da der der Geschirrspüler dadurch umgeworfen werden kann. - Lehnen Sie oder setzen Sie sich niemals auf die offene Tür, da der der Geschirrspüler dadurch umgeworfen werden kann. - Bei Störungen am Gerät müssen Sie immer sofort die Wasserversorgung zum Gerät abstellen und den Stecker aus der Steckdose ziehen. Ziehen Sie dann den Abschnitt "Störungssuche" zu Rate.
DE Innenansicht A B C D Oberkorb E F G H Korbhöheneinstellung Oberer Sprüharm Unterkorb Spülfilter Unterer Sprüharm Behälter für Reinigungsmittel und Klarspüler Deckel, Regeneriersalz Technische Daten Breite 45cm Tiefe 60cm Höhe 85cm 9 Maßgedecke Fassungsvermögen Leitungswasserdruck 0.03-0.6 MPa Stromspannung 220-240V~50Hz Strombelastung insgesamt 1900W .12.
S a l z DE Regeneriersalz Salzverbrauch einstellen Die Härte des Wassers ist von Ort zur Ort unterschiedlich. Wenn hartes Wasser für Ihren Geschirrspüler verwendet wird, können Je nach Härte des benutzten Wassers kann der Regeneriersalzverbrauch an diesem Geschirrspüler eingestellt werden. Dadurch wird der Regeneriersalzverbrauch optimiert und sich kalksteinartige Ablagerungen auf dem Geschirr bilden.
DE Reinigungsmittel und Klarspüler Geschirrspülmittel Klarspüler Verwenden Sie immer nur Spülmittel, die speziell für Geschirrspüler entwickelt wurden. Füllen Sie den Behälter vor Der Klarspüler sorgt dafür, dass das gespülte Geschirr glänzt und ohne Fleckenbildung trocknet. Der Behälter befindet sich Beginn eines jeden Spülprogramms und folgen Sie dabei den Anweisungen, die in der Spülprogrammtabelle beschrieben auf der Innenseite der Tür; er muss nach etwa 80 Spülprogrammen aufgefüllt werden.
Geschirrspüler beladen DE Bevor Sie das Geschirr in die Maschine laden, entfernen Sie zunächst alle größeren Speisereste, um eine Filterblockierung zu vermeiden, die die Spßlleistung verringern würde. Unterkorbs Oberkorbs Festgebackene Speisereste an Töpfen und Pfannen sind sehr schwer zu entfernen; wir empfehlen daher ein Einweichen solcher Teile vor dem Spülen. Dadurch werden zusätzliche Spülabläufe überflüssig. Ziehen Sie den Korb heraus, um das Laden des Geschirrspülers zu erleichtern.
Gerät einschalten DE Ein Spülprogramm starten Ende des Spülprogramms - Stellen Sie sicher, dass der Gerätestecker in der Wandsteckdose steckt. Sobald sich der Einstellknopf nicht mehr dreht und die Position STOP erreicht hat (siehe Abbildung), ist das Programm beendet. - Kontrollieren Sie, dass der Wasseranschluss voll geöffnet ist.
Spülprogrammtabelle Programm Programmwahl Programmbe Informationen schreibung Geschirr, Töpfe und Pfannen stark Starkspül programm verschmutzt (nicht für delikatere Teile verwendbar). Geschirr, Töpfe und Normalspül programm DE Pfannen normal verschmutzt. Übliches tägliches Spülen. Vorspülgang mit kaltem Wasser. Längerer Spülablauf mit 55 °C. Mit kaltem Wasser klarspülen. Mit heißem Wasser klarspülen. Trocknen. Geschirrs pülmittel Klarspüler 30 g Längerer Spülablauf mit 55 °C.
DE Energiespartipps - Verwenden Sie immer die richtige Spülmittelmenge. Wenn Sie zuviel Spülmittel verwenden, wird das Geschirr nicht sauberer, - Am besten lassen Sie den Geschirrspüler laufen, wenn er voll beladen ist, um Energie zu sparen. Um eine Geruchbildung und aber Sie belasten die Umwelt stärker. ein Festbacken von Speiseresten zu vermeiden, können Sie das Kaltspülprogramm verwenden. - Es bringt keinen Vorteil, das Geschirr, Töpfe, Besteck usw. vor dem Laden in den Geschirrspüler vorzuspülen.
Reinigung und Wartung DE Filtergruppe Reinigung der Sprüharme Zur Gewährleistung der optimalen Leistung und Ergebnisse muss die Filtergruppe saubergehalten werden. Es kann vorkommen, dass sich Speisereste an den Sprüharmen verkrusten und die Löcher blockieren (siehe Abbildung Innenraum, Buchstaben C-F). Prüfen Sie die Sprüharme regelmäßig und reinigen Sie sie, wenn erforderlich.
Installation DE Aufstellen des Geschirrspülers Ablassschlauchanschluss Stellen Sie den Geschirrspüler an der gewünschten Stelle auf. Schieben Sie den Ablassschlauch in ein Ablassrohr mit mindestens Die Rückseite soll an einer Wand stehen; die Seiten werden an danebenstehenden Schränken oder einer Wand ausgerichtet. Der 4 cm Durchmesser oder lassen Sie das Wasser in das Spülbecken ablaufen.
La sécurité est une habitude qu'il est bon de cultiver AVIS Nous vous invitons à lire attentivement les instructions FR * Si l'appareil ne fonctionne pas correctement ou si l'entretien doit être effectué, débranchez l'appareil. - Conservez les détergents hors de portée des enfants. Tenez les contenues dans ce manuel car elles vous fourniront des informations importantes pour installer, utiliser et entretenir enfants à l'écart du lave-vaisselle lorsque celui-ci est ouvert.
Gros plan de l'intérieur A B C D FR Panier supérieur E F G H Réglage de la hauteur du panier Bras d'aspersion supérieur Panier inférieur Filtre de lavage Bras d'aspersion inférieur Distributeur de détergent et de liquide de rinçage Bouchon du réservoir à sel Caractéristiques techniques Largeur 45 cm Profondeur 60 cm Hauteur 85 cm Capacité 9 couverts standard 0.03-0.6MPa Pression de l'eau dans les conduits 220-240V~ 50HZ Tension d'alimentation Puissance absorbée totale 1900W .22.
Sel FR Sel Le degré de dureté de l'eau varie d'un endroit à l'autre. Si l'eau Réglage de la quantité de sel Le lave-vaisselle est conçu de manière à ce que puissiez régler qui alimente votre lave-vaisselle est dure, des dépôts se formeront sur la vaisselle et sur les ustensiles de cuisson. la quantité de sel nécessaire, en fonction du degré de dureté de l'eau de votre habitation.
Détergent et liquide de rinçage FR Liquide de rinçage Détergent Ce produit permet de faire briller votre vaisselle et facilite le séchage sans laisser de traces. Le distributeur de liquide de Utilisez exclusivement un détergent spécial pour lave-vaisselle. Remplissez le distributeur de détergent avant de lancer un rinçage est situé sur la paroi intérieure de la porte. Remplissezle au bout de 80 lavages.
Comment remplir votre lave-vaisselle FR Avant de ranger la vaisselle dans votre lave-vaisselle, éliminez tous les résidus d'aliments pour éviter que le filtre ne se bouche, ce qui compromettrait les résultats de lavage. Panier supérieur Panier inférieur Si des aliments carbonisés et par conséquent très difficiles à détacher sont présents dans le fond de vos cocottes et casseroles, faites-les tremper avant de les laver au lave-vaisselle.
FR Comment mettre l'appareil sous tension Comment lancer un programme de lavage - Assurez-vous que la fiche de votre appareil est correctement À la fin du cycle de lavage Le cycle de lavage est terminé lorsque le bouton cesse de tourner branchée dans la prise secteur. - Assurez-vous que le robinet d'arrivée d'eau est ouvert à fond. et est aligné sur STOP (voir figure).
Tableau des cycles de lavage Cycle Lavage intensif Sélection du cycle Informations FR Description du cycle Plats, cocottes et casseroles très Prélavage eau froide. Lavage prolongé à 55°C. sales (à ne pas utiliser avec de la vaisselle fragile) Rinçage eau froide. Rinçage chaud. Detergent Produit de lavage rinçage 30 g 25+5g ERF Séchage. Plats, cocottes et casseroles normalement sales. Cycle de Lavage Normal lavage quotidien. Lavage prolongé à 55°C. Rinçage eau froide. Rinçage chaud.
Conseils pour économiser l'énergie FR - Il est important de tester et de faire fonctionner votre lavevaisselle lorsque celui-ci est plein, afin d'économiser l'énergie. - Utilisez la quantité de détergent adéquate : une quantité de détergent trop importante ne garantit pas un meilleur résultat Pour éviter que des odeurs ne se dégagent et que des aliments ne sèchent sur la vaisselle à laver, vous pouvez utiliser un cycle de lavage. En outre, l'impact sur l'environnement n'en sera que plus négatif.
Nettoyage et précautions particulières en matière d'entretien FR Comment nettoyer les bras d'aspersion Montage du filtre Pour obtenir des résultats de lavage satisfaisants, il est impor- Il peut arriver que des particules d'aliments s'incrustent dans les bras d'aspersion et bloquent les orifices (voir "Gros plan tant que le filtre soit propre. Le filtre recueille efficacement les particules d'aliments présentes de l'intérieur", lettres C-F).
Installation FR Raccordement du tuyau de vidange Comment installer l'appareil Installez l'appareil à l'endroit souhaité. Le dos de l'appareil doit Introduisez le tuyau de vidange dans un conduit de drainage d'un diamètre de 4 cm minimum, ou déposez-le directement reposer contre le mur et les parois latérales doivent être parallèles aux parois du meuble adjacent ou du mur. Le lave- dans l'évier en veillant à ce qu'il ne soit ni plié ni écrasé.
La sicurezza, una buona abitudine IT AVVISO Leggere con attenzione le istruzioni contenute nel presente * Se l'apparecchio non funziona in maniera corretta, oppure prima di eseguire la manutenzione, scollegare l'alimentazione elettrica. manuale, in quanto contengono informazioni importanti per una sicura e corretta installazione, per l'uso - Tenere i detersivi fuori dalla portata dei bambini ed evitare che si avvicinino alla lavastoviglie quando lo sportello è aperto.
Vista da vicino (Interno) IT A Cestello superiore E Filtro lavaggio B Regolazione altezza cestello F Irroratore inferiore C Irroratore superiore G contenitore detersivo e brillantante D Cestello inferiore H Tappo contenitore sale Caratteristiche tecniche Larghezza 45 cm Profondità 60 cm Altezza 85 cm Capacità 9 coperti standard Pressione dell'acqua da 0.03-0.6MPa 220-240V~50Hz Tensione di potenza Potenza assorbita totale 1900W .32.
Sale IT Sale Regolazione del consumo del sale La durezza dell'acqua varia da luogo a luogo. Se la lavastoviglie funziona con acqua dura, su piatti e utensili si formano dei La lavastoviglie è predisposta per la regolazione del quantitativo di sale consumato in base alla durezza dell'acqua disponibile. depositi. Questo elettrodomestico è dotato di un addolcitore speciale che Ciò permette di migliorare e personalizzare il livello di consumo del sale, riducendolo al minimo.
Detersivo e brillantante IT Detersivo Brillantante Utilizzare esclusivamente detersivi per lavastoviglie. Il contenitore deve essere riempito prima dell'inizio di ciascun ciclo di lavaggio, Questo prodotto rende i piatti brillanti e ne facilita l'asciugatura senza macchie. Il contenitore si trova nel pannello interno dello seguendo le istruzioni contenute nella "Tabella dei cicli di lavaggio".
Caricamento delle stoviglie IT Prima di inserire i piatti nella lavastoviglie, eliminare i residui alimentari più grossi per evitare di intasare il filtro e ridurre le prestazioni dell'elettrodomestico. Se i residui alimentari presenti su pentole e padelle sono Cestello inferiore Cestello superiore particolarmente difficili da eliminare, consigliamo di lasciarli in ammollo prima di procedere al lavaggio. Ciò evita di dovere effettuare ulteriori cicli di lavaggio.
Come avviare la macchina IT Per avviare un programma di lavaggio Alla fine del lavaggio - Controllare che la spia sia inserita nella presa a muro . - Controllare che il rubinetto dell'acqua sia completamente aperto. Quando la manopola cessa di ruotare e si ferma su di una tacca di STOP(vedi figura il ciclo e' terminato. spegnere la macchina - Caricare le stoviglie (vedi capitolo "carica mento delle stoviglie") - Versare il detersivo (vedi capitolo "sale,detersivo e brillantante.
Tabellal programmi Cycle Lavaggio Intensivo Informazione di Selezione di Ciclo Descrizione di Ciclo Piatti, batteria da cucina molto Pre-lavaggio con acqua fredda. Lavaggio prolungato da 55°C. sporchi. (Non è da usare con gliarticoli delicati). Risciacquatura con acqua fredda. Risciacquatura con acqua calda. Detersivo Soluzione di Risciacquatura 30 g 25+5g ERF Asciugamento. Piatti, batteria da cucina di Lavaggio Normale IT sporcizia normale. Ciclo quotidiano standard.
Consigli per risparmiare IT - E' importante attivare la lavastoviglie possibilmente a pieno carico per ottimizzare I consumi; per evitare che nel fratempo si - Dosate la giusta quantita' di detersivo: se eccedete con il quantitativo di detersivo non otterrete stoviglie piu' pulite, ma formino cattivi odori e incrostazioni, potete utilizzare il cicli ammollo. solamente un maggioe impatto ambietale.
Pulizia e manutenzioni particolari IT Gruppo del filtro Pulizia dei bracci aspersori Per migliorare prestazioni e risultati, si consiglia di pulire il gruppo del filtro, che consente di trattenere le particelle di cibo rimaste A volte capita che residui alimentari rimangano incrostati sui bracci aspersori e blocchino i fori (vedere "L'interno della nell'acqua di lavaggio e, di conseguenza, di riutilizzarla durante il ciclo.
Installazione IT Posizionamento della lavastoviglie Allacciamento del tubo di scarico Sistemare la lavastoviglie nella posizione desiderata. La parte posteriore dovrebbe essere appoggiata ad una parete e i fianchi Inserire il tubo di scarico in una tubazione di scarico con diametro minimo di 4cm, oppure appoggiarlo al lavandino, evitando di ai mobili o alle pareti adiacenti.
La seguridad es una buena costumbre que se ha de desarrollar NOTA Lea atentamente las instrucciones incluidas en este - Guarde el detergente fuera del alcance de los niños y mantenga a los niños alejados del lavavajillas cuando esté abierto. manual. Proporcionan información importante necesaria para realizar una instalación, uso y mantenimiento seguros - Este aparato no debe instalarse en el exterior, incluso si la zona donde se va a instalar está cubierta por un tejado; es muy del aparato.
Primer plano (Interior) A B C D ES E F G H Cesto superior Adaptador de la altura del cesto Brazo aspersor superior Cesto inferior Filtro de lavado Brazo aspersor inferior Distribuidor de detergente y abrillantador Tapón del contenedor de sal Características técnicas Anchura 45 cm Fondo 60 cm Altura 85 cm Capacidad Estándar para 9 servicios Presión del agua 0.03-0.6 MPa Voltaje 220-240V~50HZ Potencia total absorbida 1900W .42.
Sal ES Sal Ajuste del consumo de sal El diseño del lavavajillas permite ajustar el consumo de sal La dureza del agua varía de un lugar a otro. Si el agua utilizada en el lavavajillas es dura, se formarán depósitos en la vajilla y dependiendo de la dureza del agua utilizada. Esto permite optimizar y personalizar el nivel de consumo de sal y mantenerlo utensilios. El aparato está equipado con un ablandador que utiliza sal es- al mínimo.
Detergente y abrillantador ES Detergente Utilice sólo detergente para lavavajillas. Rellene el distribuidor Abrillantador Este producto hace que la vajilla brille y se seque sin manchas. inmediatamente antes de iniciar el programa de lavado según las instrucciones contenidas en la "Tabla de programas de El distribuidor está situado en la parte interior del panel de la puerta y debe rellenarse cada 80 ciclos de lavado. lavado".
Carga del lavavajillas ES Antes de colocar la vajilla en el lavavajillas, quite las partículas Cesto inferior de comida más grandes para evitar que se obstruya el filtro y se reduzca el rendimiento. Cesto superior Si las cazuelas y sartenes contienen comida incrustada difícil de eliminar, péngalas a remojo antes de lavarlas. De este modo se evitan los programas de lavado adicional. Extraiga el cesto para facilitar la carga del lavavajillas.
Puesta en marcha del aparato ES Inicio del programa de lavado Al final del programa de lavado - Compruebe que el enchufe del aparato está introducido en la Cuando el mando esté alineado con la marca de STOP (vea la figura), el programa ya ha terminado. Apague el aparato con el toma de corriente de la pared. - Asegúrese de que el grifo de suministro de agua está botónON-OFF, cierre el grifo de suministro del agua y abra la puerta del lavavajillas. completamente abierto.
Tabla de programas de lavado Programa Intensivo ES Información para la selección del programa Descripción del programa Vajilla, ollas y sartenes muy Prelavado con agua fría. Programa de lavado largo a 55°C. sucias (no debe utilizarse con vajilla delicada). Aclarado con agua fría. Aclarado con agua caliente. Detergente Abrillantador 30 g 25+5g ERF Secado. Vajilla, ollas y sartenes con un grado de suciedad normal. Lavado normal IEC-EN 50242 Programa diario estándar.
Consejos para el ahorro de energía ES - Para ahorrar energía es importante probar y utilizar el lavavajillas - Utilice la cantidad justa de detergente: no por utilizar más detergente la vajilla queda más limpia, sin embargo, el impacto cuando está completamente lleno. Para evitar la formación de malos olores y que los alimentos se peguen en la vajilla, utilice negativo en el medio ambiente es mayor. el programa en frío.
Limpieza y mantenimiento especial ES Conjunto del filtro Para obtener el mejor rendimiento y los mejores resultados es Limpieza de los brazos aspersores Puede ocurrir que las partículas de alimentos se incrusten en los necesario limpiar el filtro. El filtro elimina las partículas de comida del agua utilizada en el brazos aspersores y bloqueen los orificios (vea el apartado "Primer plano" [Interior], letras C-F). Compruebe los brazos lavado y permite que recircule durante el programa.
Instalación ES Colocación del aparato Conexión del tubo de desagüe Coloque el aparato en la ubicación deseada. La parte trasera debe estar contra la pared y los laterales contra los armarios o Introduzca el tubo de desagüe en una tubería de desagüe con un diámetro mínimo de 4 cm o colóquelo en el fregadero y asegúrese paredes adyacentes. El lavavajillas está equipado con toma de agua y tubos de desagüe que pueden colocarse a la izquierda o de que no esté torcido ni doblado.
A segurança é um bom hábito a desenvolver PT - Não se apoie nem se sente na porta quando esta estiver aberta, dado que poderá fazer com que a máquina de lavar loiça se vire. - Se o aparelho não funcionar devidamente, feche a água e retire a ficha da tomada. De seguida, consulte a secção intitulada "Resolução de problemas". Se não conseguir resolver o problema, contacte um centro de assistência. - Apenas o pessoal técnico especializado está autorizado a efectuar reparações.
Vista detalhada (interior) PT A Cesto superior E Filtro de lavagem B Ajustador da altura do cesto F Braço aspersor inferior C Braço aspersor superior G Compartimento do detergente e do abrilhantador D Cesto inferior H Tampa do compartimento do sal Características técnicas Largura 45 cm Profundidade 60 cm Altura 85 cm Capacidade 9 unidades standard Pressão da água da rede 0.03-0.6 MPa 220-240V~50Hz Voltagem Consumo total de energia 1900W .52.
Sal PT Sal Ajustar o consumo de sal O grau de dureza da água varia de local para local. Se a água A máquina de lavar loiça foi concebida para permitir o ajuste do consumo de sal de acordo com o grau de dureza da água. que utiliza na máquina for dura, formar-se-ão depósitos na loiça e nos utensílios. Tal visa optimizar e adaptar o nível de consumo de sal por forma a reduzi-lo ao mínimo.
Detergente e abrilhantador PT Detergente Abrilhantador Utilize detergentes específicos para máquinas de lavar loiça. Este produto deixa a loiça brilhante e permite que ela seque Encha novamente o compartimento antes do início de cada ciclo de lavagem, conforme as instruções fornecidas na "Tabela de sem manchas. O compartimento está situado no painel interior da porta e deverá ser novamente enchido ao fim de cada 80 ciclos de lavagem".
Carregar Louças PT Antes de introduzir a loiça na máquina, elimine os resíduos maiores para evitar que o filtro fique entupido, situação passível de originar uma diminuição do rendimento. Cesto inferior Cesto superior Se tiver utilizado os tachos e as panelas na preparação de alimentos extremamente difíceis de remover, deixe-os de molho antes de os lavar. Tal eliminará a necessidade de ciclos de lavagem extra. Puxe o cesto para fora para facilitar a introdução da loiça na máquina.
Ligar o aparelho PT Iniciar um ciclo de lavagem No fim do ciclo de lavagem - Certifique-se de que a ficha do aparelho está inserida na tomada de parede. Quando o botão deixar de rodar e estiver alinhado com a marca STOP (ver figura), é sinal de que o ciclo terminou. Desligue o - Certifique-se de que a água está aberta e com a pressão máxima. aparelho através do botão ON-OFF, feche a água e abra a porta da máquina de lavar loiça. - Introduza a loiça na máquina (ver o capítulo"Carregar Louças").
Tabela de ciclos de lavagem Ciclo Informações relativas à PT Descrição do Ciclo Detergente Abrilhantador 30 g 25+5g ERF selecção do ciclo Pratos, tachos e panelas muito sujos (não usar com peças delicadas). Intensivo Vorspülgang mit kaltem Wasser. Lavagem prolongada a 55°C. Enxaguamento com água fria. Enxaguamento com água quente. Secagem. Pratos, tachos e panelas com Lavagem normal grau de sujidade normal. Ciclo diário standard. Lavagem prolongada a 55°C. Enxaguamento com água fria.
Sugestões para poupança de energia PT - Ê importante experimentar e utilizar a máquina de lavar loiça - Utilize a quantidade certa de detergente: se usar detergente em demasia, não obterá como resultado uma loiça mais limpa, mas quando ela está totalmente cheia de modo a poupar energia. Para evitar a formação de odores e a incrustação de resíduos sim um maior impacto negativo no ambiente. na loiça, utilize o ciclo de lavagem a frio.
Limpeza e manutenção especial PT Limpar os braços aspersores Conjunto do filtro Pode acontecer que partículas de alimentos fiquem encrostadas nos braços aspersores obstruindo, assim, o orifício (ver "Vista Limpe o conjunto do filtro para obter melhores resultados e um rendimento mais elevado. O filtro elimina eficazmente as partículas de comida da água de detalhada [interior]", letras C-F). Verifique os braços aspersores periodicamente e limpe-os quando necessário.
Instalação PT Posicionar o aparelho Posicione o aparelho no local desejado. A parte traseira deverá Ligação da mangueira de descarga ficar virada para a parede e as partes laterais ao longo dos armários ou da parede adjacente. A máquina de lavar loiça está Insira a mangueira de descarga num tubo de descarga com um diametro mínimo de 4 cm ou deixe-a orientada para a banca, evitando dobrá-la ou torcê-la.
Veiligheid is een goede gewoonte om te ontwikkelen BELANGRIJK Lees de aanwijzingen in deze handleiding goed door, aangezien - Niet op de deur leunen of zitten wanneer deze open staat aangezien hierdoor de vaatwasser kan kantelen. - Wanneer het apparaat niet werkt, de watertoevoer dichtdraaien en de stekker uit het stopcontact trekken. Vervolgens het onderdeel, "Problemen oplossen" raadplegen. Wanneer u het probleem niet op kunt lossen, contact opnemen met een servicecentrum.
Detailopname (Binnenzijde) A B C D NL Bovenkorf E Afwasfilter F Onderste sproeiarm G Zeep- en glansspoelmiddel-dispenser H Dop zoutreservoir Korfhoogte afstelling Bovenste sproeiarm Onderkorf Technische kenmerken Breedte 45 cm Diepte 60 cm Hoogte 85 cm 9 standaardcouverts Capaciteit 0.03-0.6MPa Druk leidingwater Stroomspanning 220-240V~50Hz Totaal energieverbruik 1900W .62.
NL Zout ... ... Zout Zoutverbruik aanpassen De hardheidsgraad van het water varieert van plaats tot plaats. Het zoutverbruik van de vaatwasser kan worden aangepast aan Bij hard water in de vaatwasser vormt zich een aanslag op de borden en het keukengerei. de hardheid van het water.
Zeep en glansspoelmiddel NL Zeep Glansspoelmiddel Men moet zeep gebruiken specifiek bestemd voor vaatwassers. De dispenser telkens voor de aanvang van het wasprogramma Dit product zorgt er voor dat het vaatwerk glanst en zonder vlekken droogt. De dispenser zit aan de binnenzijde van de deur vullen overeenkomstig de aanwijzingen in de "Wasprogramma Tabel." De dispenser zit aan de binnenzijde van de deur.
De vaatwasser inruimen NL Alvorens de vaat in de vaatwasser te plaatsen, zo veel mogelijk etensresten verwijderen om te voorkomen dat het filter verstopt raakt, waardoor de prestatie afneemt. onderkorf bovenkorf Wanneer potten en pannen aangebakken voedsel hebben dat zeer moeilijk te verwijderen is, raden wij aan deze te laten weken alvorens ze in de vaatwasser te plaatsen. Dit zal de noodzaak voor exra wasbeurten elimineren. Trek de korf uit om de vaatwasser gemakkelijk in te ruimen.
De vaatwasser inschakelen NL Een wasprogramma beginnen Aan het einde van het wasprogramma - Controleer of de stekker van het apparaat daadwerkelijk in het stopcontact gestoken is. Wanneer de knop niet meer draait en in lijn is met de STOPmarkering (zie afbeelding), dan is het wasprogramma klaar. Schakel de vaatwasser uit met de knop ON-OFF, zet de - Zorg er voor dat de watertoevoer volledig is opengezet.
Wasprogrammatabel Wasprogramma Wasprogrammakeuze NL Beschrijving van Wasprogramma Zeep Informatie Glansspoelmiddel Voorspoelen met koud water. Krachtig programma Zeer vuile borden, schalen en pannen. (niet gebruiken met Uitgebreid wassen op 55°C. Spoelen met koud water. breekbare voorwerpen) Spoelen met heet water. Drogen. Normaal vuile borden, schalen en pannen. Standaard dagelijks Uitgebreid wassen op 55°C. Spoelen met koud water. wasprogramma. Spoelen met heet water. Drogen.
Tips voor energiebesparing NL - Het is belangrijk te trachten de vaatwasser alleen te laten draaien - Gebruik de juiste hoeveelheid zeep: wanneer te veel zeep wordt wanneer ze helemaal vol is om stroom te besparen. Om te voorkomen dat geurtjes worden gevormd en eten aan de borden gebruikt, zal dit niet resulteren in schonere borden, maar wel een grotere negatieve invloed hebben op het milieu. vastdroogt, kunt u het programma Koud voorspoelen gebruiken.
Reiniging en speciaal onderhoud NL Filterassemblage De sproeiarmen reinigen Voor de beste prestatie en resultaat, moet de filterassemblage worden gereinigd. Het kan voorkomen dat etensresten vast komen te zitten op de sproeiarmen en daardoor de openingen blokkeren (zie De filter verwijdert efficient etensresten uit het waswater, zodat het water tijdens het wasprogramma gerecirculeerd kan worden. "Detailopname [binnenzijde]", letters C-F ). De sproeiarmen periodiek nakijken en indien nodig reinigen.
Installatie NL De vaatwasser plaatsen Afvoerslang aansluiting Plaats de vaatwasser in de gewenste positie. De achterzijde moet tegen de wand rusten, en de zijkanten langs de nevenliggende Breng de afvoerslang in een afvoerbuis aan met een minimum doorsnee van 4cm, of laat het in de gootsteen lopen, waarbij men er voor moet zorgen dat de slang niet gebogen of geknikt wordt. Gebruik de speciale kunststof steun die meegeleverd wordt (zie Afb.2).
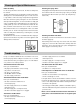
Installation Diagram Door switch WR 3(1) 1(2) 220-240V ~ 50Hz IS IG 1 4(2) 2(1) P1 drain pump water level switch 3 2 F Filter B4 dispenser D/Ed A5 A6 a A7 A8 b salt missing spy-lamp b ISS a B11 B12 EV1 LSS softener switch a b B6 B5 B2 B1 A4 A1 A2 LS a B8 b B7 power indector B3 50°C inlet valve A3 a b washing pump A12 A11 b a A10 B10 B9 A9 C timer motor softener valve 2 3 H heater EV2 temperature limiter 1 overflow switch