ROOM AIR CONDITIONER Use & Care Guide ACONDICIONADOR DE AIRE PARA HABITACIÓN Manual de Uso y Cuidado CLIMATISEUR DE PIÈCE Guide d’utilisation et d’entretien Model: ESA405K For questions about features, operation/performance, parts, accessories or service call: 1-877-337-3639 Si tiene preguntas respecto a las características, funcionamiento, rendimiento, partes, accesorios o servicio técnico, llame al: 1-877-337-3639 Au Canada, pour assistance, installation ou service, composez le : 1-877-337-3639 No.
TABLE OF CONTENTS AIR CONDITIONER SAFETY ........................................................3 INSTALLATION REQUIREMENTS.................................................3 Tools and Parts ............................................................................3 Location Requirements ...............................................................4 Electrical Requirements ...............................................................4 INSTALLATION INSTRUCTIONS..........................................
AIR CONDITIONER SAFETY Your safety and the safety of others is very important. We have provided many important safety messages in this manual and on your appliance. Always read and obey all safety messages. This is the safety alert symbol. This symbol alerts you to potential hazards that can kill or hurt you and others. All safety messages will follow the safety alert symbol and either the word “DANGER” or “WARNING.
Electrical Requirements Location Requirements IMPORTANT: Observe all governing codes and ordinances. Check the location where the air conditioner will be installed. Make sure you have everything necessary for correct installation. The location should provide: ʄ Grounded electrical outlet within 6 ft (183 cm) of where the power cord exits the air conditioner. NOTE: Do not use an extension cord. ʄ Free movement of air in room to be cooled. ʄ A large enough opening for the air conditioner.
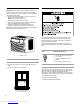
Power Supply Cord NOTE: Your air conditioner’s device may differ from the one shown. A B RESET TEST A. Test button B. Reset button This room air conditioner is equipped with a power supply cord required by UL. This power supply cord contains state-of-the-art electronics that sense current leakage. If the cord is crushed, the electronics detect current leakage and power will be disconnected in a fraction of a second. To test your power supply cord: 1.
NOTE: Your model may differ from the one shown. 3. Slide the side curtain frame into the top channel on the top of the air conditioner and the track on the bottom of the air conditioner. 4. Slide the side curtain frame as close to the air conditioner as necessary to lock the side curtain to the frame. 5. Repeat above steps for the left-hand side curtain and frame. B A. 13⁄32” screws B.
Position Air Conditioner NOTES: ʄ Handle the air conditioner gently. ʄ Be sure your air conditioner does not fall out of the opening during installation or removal. ʄ The place where the power cord exits the air conditioner should be no more than 6 ft (183 cm) from a grounded outlet. ʄ Do not block the louvers in the front panel. ʄ Do not block the louvers on the outside of the air conditioner. 1. Center the air conditioner in the window.
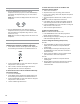
Top View 4. Plug into a grounded 3 prong outlet. 5. Press RESET on the power supply cord. See “Electrical Requirements.” Bottom View Complete Installation 1. Notes:Push to open the air outlet before using the air conditioner. Insert the foam seal behind the top of the lower window sash and against the glass of the upper window. A B Adjust to desired position. A. Top of lower window sash B. Foam seal 2. Place the window lock bracket as shown.
AIR CONDITIONER USE Operating your air conditioner properly helps you to obtain the best possible results. Do not try to operate your air conditioner in the Cool mode when outside temperature is below 61°F (16°C). The inside evaporator coil will freeze up, and the air conditioner will not operate properly. ʄ This section explains proper air conditioner operation. IMPORTANT: ʄ If you turn off the air conditioner, wait at least 3 minutes before turning it back on.
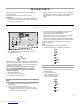
To set the Timer to turn on the air conditioner and change the previous settings: Temperature ʄ Press the TEMP/TIME up arrow button to raise the temperature. Each time you press or hold the TEMP/TIME up arrow button, the temperature will go up 1ºF until it reaches 86°F (30°C). NOTE: After 5 seconds, the display will show the current room temperature. 1. Turn on the air conditioner. 2. Adjust the mode to Fan, Cool, Energy Saver or Dehum. 3.
Using the Remote Control NOTE: Dots are Braille text for sight Impaired. Remote control may differ in appearance. Temperature ʄ ON/OFF Press the TEMP/TIME up arrow button to raise the temperature. Each time you press or hold the TEMP/TIME up arrow button, the temperature will go up 1ºF until it reaches 86°F (30°C). MODE TEMP/TIME SPEED TIMER ʄ Press the TEMP/TIME down arrow button to lower the temperature.
4. Adjust the temperature between 61ºF and 86ºF (16ºC and 30ºC). NOTE: In Fan mode, the temperature cannot be set. 3UHVV 7,0(5 7LPHU 2Q LQGLFDWRU OLJKW ZLOO ÀDVK 'LVSOD\ ZLOO show remaining hours before the air conditioner will turn on. 6. Press the TEMP/TIME up or down arrow button to change the delay time from 1 hour to 24 hours. 7. Timer On indicator light will remain on.
TROUBLESHOOTING Before calling for service, try the suggestions below to see whether you can solve your problem without outside help. Air conditioner power supply cord trips (Reset button pops out) ʄ Disturbances in your electrical current can trip (Reset button will pop out) the power supply cord. Press and release RESET (listen for click; Reset button will latch and on some devices, a green light will turn on) to resume operation.
ASSISTANCE OR SERVICE When calling, please know the purchase date and the complete model and serial number of your appliance. This information will help us to better respond to your request.
LIMITED WARRANTY ONE YEAR LIMITED WARRANTY This warranty covers all defects in workmanship or material for the mechanical and electrical parts (including labor costs) contained in this product for a period of 12 months from the date of purchase. For commercial or rental application, the warranty is 90 days. You must keep and be able to provide your original sales receipt as proof of the date of purchase.
Downloaded from www.Manualslib.
SEGURIDAD DEL ACONDICIONADOR DE AIRE Su seguridad y la seguridad de los demás es muy importante. Hemos incluido muchos mensajes importantes de seguridad en este manual y en su electrodoméstico. Lea y obedezca siempre todos los mensajes de seguridad. Este es el símbolo de advertencia de seguridad. Este símbolo le llama la atención sobre peligros potenciales que pueden ocasionar la muerte o una lesión a usted y a los demás.
Requisitos de ubicación IMPORTANTE:Observe todos los códigos y reglamentos aplicables. 9HUL¿TXH HO OXJDU GRQGH VH LQVWDODUi HO DFRQGLFLRQDGRU GH DLUH Asegúrese de tener todo lo necesario para una instalación correcta. El lugar debe tener: ʄ &RQWDFWR FRQ FRQH[LyQ D WLHUUD D QR PiV GH SLHV FP de donde el cable eléctrico sale del acondicionador de aire. NOTA: No use un cable eléctrico de extensión. ʄ Libertad de movimiento del aire en la habitación que desea enfriar.
Para poner a prueba el cable de suministro de energía: Cable de suministro de energía NOTA:El dispositivo de su acondicionador de aire puede ser diferente del que se ilustra. A B RESET TEST A. Botón de prueba B. Botón de reposición (VWH DFRQGLFLRQDGRU GH DLUH SDUD KDELWDFLyQ HVWi HTXLSDGR FRQ un cable de suministro de energía según lo exige UL. Este cable de suministro de energía incluye circuitos electrónicos de última generación que detectan la corriente de fuga.
Prepare el acondicionador de aire para la instalación 3. Deslice el marco de la cortina lateral dentro del canal superior, en la parte superior del acondicionador de aire, y la vía en la parte inferior del mismo. Instale el canal superior 1. Coloque el canal superior sobre la parte superior del DFRQGLFLRQDGRU GH DLUH DOLQHDQGR ORV RUL¿FLRV HQ HO FDQDO VXSHULRU FRQ ORV RUL¿FLRV HQ OD SDUWH VXSHULRU GHO acondicionador de aire. 2.
Coloque el acondicionador de aire en su lugar 3. Deslice el soporte lateral sobre el tornillo. $SULHWH HO WRUQLOOR (O VRSRUWH ODWHUDO GHEHUi GHVFDQVDU VREUH la repisa de la ventana. ADVERTENCIA Peligro de Peso Excesivo Use dos o más personas para mover e instalar el acondicionador de aire. No seguir esta instrucción puede ocasionar una lesión en la espalda u otro tipo de lesiones. NOTAS: ʄ Trate el acondicionador de aire con cuidado.
Vista superior 4. Conecte a un contacto de pared de conexión a tierra de 3 terminales. 5. Presione RESET (Reposición) en el cable de suministro de energía. Vea “Requisitos eléctricos”. Vista inferior ADVERTENCIA Peligro de Choque Eléctrico Conecte a un contacto de pared de conexión a tierra de 3 terminales. No quite la terminal de conexión a tierra. No use un adaptador. No use un cable eléctrico de extensión. No seguir estas instrucciones puede ocasionar la muerte, incendio o choque eléctrico.
CÓMO USAR EL ACONDICIONADOR DE AIRE Operar debidamente su acondicionador de aire le permite obtener los mejores resultados posibles. Esta sección le explica cómo operar su acondicionador de aire debidamente. IMPORTANTE: ʄ Si usted apaga el acondicionador de aire, espere por lo menos 3 minutos antes de volver a ponerlo en marcha. Esto evita que se queme un fusible del hogar o se dispare un cortacircuitos a causa del acondicionador de aire.
SPEED HIGH MED LOW Temperatura ʄ Presione el botón de TEMP/TIME (Temperatura/Tiempo) FRQ OD ÀHFKD KDFLD DUULED SDUD HOHYDU OD WHPSHUDWXUD &DGD vez que usted presione o sostenga el botón de TEMP/ 7,0( 7HPSHUDWXUH 7LHPSR FRQ OD ÀHFKD KDFLD DUULED OD WHPSHUDWXUD VH HOHYDUi HQ ) KDVWD DOFDQ]DU ORV ) (30°C). NOTA: 'HVSXpV GH VHJXQGRV OD SDQWDOOD PRVWUDUi OD temperatura actual de la habitación.
Cómo usar el control remoto NOTA:La apariencia del control remoto puede variar.
5. Oprima TIMER (Temporizador). La luz indicadora de Timer On (Temporizador encendido), ubicada en el panel de control GHO DFRQGLFLRQDGRU GH DLUH GHVWHOODUi /D SDQWDOOD PRVWUDUi las horas restantes antes de que el acondicionador de aire se encienda. 6. Presione el botón de TEMP/TIME (Temperatura/Tiempo) con OD ÀHFKD KDFLD DUULED R KDFLD DEDMR SDUD FDPELDU HO WLHPSR GH retraso de 1 hora a 24 horas. 7.
SOLUCIÓN DE PROBLEMAS Antes de solicitar servicio, pruebe las sugerencias que se incluyen a continuación para ver si puede resolver el problema sin ayuda. ADVERTENCIA ʄ Las interrupciones en la corriente eléctrica de su casa pueden hacer que se suelte (el botón de Reset Reposición saltará) el cable de suministro de energía.Para reanudar el funcionamiento, presione y suelte RESET (Reposición HVFXFKHHO FKDVTXLGR HO ERWyQ GH UHSRVLFLyQ TXHGDUi WUDEDGR \ VH HQFHQGHUi XQD OX] YHUGH HQ DOJXQRV DSDUDWRV
Ŷ /D WHPSHUDWXUD GH OD KDELWDFLyQ TXH HVWi WUDWDQGR GH HQIULDU HVWi GHPDVLDGR FDOLHQWH 'HMH SDVDU PiV WLHPSR SDUD TXH HO acondicionador de aire enfríe una habitación muy caliente. Ŷ (VWiQ DELHUWDV YHQWDQDV R SXHUWDV TXH GDQ DO H[WHULRU &LHUUH todas las puertas y ventanas. Ŷ (O &RQWURO GH WHPSHUDWXUD QR HVWi HQ XQ DMXVWH OR VX¿FLHQWHPHQWH IUtR $MXVWH HO &RQWURO GH 7(03 7,0( 7HPSHUDWXUD 7LHPSR D XQD SRVLFLyQ PiV IUtD RSULPLHQGR HO botón de menos para reducir la temperatura.
GARANTÍA LIMITADA GARANTÍA LIMITADA DE UN AÑO (VWD JDUDQWtD FXEUH WRGRV ORV GHIHFWRV GH IDEULFDFLyQ R GH PDWHULDOHV SDUD ODV SLH]DV PHFiQLFDV \ HOpFWULFDV LQFOX\HQGR ORV FRVWRV SRU mano de obra) que contenga este producto de, durante un período de 12 meses a partir de la fecha de compra. Para una aplicación FRPHUFLDO R GH DOTXLOHU OD JDUDQWtD HV GH GtDV 8VWHG GHEHUi JXDUGDU VX UHFLER GH FRPSUD RULJLQDO \ SURYHHUOR FRPR SUXHED GH OD fecha de compra.
Downloaded from www.Manualslib.