OWNER’S MANUAL LE42H330 LE46H330 LE55H330 LD42K3 LED-LCD TELEVISION Please READ this manual carefully before operating your TV, and retain it for future reference.
Contents Contents 3 Function Menu ...................................................18 Important Safety Instructions 4 Introduction 6 Adjust Menu .......................................................19 Time Menu..........................................................19 Lock Setup ..........................................................20 Warning Function Menu Set ............................................................ 18 Panel Control ...................................................
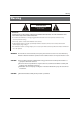
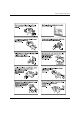
Warning Warning WARNING: ! WARNING RISK ELECTRIC SHOCK DO NOT OPEN TO REDUCE THE RISK OF ELECTRIC SHOCK DO NOT REMOVE COVER (OR BACK). NO USER SERVICEABLE PARTS INSIDE. REFER TO QUALIFIED SERVICE PERSONNEL. * To avoid electric hazards, it is strongly suggested that the back cover not be opened, as there is no any accessory inside the casing. * lf necessary, please contact authorized after-sales services.
Important Safety Instructions Important Safety Instructions 4 LED -LCD television Owner’s Manual
Important Safety Instructions LED -LCD television Owner’s Manual 5
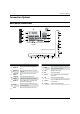
Panel Control Introduction - This is a simplified representation of front panel. - Here shown may be somewhat different from your TV. Panel Control LD42K3 LE42H330/LE46H330/LE55H330 1 TV/AV 2 VOL +/3 POWER 4 CH +/5 MENU 6 Press this key to open/close signal source options menu. Press to adjust the volume. In the MENU screen, these buttons serve as right/left buttons. Press to turn on and off the TV. Press to scan through channels. To scan quickly through channels, press and hold down either +/- .
Panel Control Remote Control Battery loading 1. Slide open the cover of the battery compartment on the back of the remote controller. 2. Load two 7# (AAA) alkaline batteries in the compartment, (plus and minus poles to respective mark) 3. Replace the cover of the battery compartment. Precautions As strong light may interfere the signals, change your position to operate the remote controller if the television cannot be turned on or off as you expect.
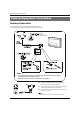
Connection Options Connection Options Back panel connections LD42K3 LE42H330/LE46H330/LE55H330 1 PC Video In Connect a video cable from a computer to this jack.. 8 ANT In Connect cable pr antenna signal to the TV, either directly or through your cable box. 2 PC/DVI Audio In Connect the audio L/R cables from a computer to this jack. 9 SPDIF Digital Audio Optical output. For the smart comtroller. Component Video In Connect a component video device to these jacks.
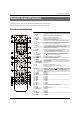
Remote Control Function Remote Control Function - The remote control cannot be operated unless the batteries are properly loaded. - When using the remote control, aim it at the remote control sensor on the TV. Function introduction 1 POWER 2 3 4 5 USB H. LOCK SOURCE DSMB 6 STILL 7 ARC 8 MUTE 9 0-9 0 Q. VIEW A VOL+ /B CH+/C Sound Mode D Picture Mode E TV.MENU F D.MENU THUMBSTICK (Up/ Down/Left/Right) H OK I EXIT G J USB K L M N O P Q R S T U V W X Y Z [ \ TV.
External Equipment Connections External Equipment Connections Antenna Connection - Antenna or Cable Service without a Cable Box Connections. - For optimum picture quality, adjust antenna direction if needed. Note: * It is recommended that you'd better use 757 coaxial cable to remove the disturbance caused by airwave. * Don't bind antenna cable and electric wire together. To improve picture quality in a poor signal area, purchase and install a signal amplifier.
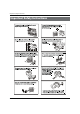
External Equipment Connections select the source, press the OK button to confirm. Choose Your Connection There are several ways to connect your television, depending on the components you want to connect and the quality of the signal you want to achieve. The following are examples of someways to connect your TV. Take LE42H330 as an example, Choose the connection which is best for you. VCR Connection To avoid picture noise (interference), leave an adequate distance between the VCR and TV.
External Equipment Connections AUDIO jacks on the TV’ as shown in the figure. C Press Play button on external equipment for program play. / How to use A B C D Turn on the DVD player, insert a DVD. Use the SOURCE button on the remote control,and then press / button to to select COMPONENT mode, press the OK button to confirm. PC Setup Press Play button on external equipment for program play. How to connect Refer to the DVD player’s manual for operating instructions.
External Equipment Connections Note ❏ Component, PC, HDMI input sources cannot be used for Monitor out. ❏ When connecting with external audio equipments, such as amplifiers or speakers, please turn the TV speakers off. Power source TO USE AC POWER SOURCE Use the AC polarized line cord provided for operation on AC. Insert the AC cord plug into a standard polarized AC outlet. Note ❏ Avoid keeping a fixed image on the TV’s screen for along period of Time.
Basic Receiving and Playing Operations Basic Receiving and Playing Operations Playing Operations Choose the Input source Change the picture source so you can watch your TV, VCR, Cable , or any other devices that are connected to your TV. A Switching ON/OFF the TV set In the manual, the OSD (on screen display) may be different from your TV’s because it is just an example to help you with the TV operation.
Basic Receiving and Playing Operations Back light range of 2500K~15000K from warm color to cold color, afterwards press / to adjust; if a different benchmark is selected for adjustment, the original adjustment data will be automatically cleared. LED Four_DIM Contrast Prog... Brightness Color Sharpness Tint Back light AVL MAXX Bass Reset DSM Background OPC LED Palette Four_DIM Reset DTV Manu.
Basic Receiving and Playing Operations B Press / button to select the desired items, Return to factory default settings. press OK to enter its submenu. C Press / button to adjust the setting. Channel menu Press / to adjust the volume of TV set. Display channel menu by pressing SOURCE button then use / button to select the source of ATV or DTV item. Balance A Volume This will adjust the output of the right and left speakers to obtain the best stereo reproduction for your listening position.
Basic Receiving and Playing Operations screen. Back light LED Four... Intelligent Mode Net Upgrade Color system Press / to select the Color Systems option, and then press / to select correct color system. The TV is designed with three systems for your choice, i.e. Auto, PAL , SECAM and NTSC. Generally, the system is set as Auto and it is not necessary to make an adjustment. The system is normally set as Auto during auto search. All channels now available will be automatically preset in order .
Basic Receiving and Playing Operations MEMC Function Menu Press / to set ON, Demo1,Demo2 or OFF, the moving picture will be better when MEMC is on function. Function Menu Set A B DSM Press MENU on the remote control unit or MENU on the TV’s front panel to display the main menu, and then press / to select the Function menu. Press / to select the option to be adjusted, and then press / to adjust it. Language Two languages (i.e. Simplified Chinese and English) are available for your choice.
Basic Receiving and Playing Operations Net Upgrade Time Menu Press / to select OK or Cancel to upgrade the TV set by internet and flash. A Adjust Menu B Press MENU button and then use select Time menu. / button to Press / to select the desired option, press OK to enter its submenu. The TV can be used as a display, and you may adjust relevant settings. Press SOURCE to switch the signal input to PC mode.
Basic Receiving and Playing Operations cleared. Lock Set On channel: This function is used in combination with the On/Off Time function. When the TV turns on upon reaching the On time, it automatically enters the preset channel. Change Password • Press OK first and then press / to set the On Channel or OFF. Remind Time/Remind channel: The remind time and remind channel functions allow the TV to automatically enter the preset channel at preset time.
Basic Receiving and Playing Operations Source Lock This function is used to prohibit watching a program from various external inputs, e.g. AV and PC, etc. Press / to select a certain option, and then press OK to enter the submenu, press / to set an external input lock ON or OFF.
Basic Receiving and Playing Operations Streaming Media Playing System Note B Press / to select the “Confirm” option, you will enter the interface for selecting a corresponding 3D mode. (See Fig. 2 below) ❏ The diagrams in the following section are schematic and only for your reference. Please see the actual product if necessary. A • Picture: *. JPEG; PNG; BMP; • Music: *. Mp3(8-320kbps; WMA(32-192kbps); AAC(16-576kbps) • Movie: MPEG4: *. avi files in accordance with Div*4. x/5.
Basic Receiving and Playing Operations • The file code rate should be lower than 300KB/S; • Due to the limitation of USB signal transmission distance, it is recommended not to use USB patch cord, in case of using the cord, make sure that its length is not over 1m; • Use high-speed USB equipment in conformity with USB2.0 Interface Standard; if USB equipment in conformity with USB1.1 Interface Standard is used, the playing may be unsmooth.
Basic Receiving and Playing Operations C Press / to change page, and press / to select the picture you want to play, and then press OK to enter the playing display interface. D Note • Press ZOOM to magnify the picture, and then press / / / to move the picture. • Press / to select the last or next picture. • Press / to rotate the picture. ❏ The menu display varies with the number and names of files in your equipment. Playing Music A B D To exit playing, just press BACK repeatedly.
Maintenance / Troubleshooting Note ❏ The red button on the control can doing some delete. Text playback support TXT format. Maintenance Maintenance Early malfunctions can be prevented. Careful and regular cleaning can extend the amount of time you will have your new TV. Be sure to turn the power off and unplug the power cord before you begin any cleaning. Cleaning the Screen D To exit the Text mode, just press BACK repeatedly.
Specification No picture, no sound Problem Turn onthe power supply; Properly plug theTV setto the powersocket; Check to see if the power cable of other appliance is plugged in the TV set. Make sure that the power cable of the TV set is properly connected. Possible remedies Good picture, no sound Depress the volume button; Check out theaudio frequency input signals.
Format Note 1 480i/480p 60 ❏ Design and specifications are subject to change without notice. The dimension in this manual is a 2 576i/576p 50 3 720p 50/60 4 1080i/1080p 50/60 approximation. Format Recommendatory HDTV/ SDTV(YPbPr/YCbCr) format Sequence Number Format Refresh Frequency (Hz) 1 480i/480p 60 2 576i/576p 50 3 720p 50/60 4 1080i/1080p 50/60 Recommendation PC connection input format sequence number Format H-Frequency (KHz) V-Frequency (Hz) 1 640*480@60Hz 31.
Specification 28 LED -LCD television Owner’s Manual
Format LED -LCD television Owner’s Manual 29
Specification 30 LED -LCD television Owner’s Manual
Format LED -LCD television Owner’s Manual 31
Specification 32 LED -LCD television Owner’s Manual Specification / Format
Format LED -LCD television Owner’s Manual 33
Specification 34 LED -LCD television Owner’s Manual
Format LED -LCD television Owner’s Manual 35