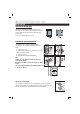
AUTOMATIC DRUM WASHING MACHINE USER MANUAL HW-D1270TVE HW–D1270TVE ME HW-D1470TVE HW–D1470TVE ME Power preWash Rinse Spin Dry wash Wash Rinse Spin Temp Silk ON OFF Speed Delay Delay Extra Extra rinse rinse Dry Rinse hold EcoTime Eco Start/ Start/ Pause Pause Quickwash Wool Synthetics Cotton&Linen Prewash Sport Quick Wash Rinse Spin Drain
01 - 07 TABLE OF CONTENTS 08 - 13 14 - 18 BEFORE USE USING THE APPLIANCE MAINTENANCE >COMPONENTS .............................. 3 >PREPARATION ............................... 4 >SAFETY INSTRUCTIONS .................. 5 >INSTALLATION ............................... 6 >CONTROL PANEL ........................... 8 >PROGRAM SELECTION .................. 10 >CLEANING & CARE....................... 16 >DISPLAY CODES .......................... 18 >TROUBLESHOOTING.....................
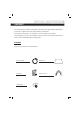
COMPONENTS BEFORE USE Please read these instructions carefully before using this appliance. The instructions contain important information which will help you get the best out of the appliance and ensure safe and proper installation, use and maintenance. Keep this manual in a convenient place so you can always refer to it for the safe and proper use of the appliance.
PREPARATION BEFORE USE PREPARING THE MACHINE Remove all the packing materials to prevent unsteadiness, including the polystyrene base. Upon opening the package, water drops may be seen on the plastic bag and the porthole. This is normal phenomenon resulting from water tests in the factory. DESCRIPTION This diagram may be slightly different from the layout of the washing machine you have just purchased due to technical improvements.
SAFETY INSTRUCTIONS BEFORE USE 5 BEFORE SWITCHING THE APPLIANCE ON FOR THE FIRST TIME DO ... ... make sure that the transport bolt are removed. ... Use a separate earthed socket for the power supply. ... Make sure that the plug is accessible. ... Hold the plug and not the electric cable when unplugging the power supply. ... Make sure that the fuses in the power circuit are rated for 15A. ... Keep away from heat sources and direct sun light to prevent plastic and rubber components from aging. ...
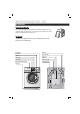
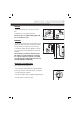
INSTALLATION BEFORE USE ADJUSTING THE BOTTOM COVER When open the shrink package,you will find a calcium plastic board which is laid on the top of washing machine as shown in fig.1.The board is used for reducing noise by pasting it under the cabinet when setting as shown in fig.2 It keeps out the dampness and reduces the noise. DISMANTLE THE TRANSPORTATION BOLTS The transportation bolts are designed for clamping anti-vibration components inside of the washing machine during the transportation process. 1.
BEFORE USE INLET HOSE 1. Connect the nut on the inlet hose to the connector on the water valve. 2. Apply inlet hose to a water tab with cold, fresh water. Note: Use the hose-set supplied with the appliance. Old hose-sets should not be reused. 1. 2. DRAIN HOSE 2. The height of the drainage outlet must be 80-100 cm. Fix the drain hose to the clip at the back of the washing machine to prevent it from dropping off.
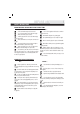
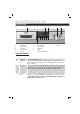
BEFORE USE CONTROL PANEL J I B A K Power preWash Rinse Spin Dry wash Wash Rinse Spin Temp Silk ON OFF Quickwash Wool Speed Delay Delay Extra Extra rinse rinse Dry Rinse hold EcoTime Eco Sport Quick Wash Rinse Synthetics Start/ Start/ Pause Pause Spin Cotton&Linen Drain Prewash H A B C D E Program knob Temperature button Speed button Start/pause button Eco button F G H I J G F E DC Rinse hold button Extra rinse button Delay button Display Detergent distribution drawer K Pow
BEFORE USE E ¬ Eco button _ Before a washing program, press this button to set the required washing load (1 :3-FulI), the washing machine will automatically adjust the water consumption, heating time and washing time. Users can select the washing load as required for economical operation. Note:1."1 :3-Full"refers to the four levels of washing load. If the laundry is more than half of the drum content, it is recommended to select 2:3-Full: otherwise, select 1:3-1:2 2.
USING THE APPLIANCE PROGRAM SELECTION PROGRAM MODES 2 3 1 1 Detergent compartment for prewash mode 2 Detergent compartment 3 Compartment for softener and other additives Program Temperature Maximum Preset Recommended Laundry Preset spin speed 1 ¬ Prewash -- to 90 °C 40 °C Cotton fabrics 1000 rpm 2 ¬ Cotton&linen -- to 90 °C 40 °C Cotton fabrics 1000 rpm 3 ¬ Synthetics 0 ° to 60 °C 40 °C Fast colours / Medium 1000 rpm soiled 4 ¬ Wool 0 ° to 40 °C / Wool fabrics / 5 ¬ Hand
USING THE APPLIANCE CONSUMPTION AND TECHNICAL DATA CONSUMPTION TABLE The wash cycle times are intended as a guide only. The actual time used may vary due to different water pressure, initial water temperature, etc. MAX. ENERGY WATER WASHING PROGRAM LOAD CONSUMPTION CONSUMPTION TIME ¬ Prewash 7 kg 0.89 kWh 87L 2:32 h ¬ Cotton 60 °C * 7 kg 1.19 kWh 60 L 2:58 h ¬ Cotton 40 °C 7 kg 0.66kWh 79 L 2:12 h ¬ Synthetics 3 kg 0.475 kWh 55L 1:35 h ¬ Wool 2kg 0.
WASHING METHODS USING THE APPLIANCE PLEASE NOTE This washing machine is for domestic use only. Do not use it for purposes other than that for which it was designed. Follow the instructions given on the label of each garment and wash only machine-washable garments. POWER SUPPLY Connect the washing machine to the power supply (220V to 240V~/50Hz). WATER CONNECTION Turn on the tap. The water must be clean and clear.
USING THE APPLIANCE LOADING THE MACHINE Open the washer door, put in the laundry piece by piece. Close the door tightly. ¬ When first using the washing machine, let it run unloaded for one program to prevent the laundry from being tainted by oil or dirty water from the washing machine. ¬ Do not overload the washing machine. SELECTING DETERGENT The washing efficiency and the performance is determined by the quality of detergent used. Special nonfoaming detergent produces good washing results.
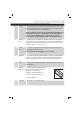
USING THE APPLIANCE SETTING WASHING TEMPERATURE Press and hold down the temperature button until the desired temperature is selected or the symbol "--" for no water heating. Temp Speed yse d EcoTime Eco Start/ Start/ Pause Pause SETTING SPIN SPEED Press and hold down the speed button until the desired speed is selected or the symbol "0" is selected for no spin. See "Operational functions" on the "Control panel" pages (08 and 09) for selecting temperature and spin speed.
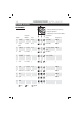
USING THE APPLIANCE CARE CHART Resistant material Bleachable in cold water Don't dry clean Delicate fabric Do not bleach Dry flat Washable at 95 °C Iron at 200 °C Hung to dry Washable at 60 °C Iron at 150 °C Dry on clothes hanger Washable at 40 °C Iron at 100 °C Tumble dry, normal heat Washable at 30 °C Don't iron Tumble dry, reduced heat Hand wash Dry cleaning with any solvent Don't tumble dry Dry clean only Dry cleaning with pericloride Wool Seal Dry cleaning with aviation fuel
CLEANING & CARE MAINTENANCE AFTER WASHING Turn off the water supply and pull out electricity plug after each wash. Open the washer door to prevent formation of moisture and odours. If the washing machine is left idle for a long period, drain the water in the machine and replace the drain hose. 1. 2. CLEANING THE DETERGENT DRAWER 1. Clean the detergent distribution drawer regularly. Swing out the drawer, flush it clean with water and then replace it. CLEANING THE MACHINE 2.
MAINTENANCE WATER INLET AND INLET FILTER To prevent blockage to the water supply by ingress of foreign substances, clean the water inlet and inlet filter regularly. MOVING THE MACHINE If the machine is to be moved to a distant location, replace the transportation locks removed before installation to prevent damage as shown below. 1. 2. 3. 4. 5. Remove the blanking plugs. Remove the back cover Insert the synthetic stabilisers and the transportation bolts. Tighten the bolts with a spanner.
DISPLAY CODES MAINTENANCE DISPLAY CODES AND SPECIAL FUNCTIONS CODES Err1 Err2 CAUSES ¬ Washer door is not properly shut. ¬ Drainage error. Err3 ¬ Temperature sensor error (Appears at the end of a cycle). ¬ Heater error (Appears at the end of a cycle). ¬ Water inlet error. ¬ Motor error. ¬ Motor error. ¬ Water exceeds protective level. ¬ Laundry is unevenly distributed. ¬ End of wash cycle. ¬ Remaining time is 1 hour and 16 minutes. ¬ Remaining time is 1 minute.
TROUBLESHOOTING MAINTENANCE 19 TROUBLESHOOTING The following circumstances do not constitute problems. Do not contact the Service Center until the problem has been confirmed. PROBLEM CAUSES SOLUTIONS Washing machine fails to operate. ¬ Poor connection to the power supply. ¬ Power failure. ¬ The washer door is not properly closed. ¬ Machine has not been switched on. _ _ _ _ Check connection to the power supply. Check the power supply. Close the washer door properly.
Haier Europe Trading S.r.l. Via De Cristoforis 12 21100 Varese - Italy Tel + 39 0332 24511 Fax +39 0332 245146 E-mail het.srl@haiereurope.