Dishwasher HDW101SST HDW101WHT Instructions for Use 0120505589
Index Safety information 2 Installation 4 Getting to know your dishwasher 6 How to fill the rinse aid and the detergent dispenser 7 Not suitable for the dishwasher 8 Arranging crockery, glasses, etc.
Safety information At time of delivery Check packaging and dishwasher immediately for signs of transport damage. If the appliance is damaged, do not put it into use but contact your supplier or customer service without delay. Please dispose of packaging materials properly. During installation Site the dishwasher and connect it up in accordance with the installation instructions. The dishwasher must not be connected to the electricity supply while installation is being carried out.
If a fault occurs If the appliance malfunctions, turn off water supply to the appliance and disconnect the plug from the wall socket. Then, consult the section entitled, "Finding fault" .If you cannot solve the problem, contact a service center. To maintain the EFFICIENCY and SAFETY of this appliance,we recommend: - call only the Service Centers authorized by the manufacturer. - always use original Spare Parts.
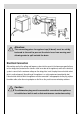
Installation Positioning the appliance Positioning the appliance in the desired location. The back should rest against the wall behind it, and the sides, along the adjacent cabinets or wall. The dishwasher is equipped with water supply and drain hoses that can be positioned to the right or the left to facilitate proper installation. Levelling the appliance Once the appliance is positioned, adjust the feet (screwing them in or out) to adjust the dishwasher, making it level.
fig.B2 Attention: The connecting piece for syphon trap (U-bend) must be solidly fastened to the wall to prevent the drain hose from moving and allowing water to spill outside the drain.
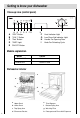
Getting to know your dishwasher Close-up view (control panel) A B C D E A B C D E FG “DRY” Button H I F G H I "3 IN 1" Button "Eco" Button "END" Light Heat Indicator Light Low Rinse Aid Indicator Light Handle For Opening Door Knob For Selecting Cycle ON-OFF Button Models explanation Colour Model HDW101WHT White HDW101SST Stainless Steel Dishwasher interior e a c b f d g h 6 a Upper Rack e Third Sprayer b Lower Rack f c Top Spray Arm g Washing Filter d Silverware Basket h Detergent
How to fill the rinse aid and the detergent dispenser Rinse aid This product makes dishes sparkle and helps them to dry without spotting. The dispenser is located on the inside panel of the door . When the low rinse aid indicator lights, you must load rinse aid. Loading the rinse aid Regardless of the type of detergent dispenser installed on your appliance, you must proceed as indicated below when loading the rinse aid.
Not suitable for the dishwasher What you should not put into the dishwasher Cutlery and tableware manufactured in whole or part from wood.They become faded and unsightly in appearance.Furthermore,the adhesives that are used are not suitable for the temperature that occur inside the dishwasher.Delicate decorative glassware and vases,special antique or irreplaceable china. The decorative patterns on such items will not be dishwasher-proof.
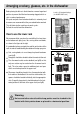
Arranging crockery, glasses, etc. in the dishwasher Before placing the dishes in the dishwasher, remove larger food particles to prevent the filter from becoming clogged, which results in reduced performance. Load for 12 Standard Settings (for AS/NZS 2007 tests) If the pots and pans have baked-on food that is extremely hard to remove, we recommend that they are soaked before washed. This will eliminate the need for extra wash cycles. Pull out the rack to load the dishwasher.
How to use the upper rack The upper rack is designed to hold more delicate and lighter dishware, such as glasses, cups and saucers, plates, small bowls and shallow pans (as long as they are not too dirty). Position the dishes and cookware so that they do not get moved by the spray of water. The upper rack can be adjusted for height by using the knobs located on both sides of the rack itself (see fig.E E). fig.
Programme overview Wash Detergent Types of load Description of cycle programme HEAVY Very dirty dishes, pots and pans. (Not to be used with delicate items.) Pre-wash with hot water. Extended wash at 70°C. Rinses with cold water. Rinse with hot water. Drying. NORMAL (AS/NZS 2007) Normal load of dirty dishes, pots and pans, Standard daily cycle. Prewash use cold water. Extended wash at 50°C. Rinse with cold water. Rinse with hot water. Drying.
Washing dishes Programme selection The most appropriate programme can be identified by comparing the type of crockery, cutlery, etc., as well as the amount and condition of food remains, with the details contained in the wash cycle table.The corresponding programme sequence and consumption details are shown in the right half of the overview. For example: Use the “Heavy Wash” programme for dishes and utensils which have plenty of food remains stuck on hard.
At the end of the wash cycle... When the buzzer constantly beeps six times, the “End” light will turn on and the cycle has finished. Turn off the appliance using the ON-OFF button, turn off the water supply and open the door of the dishwasher. Wait a few minutes before unloading the dishwasher to avoid handling the dishes and utensils while they are still hot and more susceptible to breakage. They will also dry better. Cancelling or modifying a wash cycle setting...
How to keep your dishwasher in shape After Every Wash After every wash, turn off the water supply (not necessary for models with “Aquastop” ) to the appliance and leave the door slightly ajar so that moisture and odors are not trapped inside. Remove the plug Before cleaning or performing maintenance, always remove the plug from the socket. Do not run risks. No solvents or Abrasive Cleaning Products To clean the exterior and rubber parts of the dishwasher, do not use solvents or abrasive cleaning products.
Care and maintenance Regular inspection and maintenance of your appliance helps to prevent problems from occurring.This saves time and aggravation.You should therefore carefully inspect the inside of your dishwasher from time to time. Overall condition of appliance Check that no grease or scale has accumulated on the inside of the dishwasher. If you discover any deposits: - Clean the interior of the dishwasher thorughly with a detergent solution.
Fault finding Resolving minor problems yourself Experience has shown that you can resolve most problems that rise during normal daily usage yourself, without having to call out a service engineer.Not only does this save costs,but it also means that the appliance is available for use again that much sooner. The following list of common occurrences and their remedies should help you identify the causes of most problems. Problems... ...
If you take all these checks and the dishwasher still does not function or your dishwasher have any other error display, you can power the dishwasher OFF, and wait a few minutes. You can power the dishwasher on, try it again , if the dishwasher still does not function and/or the problem persists, contact the nearest authorised service center and provide them with the following information: the nature of the problem. the model type number (Mod...) And the serial number (S/N...
Knocking sound coming from inlet valves This is caused by the way the water pipes have been laid and it has no effect upon the way the appliance functions. There is no remedy for this. ...with the dishes,cutlery, etc. Remnants of food are stuck to the dishes, cutlery,etc. Dishwasher was not loaded properly. Jets of water could not reach all parts of the dishes, ect. Too many items in the rack. Items in the rack were touching each other. Not enough detergent was added to dispenser.
Technical data Width 60 cm Depth 60 cm Height 85 cm Capacity Mains water pressure Power supply Maximum current intensity Total absorbed power 12 standard place settings 0.03-1MPa 220-240V~ 50Hz 13A 2100W Important information Notes on waste disposal Old appliances still have some residual value. An environment-friendly method of disposal will ensure that valuable raw materials can be recovered and used again. When an appliance has reached the end of its working life,unplug it from the mains.
Information on comparability tests implemented in compliance with AS/NZS 2007 Appliance loaded in accordance with standard specifications. Example of loaded dishwasher: See fig. 1 and 2. Capacity: 12 place settings Comparability programme: NORMAL wash Rinse-aid setting: 5 Detergent: 25+5g fig.1 fig.2 Height-adjustable top-basket must be inserted in the uppermost position. If the comparability tests do not comply fully with AS/NZS 2007, e.g., degree of soiling, type of dishes and cutlery, etc.