Automatic Undercounter Ice Maker User Manual Guide de l’Utilisateur Manual del Usuario Automatic Undercounter Ice Maker Model HI50IB20SS Máquina de hielo automática para debajo de la encimera
Safety Information Important Safety Instructions........................................................................... 2-3 Grounding Instructions.......................................................................................... 4 Specifications.......................................................................................................... 5 Set up & Use Parts & Features.................................................................................................. 6-7 Unpacking.....
ENGLISH important safety instructions WARNING To reduce the risk of fire, electric shock or injury when using your ice maker, follow these basic precautions. 1. Read all instructions before using the appliance. 2. Plug into a grounded 3-prong outlet; do not remove grounding prong, do not use an adapter, and do not use an extension cord. 3. It is recommended that a separate circuit, serving only your ice maker, be provided. Use receptacles that cannot be turned off by a switch or pull chain. 4.
11. If the ice maker will not be used for a long time, before the next use it must be thoroughly cleaned. Follow carefully any instructions provided for cleaning or use of sanitizing solution. Do not leave any solution inside the ice maker after cleaning. 12. DO NOT use solvent-based cleaning agents or abrasives on the interior. These cleaners may transmit taste to the ice cubes, or damage or discolor the interior. 13. DO NOT use outdoors. 14. Do not use the apparatus other than for its intended purposes.
ENGLISH GROUNDING INSTRUCTIONS The ice maker must be installed with all electrical and water connections in accordance with state and local codes. A standard (115V AC, 60 Hz, 15A) electrical supply, properly grounded in accordance with the National Electrical Code and local codes and ordinances, is required. Power Supply Cord 1. If the power supply cord is too short, do not use an extension cord. Have a qualified electrician or serviceman to install an outlet near the appliance. 2.
Electrical Power: 115VAC ~ 60Hz Ice-making /-harvest rated current: 3.0A/3.6A Refrigerant: R134a, 3.17 oz. Unit Dimensions (WxDxH): 14⅝’’ x 23⅝” x 33½” Unit Weight: 84 lbs. Ice-making Capacity: 50 lbs. / day* ice Shape: Cube Ice Cube Dimensions: 3/4" x 3/4" x 1" The technical data and performance index listed above should be used for reference only. They are subject to change. * The actual quantity of ice produced per day can vary with room and water conditions.
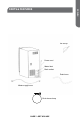
ENGLISH Parts & Features Water distribution tube Door Evaporator (ice mold) Water trough Float Ice Bucket Legs (not shown) Control panel Front louver panel Page 6 • Set up and use
English Parts & Features Ice scoop Power cord Water inlet Drain outlet Drain hose Water supply hose Drain hose clamp Page 7 • Set Up & Use
ENGLISH installation Instructions WARNING Excessive Weight Hazard Use two or more people to move and install ice maker. Failure to do so can result in back or other injury. Unpacking Remove packaging materials. IMPORTANT: Do not remove any permanent instruction labels or the data label on your ice maker. Remove tape and glue from your ice maker before using. • To remove any remaining tape or glue, rub the area briskly with your thumb.
• This ice maker should be properly installed by qualified personnel. elements, such as wind, rain, water spray or drips. • To ensure proper ventilation for your ice maker, the front of the unit must be completely unobstructed. • The unit should not be located next to ovens, grills or other high heat sources. • When installing the ice maker under a counter, follow the recommended spacing dimensions shown.
ENGLISH installation Instructions Cont. Leveling the ice maker It is important for the ice maker to be leveled in order to work properly. Otherwise water will not flow properly through the evaporator (ice mold). The ice production will be less than normal, and may be noisy. The unit can be raised or lowered by rotating the plastic sheaths around each of the four rolling casters on the bottom of the machine. If you find that the surface is not level, rotate the casters until the ice maker becomes level.
4. Keep the handle apart from the hinge side. Align the door on the bottom hinge 1 and replace axis on the hinge 2. Tighten it firmly. 5. Push the plug buttons into the original screw holes. See Figure below. See Figure below. Page 11 • Set Up & Use English installation Instructions Cont.
ENGLISH installation Instructions Cont. Water Supply The water supply should be ready at the point of installation. The water supply pressure should be a minimum of 15 psig with a static pressure not more than 80 psig. (A wall outlet directly behind the ice machine will make installation easier.) IMPORTANT: 1. All installations must be in accordance with local plumbing code requirements. Professional installation is recommended. 2.
4. A floor drain is also acceptable. If this is not possible, the use of a condensate pump is recommended. Recommended drain pump: Little Giant model VCMX-20ULS (554530) can be purchased though Industromart Dist. 1-877-869-0200. Drain hose diameter from pump is 3/8". 5. Pour 1 gallon of water into the ice storage bin to check for leaks in the drainage system. Tighten any connections that leak. IMPORTANT: This ice maker is not a freezer.
ENGLISH operation Instructions Final Check List before Operation 1. Have all packing materials and tape been removed from the interior and exterior of the ice maker? 2. Did you clean the ice storage bin? 3. Have the installation instructions been followed, including connecting the machine to water and electricity? 4. Has the machine been leveled? 5.
Description of LEDs and buttons: 1. Bin Full (Red) LED: Bin full indicator light When this is lit, the ice storage bin is full of ice or there is something blocking the bin-full probe. The unit will stop working. When ice cubes are removed from the ice storage bin, freeing the bin-full probe, the red LED will remain flashing for 3 minutes, then the unit will restart and return to the ice making mode. 2.
ENGLISH Operation Instructions cont. Final Check List before Operation Set the ON/OFF button to the ON position. The machine will automatically go to the ice making stage. There are two distinct cycles: ice freeze and harvest. The freeze cycle happens when water flows to the evaporator surface. The harvest cycle is when the ice is released and water enters the machine. A complete cycle takes about 20 minutes, but it depends on temperature and operating conditions.
Normal sounds Your new ice maker may make sounds that are not familiar to you. Most of the new sounds are normal. Hard surfaces like the floor and walls can make the sounds louder than they actually are. The following list describes the sounds that might be new to you and what may be causing them. • Rattling noises may come from the flow of the refrigerant or the water line. Items stored on top of the ice maker can also make noises.
ENGLISH CLEANING AND MAINTENANCE CAUTION If the ice maker is left unused for a long time, before the next use it must be thoroughly cleaned. Follow carefully any instructions provided for cleaning or use of sanitizing solutions. Do not leave any solution inside the ice maker after cleaning. Periodic cleaning and proper maintenance will ensure efficiency, top performance, and long life. The maintenance intervals listed are based on normal conditions.
Interior cleaning The ice storage bin should be sanitized occasionally. Clean the water trough before the ice maker is used first time and reused after stopping for an extended period of time. It is usually convenient to sanitize the trough after the ice making system has been cleaned, and the ice storage bin is empty. 1. Disconnect the power to the unit. 2. Open the door and take out the removable ice storage bin.
ENGLISH CLEANING AND MAINTENANCE cont. WARNING DO NOT touch the condenser. They are sharp and can be easily damaged. Water distribution tube cleaning When you find the ice cubes are incompletely formed or the output is low, the water distribution tube may be blocked. Turn off the power button, gently take out the water distribution tube, locate the holes in the distribution tube and use a pointed object such as a toothpick to dredge the holes.
WARNING The ice machine cleaner contains acids. DO NOT use or mix with any other solvent-based cleaner products. Use rubber gloves to protect hands. Carefully read the material safety instructions on the container of the ice machine cleaner. Discard the first batch of ice produced after cleaning. 6. Prepare a sanitizing solution made of 1 ounce of household bleach and 2 gallons of hot water (95ºF to 115ºF). Wipe the entire bin inside and outside, covering the entire surface of the walls. 7.
ENGLISH TROUBLESHOOTING Check your problem by using the chart below and try the solutions for each problem. TROUBLE POSSIBLE CAUSE POSSIBLE REMEDY The machine doesn’t operate. The ice maker is unplugged. Plug the ice maker in. The fuse is blown. Replace fuse. If it happens again, call for service to check for a short circuit in the unit. The ice maker power button is set at OFF. The ice storage bin is full of ice. Switch the ice maker power button to ON. Remove some ice cubes.
English TROUBLESHOOTING TROUBLE POSSIBLE CAUSE POSSIBLE REMEDY Cubes are partially formed or are white on the bottom. Not enough water in the water trough. Check if the water supply pressure is below 15 psig. Check water supply or filter may be restricted. Check for a water leak at the water trough. Noise during operation The feet are not leveled and locked. Certain sounds are normal. Level and lock the feet. See Leveling the Ice Maker. See Normal Sounds.
ENGLISH Customer Service IMPORTANT Do Not Return This Product To The Store If you have a problem with this product, please contact the Haier Customer Satisfaction Center at 1-877-337-3639. DATED PROOF OF PURCHASE, MODEL # AND SERIAL # REQUIRED FOR WARRANTY SERVICE NOTE: I ce maker WARRANTY does not cover purchased & installed pump. It should be covered by pump manufacturer warranty or distributor. For pump warranty service, contact the installer.
In-Home ServiceWhat is covered and for how long? This warranty covers all defects in workmanship or materials of the automatic ice maker for a period of: 12 months labor 12 months parts The warranty commences on the date the item was purchased and the original purchase receipt must be presented to the authorized service center before warranty repairs are rendered. What is covered. 1. The mechanical and electrical parts, which serve as a functional, purpose of this kit for a period of 12 months.
www.Haier.com Model # HI50IB20SS Issued Date: August 2014 115 V, 60 Hz Made in China Fabriqué en Chine Hecho en China Printed in China Haier America Wayne, NJ 07470 ©2014 Haier America Trading, LLC.