TFT-LCD TV OWNER ' S MANUAL Please READ this manual carefully before operating your TV, and retain it for future reference.
Warning WARNING RISK ELECTRIC SHOCK DO NOT OPEN WARNING : To reduce the risk of electric shock do not remove cover or back. No user-serviceable parts inside refer service to qualified service personnel. Operator Safety has been taken into consideration at the design and manufacture phase, but inappropriate operation may cause electric shock or fire. To prevent the product from being damaged, the following rules should be observed for the installation, use and maintenanceof th product.
Safety Instructions IMPORTANT SAFETY INSTRUCTIONS Read all of the instructions before using this appliance. When using this appliance, always exercise basic safety precautions, including the following: 1) Read these instructions. 2) Keep these instructions. 3) Heed all warnings. 4) Follow all instructions. 5) Do not use this apparatus near water. 6) Clean only with dry cloth. 7) Do not block any ventilation openings. Install in accordance with the manufacturer`s instructions.
Safety Instructions SAVE THESE INSTRUCTIONS Thank you for purchasing the Haier product. This easy-to-use manual will guide you in getting the best use of your product. Remember to record the model and serial number. They are on label in back of the unit. Model number serial number Date of purchase Staple your receipt to your manual. You will need it to obtain warranty service.
Introduction Contents War ni ng . . . . . . . . .. .. .. .. .. .. . . . . . . . . . . . . . . . . . . . . . . 2 Sa fe ty I ns tr uc ti on s . . . . . . . . . . . . . . . . . . . . . . . . . . . 3 Introduction Co nt ro ls . . . . . . . . . . . . . . . . . . . . . . . . . . . . . . . .. .. .. .. . 6 Co nn ec ti on O pt io ns . . . . . . . . . . . . . . . . . . . . . . .. .. .. .. 7 Universal Remote Control . ............ . . . . . . . . ........ 8 Installation Ac ce ss or ie s . . . . . . . . . . . . . . . .
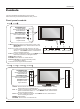
Introduction Controls This is a simplified representation of front panel. Here shown may be somewhat different from your TV. Front panel controls HL26S A HL32S A AV3 AUDIO Input connect to hear stereo sound from an external device. AV3 VIDEO Input Connects the video signal from a video device. AUDIO-R AUDIO-L VIDEO Headphone jack Headphone audio output terminal. 1.INPUT: Press to show the input source mode. In the MENU/INPUT screen, these buttons serve as OK buttons. 2.
Introduction Connection Options Back panel controls HL26S A HL32S A HL26B A HL32B Power Cord Socket This TV operates on AC power. The voltage is indicated on the Specifications page. Never attempt to operate the TV on DC power. A HL26BG A HL32BG A S-Video Input Digital Audio Output Connect S-Video Connect digital audio from various types of equipment. out from an S-VIDEO device to the Note: In standby mode, S-VIDEO input. these ports will not work.
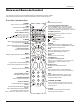
Introduction Universal Remote Control The remote control cannot be operated unless the batteries are properly loaded. When using the remote control, aim it at the remote control sensor on the TV. Function introduction POWER Press to turn on and off the TV. HDMI Press to enter HDMI signal CH.LIST Open the channel list. Shortcut Button of Input TV:Press to enter TV VIDEO:Press to enter VIDEO S-VIDEO: Press to enter S-VIDEO COMPONENT: Press to enter COMPONENT PC Press to enter PC signal. SELECT CH.
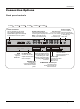
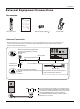
Installation External Equipment Connections Accessories SELECT CH.LIST HDMI PC TV VIDEO S-VIDEO P.MODE S.MODE TIME NPUT COMPONENT CC FREEZE EN INF U TFT-LCD TV OWNER ' S MANUAL Please READ this manual carefully before operating your TV, and retain it for future reference. O OK EX P IT SL ARC EE SAP VOL+ CH+ VOL- CH- MODEL S : HL26S A HL32S A HL26B A HL32B A HL26BG A HL32BG A Q.
Installation External Equipment Connections NOTE: All cables shown are not included with the TV. Choose Your Connection There are several ways to connect your television, depending on the components you want to connect and the quality of the signal you want to achieve. The following are examples of some different ways to connect your TV with different input sources.
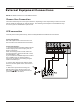
Installation External Equipment Connections External A/V Source Setup How to connect Connect the audio and video cables from the external equipment's output jacks to the TV input jacks, as shown in the figure. When connecting the TV to external equipment, match the jack colors (Video = yellow, Audio Left = white, and Audio Right = red). AV IN AUDIO L R Video L R L R Video L R S-VIDEO How to use 1. Select the input source with using the INPUT button on the remote control. 2.
Installation External Equipment Connections DTV connection This TV can receive Digital Over-the-air/Cable signals without an external digital set-top box. However, if you do receive Digital signals from a digital set-top box or other digital external device, refer to the figure as shown below. This TV supports HDCP (High-bandwidth Digital Contents Protection) protocol for Digital Contents (480p,720p, 1080i).
Installation External Equipment Connections PC connection How to connect 1. To get the best picture quality, adjust the PC graphics card to 1024 x768 . 2. Use the TV`s PC or DVI (Digital Visual Interface)Audio IN port for video connections, depending on your PC connector. If the graphic card on the PC does not output analog and digital RGB simultaneously, connect only one of either PC IN or HDMI/DVI IN to display the PC on the TV.
Installation HDMI When the source device(DVD player or Set Top Box) supports HDMI How To Connect 1. Connect the source device to HDMI port of this TV with an HDMI cable(not supplied with this product). 2. No separated audio connection is necessary. How To Use If the source device supports Auto HDMI function, the output resolution of the source device will be automatically set to 1280x720p. If the source device does not support Auto HDMI, you need to set the output resolution appropriately.
Installation Cable sample HDMI Cable (not supplied with the product) HDMI to DVI Cable (not supplied with the product) Analog Audio Cable (Stereo to RCA type) (not supplied with the product) Owner s Manual 15
Installation External Equipment Connections Connecting Headphones You can connect a set of headphones to your set if you wish to watch a TV programme without disturbing the other people in the room. AUDIO-R AUDIO-L Plug a set of headphones into the 3.5mm mini-jack socket on the side panel of the set. VIDEO Note Prolonged use of headphones at a high volume may damage your hearing. You will not receive sound from the speakers when you connect headphones to the system.
Installation Take the table stand off You can take off the table stand if you don`t want to use the table stand. HL26S A HL32S A Please release the screws 6XM4, see the picture. HL26B A HL32B A HL26BG A HL32BG A Please release the screws 6XM4, see the picture.
Operation Operation In the manual, the OSD (on screen display) may be different from your TV`s, because it is just an example to help you with the TV operation. There are several options you might need to set up in order for your TV to work properly. Read the instructions that follow. Switching On/Off the TV set 1. First, connect power cord correctly. 2. Select the viewing source by using INPUT button on the remote control. 3. When finished using the TV, press the POWER button on the remote control.
Operation Channel menu This TV set has two methods to set channels, which are respectively Auto Scan, Add Channel Scan. In this section, how to use the remote control to set channel is explained. You can also use buttons on the TV set to set channel. Automatic Scan Automatically finds all channels available through antenna or cable inputs, and stores them in memory on the All Channel List. Note The Channel menu will be only operated in normal TV mode.
Operation Channel menu Add Channel Scan Only search the new channel ,so the old channel will not be cleared. 1 Press the MENU button and then select the Channel menu. 2 Press the or OK button and then use / button to select Tuner. 3 Press the or OK button Select Cable or Antenna mode. 4 Press the / button to select Add Channel Scan . 5 Press the or OK button to start searching. 6 To cancel searching, press the EXIT/MENU button.
Operation Select the desired program 1 Using the CH+/- buttons. Press the CH+ button to select a channel number in number increasing direction. Press the CH- button to select a channel number in number decreasing direction. (Note: If Skip is ON on one channel, press CH+/- button, the channel will not appear.) 2 Also can enter channel number directly,eg:2-0. Select the desired sound Press the VOL-/+ buttons on the remote or the front of the TV set to adjust the volume level. The range is 0~100.
Operation Video menu The TV menu gives you an overview of the menus you can select. Note Depending on the input signal, one or more menu items may not be selectable. How to select picture mode The picture mode provides the pre-defined images settings. There are four settings: standard/ vivid /mild/custom. Press P.MODE button on the remote control to select the option (Standard/Vivid/Mild/Custom) Standard: normal mode. Vivid: mode of watching the movement of picture. Mild: produces a softer picture.
Operation Audio menu How to Select Audio mode Press S.MODE button on the remote control to select the Audio Mode (Standard/Music/Theater/Custom). Standard Normal sound with moderate bass and treble setting. Music Designed to reduce the bass and treble which enhances the voice for news programs. Theater Enables extra bass and treble to enhance the movie experience. Custom A spare setting that can be adjusted to personal tastes.
Operation Audio menu SAP Broadcasts Setup This TV can receive MTS stereo programs and SAP (Secondary Audio Program) that accompanies the stereo program; if the station transmits an additional sound signal as well as the original one. When having selected SAP button on the remote control, this TV can only receive the signal when the TV station transmits the proper signals. Mono sound is automatically received if the broadcast is only in Mono; even though Stereo or SAP has been selected.
Operation Time menu Time zone setting This function allows you to select your local time zone. Broadcasted time information will correct the clock display for your local time. 1 Press the MENU button and then use / button to select the Time menu. 2 Press the or OK button and then use / button to select the Time Zone items. 3 Press the or OK button to select your viewing area time zone: Eastern, Central, Mountain, Pacific, Alaska or Hawaii .
Operation Time menu Timer on setting Switch on automatically at the time you presetting. 1 Press the MENU button and then use / button to select the Time menu. 2 Press the or OK button and then use / button to select the Timer. 3 Press the or OK button and then use / button to select the On Mode. 4 Press the OK button to confirm. Then press / button to move cursor, press / button to set.
Operation Function menu DTV Caption Style (In DTV mode) This allows you to modify how digital captions are displayed on your TV. Select from the following options to change the visual characteristics of your TV`s digital captioning. Customize the DTV/CADTV captions that appear on your screen. 1. Press the MENU button and then use / button to select the Function menu. 2. Press the or OK button and then use / button to select DTV Caption Style. 3.
Operation Function menu OSD Timeout Channel 1. Press the MENU button and then use / button to select the Function menu. 2. Press the or OK button and then use / button to select OSD Timeout. 3. Press the or OK button to select Short, Middle or Long.
Operation Lock Menu Parental Control can be used to block specific channels, ratings and other viewing sources. The Parental Control Function is used to block program viewing based on the ratings sent by the broadcasting station. The default setting is to allow all programs to be viewed. Viewing can be blocked by choosing the type of the program and the categories. To use this function, the following must be done : 1. Set ratings and categories to be blocked. 2. Specify a password 3.
Operation Lock Menu Lock setup Set up blocking schemes to block specific channels, ratings, and external viewing sources. A password is required to gain access to this menu. Enter Password 1. Press the MENU button and then use / button to select the LOCK menu. Then, press the or OK button. The TV is set up with the initial password security default password is 9-4-4-3. 0-0-0-0 and 2. Use the / button to select the desired items, and press the or OK button to enter the next menu.
Operation Lock Menu Parental Guide Note The Parental control will automatically block certain categories that are more restrictive . For example, if you block TV-Y category, then TV-Y7 will automatically be blocked. Similarly, if you block the TV-G category, then all the categories in the young adult group will be blocked (TV-Y, TV-Y7, TV-G, TV-PG, TV-14, and TV-MA). The sub-ratings (D, L, S, V) work together similarly. How to set the FV, D, L, S and V sub-ratings.
Operation Other Functions Brief Info Brief Info shows the present screen information. Press the INFO button to show the Brief Info on the screen. Press the INFO button or EXIT button to exit. Function: Show the present screen information. Press the INFO button or EXIT button to exit. A: Video resolution B: Additional information.
Operation Other Functions Aspect Ratio Control Lets you choose the way an analog picture with a 4:3 aspect ratio is displayed on your TV with a 16:9 ratio picture format. Note If a fixed image is displayed on the screen for a long time, the image may become permanently burned on the screen and remain visible. Press the ARC button to select the desired picture format(Normal, Zoom, Wide, Cinema). Normal Choose normal when you want to view the picture with original aspect ratio of the input signal.
Operation Remote Control Setting Up Your Remote Control After it has been set up properly, your remote control can operate in six different modes: TV, DVD, VCR, SETBOX , CABLE or AUDIO. Pressing the corresponding button on the remote control allows you to switch between these modes, and control whichever piece of equipment you choose. Note The remote control might not be compatible with all DVD Players, VCRs and Cable boxes. SELECT CH.LIST HDMI PC TV VIDEO S-VIDEO P.MODE S.
Operation Remote Control 5. When the device turns ON, press and release the OK key to program the control with the new code, saving the code and exit. To exit without programming, press any key other except CH+/CH- and OK. LED will be off after manually scan mode is exit. 6. If the device responds, no further programming is required. If the device does not respond, repeat step 1 through 5.And searching will start from current code set.
Operation Remote Control Remote Control Codes TV NO. Brand 1 2 3 4 5 6 7 8 9 10 11 12 13 14 15 16 17 18 19 20 21 22 23 24 25 26 27 28 29 30 31 32 33 34 35 36 37 38 39 40 41 42 43 44 45 46 47 48 49 50 51 52 53 54 55 56 57 58 59 60 61 62 63 64 65 66 67 68 69 70 71 72 73 NO.
Operation Remote Control Remote Control Codes VCR DVD NO.
Operation Remote Control Remote Control Codes SETBOX NO.
Operation Remote Control Remote Control Codes AUDIO Receiver/Tuner NO.
Operation Maintenance Early malfunctions can be prevented. Careful and regular cleaning can extend the amount of time you will have your new TV. Be sure to turn the power off and unplug the power cord before you begin any cleaning. Cleaning the Screen 1. Here`s a great way to keep the dust off your screen for a while. Wet a soft cloth in a mixture of lukewarm water and a little fabric softener or dish washing detergent. Wring the cloth until it`s almost dry, and then use it to wipe the screen. 2.
Specifications Product Specification Resolution 1366X768(Dot) Power requirement 120V~ , 60Hz NTSC Color system ATSC Clear QAM External Antenna Impedance 75 ohm Color 16,770,000(256 steps of each R, G and B) Operating Temperature Range 32~104 F(0~40 C) Operating Humidity Range Less than 80% Maximum Elevation 6561 feet (2000m) Dimensen(WX D X H ) Unit::inches/mm (Including stand) MODEL Weight(pounds/kg) HL26S A 31.3X8.3 X18.9inches 795X210X480 mm 26.0/11.8 HL32S A 37.0X9.4X22.
Troubleshooting Troubleshooting For the sake of time and cost, it is strongly recommended that you check out the problem by yourself according to the instructions listed hereunder before contacting the after-sales service for technical assistance. No picture, no sound Verify if the television is properly plugged. Verify if the television is properly supplied power. Verify if electricity is available. Blank screen Verify if correct signals are input.
Warranty Warranty This Haier brand product, when shipped in its original container, will be free from defective workmanship and materials, and agrees that it will, at its option, either repair the defect or replace the defective product with a new or re-manufactured equivalent at no change to the purchaser, for parts or labor for the periods set forth below: This warranty does not apply to the appearance of the product or the exterior of the product, which has been damaged or defaced, altered or modified i