Portable Electronic Washer Lave-Linge Électronic Mobile Lavarroopas Eléctrico Portátil 02 SURPLUS (MIN) HIGH MEDIUM LOW VERY LOW HLP23E ER) LAT PROCEDURE STATUS aa SOAK HEAVY bb WASH 03 GENTLE cc RINSE 04 QUICK WASH dd SPIN 05 WASH 06 SPIN RSS OUUR EE(H(HO ERV RES PROGRAM STATUS 01 STANDARD WATER LEVEL PROGRAM RESERVATION User Manual HLP23E Guide de l’Utilisateur HLP23E Manual del Usuario Modelo HLP23E Quality • Innovation • Style
English IMPORTANT SAFETY INSTRUCTIONS Warning – To reduce the risk of fire, electric shock, or injury to persons when using your appliance, follow basic precautions, including the following: 1. Read all instructions before using the appliance. 2. Use this appliance only for its intended purpose as described in this use and care guide. 3. Use only detergents or softeners as recommended for use in this manual and keep them out of the reach of children. 4.
English 20. This appliance must be connected to a proper electrical outlet with the correct electrical supply. 21. Proper grounding must be ensured to reduce the risk of shock and fire. DO NOT CUT OR REMOVE THE GROUNDING PLUG. If you do not have a three-prong electric receptacle outlet in the wall, have a certified electrician install the proper receptacle. The wall receptacle MUST be properly grounded. 22. Hydrogen gas may be produced if the water heater has not been used in more than 2 weeks.
English Table Of Contents PAGE SAFETY INSTRUCTIONS ..............................................................................1-2 PARTS AND FEATURES ..............................................................................4-5 OPERATING YOUR WASHER ..........................................................................6 UNPACKING AND ACCESSORIES INVENTORY ......................................................10 PROPER LOCATION.......................................................................
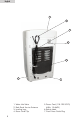
English OPERATING INSTRUCTIONS Parts and Features 1 02 SURPLUS (MIN) HIGH MEDIUM LOW VERY LOW HLP23E ER) LAT PROCEDURE STATUS aa SOAK HEAVY bb WASH 03 GENTLE cc RINSE 04 QUICK WASH dd SPIN 05 WASH 06 SPIN RSS OUUR EE(H(HO ERV RES PROGRAM STATUS 01 STANDARD WATER LEVEL 2 PROGRAM RESERVATION 3 4 1. Top Lid 3. Washer Cabinet 2. Control Panel 4.
English 1 4 5 6 2 7 1. 2. 3. 4. 5 Water Inlet Valve Back Panel Service Entrance Leveling Legs Power Cord Clip 3 5. Power Cord (110-120 VOLTS, 60Hz, 15 AMPS) 6. Rating Label 7.
English OPERATING YOUR WASHER The Control Panel 4 3 2 1 Power ON/OFF: (1) • Press the button once to turn ON the power to the washer. Press it again to turn the power OFF. Start/Pause: (2) • Press this button once to start the wash process. Press this button once again to pause the activity during the wash cycle. Push it again to resume the wash cycle. Program Select: (3) • Select your desired cycle program by pressing the "Program" button. There are 6 options to select from.
English • Pre-treat all stains and heavily soiled areas for best results. • Do not overload your washer. • Close the door properly after loading the clothes. • When loading wet items, keep water level high enough to keep the unit in balance and to allow clothing to float easily in the water. Proper Use of Detergent • • • • Fill water in the tub at the "Low" water level. Add the detergent. Load the washer. Select the water level.
English Selecting the Wash Cycle • Press the "Program Select" button for your desired wash cycle. Choose between 6 options. • The total time includes the normal water inlet time and drain time. The total washing time may be affected by the water inlet pressure and water level. • The spin time is the time from the intermittent running to the finishing of the cycle. • In the "Heavy" program, the first soak is approximately 20 minutes, pre-wash is approximately 8 minutes.
English End-of-Cycle Signal The machine will beep at the end of the cycle, indicating that the washing is complete. The "Wash/Rinse/Spin" indicator lights will still be ON. The washer will turn OFF automatically in approximately 10 minutes after the completion of the cycle. Closing the Top Lid For safety purposes, the top lid must always be closed during the wash process. If you open the top lid while the wash cycle is in progress, you will observe the following: • An alarm will sound.
English Unpacking and Accessories Inventory Unpacking 1. Remove all packing materials. This includes the foam base and all adhesive tape holding the washer accessories inside and outside. Slide out and remove the bottom Styrofoam that is used to protect the washer from shipping damage due to vibrations and shock. 2. Inspect and remove any remaining packing, tape or printed materials before using the washer. Note: The bottom panel is located between the upper foam protection and box.
English Proper Location General • Select a suitable location for the washer on a hard even surface away from direct sunlight and heat sources (e.g., radiators, baseboard heaters, cooking appliances, etc.). • Any floor unevenness should be corrected with the leveling leg located on the bottom right corner of the washer. • The washer must be placed at room temperature. You must not place the washer where the temperature is at or below freezing.
English Installation Instructions Read carefully and understand all installation instructions before installing this washing machine. If after completing the process you are still unsure whether the washer has been properly installed, we recommend that you contact a qualified installer.
English Installing the Lint Filter The lint filter must be installed before the washer is used. The lint filter is packaged with the User Manual. Leveling the Washer Your washer has an adjustable leveling leg that is located on the front right corner. After properly placing your washer in its final location, you may level the washer. • Loosen the adjustable nut. The leveling leg can be adjusted by turning it counter-clockwise to raise the washer and clockwise to lower the washer.
English Installing Quick Sink Adapter: When installing the quick sink faucet adapter to the faucet, follow the steps below: 1. First, remove the aerator from your faucet nozzle and determine the size/type of the faucet. 2. Once you determine the size/type of the faucet (Outside Threaded End or Inside Threaded End), place the proper sized rubber washer into the silver faucet adapter. 3. Attach the silver faucet connector to the faucet. 4.
English Electrical Connections Grounding Instructions This appliance must be grounded. In the event of an electrical short circuit, grounding reduces the risk of electric shock by providing an escape wire for the electrical current. This appliance is equipped with a cord having a grounding wire with a grounded plug. The plug must be inserted into an outlet that is properly installed and grounded. • Improper use of the plug can result in a risk of electric shock.
English Proper Care and Cleaning Warning! Always unplug your appliance before cleaning to avoid electric shock. Ignoring this warning may result in personal injury or death. Before using cleaning products, always read and follow the cleaning product manufacturer’s instructions and warnings to avoid personal injury and product damage. General Cleaning and Maintenance Use only a damp or sudsy cloth to clean the control panel.
English Troubleshooting Guide Before calling for service, determine the symptoms and follow the suggested solutions: Washer does not operate: • Check if the unit is plugged in. The plug may have come loose. • Check if the electrical wall receptacle is of proper voltage. • Check if the circuit breaker needs to be reset or if the fuse needs to be replaced. • Check if the washer is overloaded. Reload and redistribute the clothing to rebalance the machine. • Check if the door is open.
English Washer makes noises: • Washer may need to be reinstalled and leveled. Refer to the washer installation section. • Wash load may need to be rebalanced, as the load may be uneven. • Coins, loose change, buttons or other heavy objects may be making the noise. Refer to the Operating Guide – Normal Operating Sounds. • A squeaking sound may be due to an overloaded washtub. • Vibration noises are due to an improper leveling of the washer or an uneven distribution of clothing in the tub.
English Limited Warranty In Home Service Full ONE Year Warranty For 12 months from the date of original retail purchase, Haier will repair or replace any part free of charge including labor that fails due to a defect in materials or workmanship. Limited Warranty After one year from the original retail purchase date, Haier will provide a part at no cost, as indicated below, to replace said part as a result of a defect in materials or workmanship. Haier is solely responsible for the cost of the part.
IMPORTANT Do Not Return This Product To The Store If you have a problem with this product, please contact the "Haier Customer Satisfaction Center" at 1-877-337-3639. DATED PROOF OF PURCHASE, MODEL # AND SERIAL # REQUIRED FOR WARRANTY SERVICE IMPORTANT Ne pas renvoyer cet appareil au magasin. Si vous avez un problème avec cet appareil, veuillez contacter le service à la clientèle de Haier au 1-877-337-3639.