Inspired living Refrigerator/Freezer Combo User’s Guide HRF-663BSS HRF-663ATA2* HRF-663ASA2* HRF-663ITA2* HRF-663ISA2* HRF-663ASB2* HRF-663ISB2* *=blank,WW,HS,SS Thank you very much for choosing to purchase a Haier-brand refrigerator. This User’s Guide will help you properly install and operate your newly acquired appliance. For future reference, please write down the model and serial number in the spaces provided below.
Contents Before operation Your refrigerator’s features ................................................1 Components.......................................................................2 Precautions .................................................................... 3-5 Preparations ....................................................................6-9 Door removal ............................................................. ..10-11 Setting up the Refrigerator/Freezer Combo .................... .
Your refrigerator’s features Your Haier-brand Refrigerator/Freezer Combo is equipped with numerous innovative, space-saving and energy-efficient features. (1) Ice cube maker Automatic ice cube maker, powerful ice crusher, refrigerated water dispenser (2) Minibar(HRF-663BSS,HRF-663ATA2*,HRF-663ASA2*,HRF-663ASB2*) You can store drinks here for quick retrieval without having to open the refrigerator door.
Components Refrigerator compartment Freezer Bottle rack Bottle cover Light Ice maker Shelves Light Shelves Bottle rack Drawer cover Minibar cover Bottle rack Veggie drawer cover Freezer drawers Veggie drawer Note ● ● ● ● ● ● ● The power plug must remain accessible after setting up the appliance. If damaged, the power cord of this appliance must be replaced by the maker, their customer service or an equally qualified person so as to prevent any hazards.
Customer service Precautions Dispenser not supplying ● No ice cubes in the ice cube container. Wait until ice cubes are supplied. ● The water supply valve is closed. Open the water supply valve. ● Freezer temperature is set too high. Lower the freezer temperature to improve the performance of the ice cube maker. the spindle due to long period of idleness, large temperature swings or voltage peaks. Empty, clean, wipe and re-place the ice cube container. A dedicated grounded outlet is required.
Precautions After-sales Service Confirm the following before ordering a repair. Never place flammable, explosive or corrosive materials in the refrigerator. Do not store fuel and other flammable products near this appliance. This appliance is intended strictly for storing and freezing foods. It is not suitable for storing such things as vaccines, bacteria or chemical samples, which have demanding temperature requirements. Do not put microwave ovens, voltage regulators or power strips on this appliance.
Customer service Should a malfunction occur that you cannot resolve as described below, contact the nearest customer service. In such a case, please indicate the full model name, serial number and spare part register. (See the product label at the back of the appliance.) Precautions To avoid injury, keep fingers away from the door crack when opening or closing the doors. Keep children away from the appliance doors being opened and closed. Do not pour water onto the appliance or set it up in wet areas.
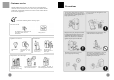
Preparations Troubleshooting Unpacking Remove the entire packing material, including the foam underlay and pieces of tape used to hold accessories in place. Separate and count the included accessories. Check the items in the box against the packing list. In case of a mismatch, please contact your supplier. Set up the appliance in a suitable area. (Details under “Setting up”.) When operating, the fan produces an audible sound.
Troubleshooting Preparations Long operation time and a temperature increase of housing and compressor are normal during initial operation. Some of the sounds produced during initial operation or at start-up will fade during normal operation. Attaching the toe moulding Open the refrigerator and freezer doors, remove the moulding from the refrigerator compartment, and then affix it as shown in the illustration. During initial operation, the appliance housing may become warm to prevent condensation.
Preparations Inoperation When on vacation Installing the door handle First, screw part 2 into the threaded hole in the door (part 1); there are two screws per door. Next, press part 3 with its larger opening onto part 2. Finally, pull part 3 down in order to attach it firmly to the door. ● Before a long vacation, turn off the appliance, take out the food, remove the frost, clean the interior and leave the door open to prevent odour build-up. Transportation ● Unplug the power cord.
Inoperation Preparations In the event of a power outage Even in the summer, foods can be kept cool for several hours during a power outage. ● In the event of a power outage, refrain from adding foods to the appliance and opening the doors. ● If you know there will be a power outage, produce more ice cubes and place them in the top section of the refrigerator. It is recommended to clean the interior before starting up the appliance. (Details under “Cleaning”.
Door removal Removing the door Defrosting · Cleaning If your house door is too narrow, remove the refrigerator door and carry the refrigerator in narrow side first. Defrosting The appliance defrosts automatically. Remove the toe moulding, and then release the water coupler. Cleaning Clean the refrigerator regularly to prevent odour build-up. Toe moulding ● For safety reasons, first unplug the power cord.
Dispenser precautions Door removal Precautions The following instructions refer only to products equipped with an ice cube maker, ice crusher and refrigerated water dispenser. ● Do not use very tall or short glasses. ● Hold the glass as close as possible to the ice cube outlet so as to prevent dropping ice cubes or jamming the ice cube supply. ● The outlet closes five seconds after ice cubes have been supplied.
Setting up the Refrigerator/Freezer Combo Dispenser operation Dispenser operation Be sure to choose a flat and level setup location. Use sturdy and fireproof supports to correct an unevenness in the floor. Turning an appliance foot clockwise raises the appliance, turning it anticlockwise lowers the appliance.
Removing and installing the ice cube container Start-up Removing the ice cube container Press the middle section of the ice cube container in and pull it off its shelf. Power connection After connecting it to the power, the appliance is automatically set to the Intelligent and Crushed Ice modes. This appliance has a memory function which, in the event of a power failure, automatically stores the operating mode that was last used and restores it when the power is turned on again.
Digital display operation Ice maker and dispenser operation Precautions Control panel A. Intelligent mode key indicator B. Superfrost key C. Freezer temperature adjustment key D. Refrigerator temperature adjustment key E. Ice/water selector F. Intelligent mode indicator G. H. I. J. K. L.
Starting up the ice maker and dispenser Using the digital display Preparations before starting up the ice maker and dispenser Superfrost The ice maker can be connected either directly to a water supply line if fitted with a filter (option A) or to a drinking water container if fitted with a water pump (option B). ● Cut the water line to the right length to prevent it from kinking. The recommended maximum length for the water line is 12 m.
Using the digital display Notes on freezing Open-door buzzer warning A buzzer sounds intermittently when the door is left open permanently or is not closed properly. Let warm foods and drinks cool down to room temperature before putting them in the freezer compartment. Pack the food into portions of up to 2.5 kg suitable for your household. As a result, the portions will freeze faster and the quality after thawing remain optimal for preparation.
Freezer compartment Use the freezer compartment for long-term food storage A low temperature in the freezer compartment is necessary for long-term food storage. Do not exceed the maximum length of storage indicated on the package. Removing and cleaning glass shelves First, lift the rear of the shelf in direction (1), and then pull the shelf out in direction (2). Finally, tilt the shelf in direction (3) and remove it once the door is open 90º.
Refrigerator compartment Home bar (HRF-663BSS,HRF-663ATA2*,HRF-663ASA2*,HRF-663ASB2*) Stocking example Foods should be grouped according to the various temperature ranges in the refrigerator compartment. (1) Eggs, butter, cheese (2) Tinned drinks and foods, seasonings (3) Drinks, bottles (4) Preserves (5) Meats (6) Flours, preserves, milk Do not remove the inner cover of the home bar. The home bar will not operate if the cover has been removed.
Home bar (HRF-663BSS,HRF-663ATA2*,HRF-663ASA2*,HRF-663ASB2*) Refrigerator compartment Using the veggie drawer Operation To open the bar, press the compartment button. The bar compartment opens. The home bar can be used without opening the appliance door; which saves energy. When the home bar is opened, the refrigerator light comes on. The appliance is equipped with a veggie drawer suitable for keeping fruits and vegetables. The humidity level in the veggie drawer is adjustable.
Notes on refrigeration Tips on refrigeration Let warm foods and drinks cool down to room temperature before putting them in the refrigerator compartment. Pack and seal foods before storing them. This prevents drying and odour dissipation. Wash and dry off fresh foods before storing them. Remove the leaves of root vegetables to prevent them from absorbing the nutrients. Thawing frozen foods inside the refrigerator helps conserve energy. Items not requiring refrigeration: Onions, peppers, garlic, ginger.