W70-B1486-F HW70-B1286-F HW80-B1486-F HW80-B1286-F Coton M1 Temp.
HAIER 4
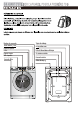
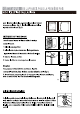
Tuyau de vidange Bandeau de commande Touche Marche / Arrêt Couvercle supérieur Hublot Poignée de porte Boîte à produits Clappet entrée d’eau Fiche d’alimentation eléctrique Vis couvercle arrière Couvercle arrière Couvercle filtre Boulonsdetransportr Coton Lavage Temp.
fig.
08 J IHG EDC F Coton Lavage Temp.
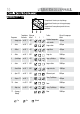
09 F G H I Affichage L’afficheur indique les fonctions suivantes: durée du programme, temps restant, temps de rinçage, temps d’essorage, sélection température, sélection vitesse d’essorage, sécurité d’enfant, verouillage de la porte, deroulement du programme, défauts machine avec codes d’erreurs. Appuyez cette touche pour choisir le temps de lavage ou sa durée. En appuyant succesivement sur cette touche, le temps Touche temps lavage ou la durée de lavage peut être choisie.
2 2 Compartiment 1:lessive pour le prélavage 2 3 Compartiment 2:lessive pour le lavage,trempage inclu Compartiment 3:assouplissant,produit de tenue, amidon,etc.
USING THE APPLIANCE CONSUMPTION AND TECHNICAL DATA CONSUMPTION TABLE SPIN DRYING PERFORMANCE MAX. LOAD HW70-*86-F/HW80-*86-F TEMPERATURE ¬ Hand Wash 2kg/2 kg 30°C 0:38 / ¬ Wool 2kg/2 kg 30°C 0:35 / ¬ Delicate 2kg/2 kg 30°C 0:38 / ¬ Mix 5kg/5 kg 40°C Auto / ¬ Synthetic 3.5kg/4 kg 40°C Auto / ¬Cotton 7kg/8 kg 60°C Auto 53%/51% ¬ Daily Wash 3.5kg/4 kg 40°C 0:41 / ¬ Sport 25’ 3.5kg/4 kg 30°C 0:25 / ¬ Express 15‘ 2kg/2 kg -- -- 0:15 / ¬ Jeans 3.
Coton Temp. Lavage M1 Synthétique Mixte Vitesse Rinçage Intense Fin différée Prélavage Arrêt cuve pleine Quotidien M2 Sport 25' M3 Délicat Laine M emo Essorage Lavage main Départ/Pause Express15' Jeans Marche / Arrêt Power Bébé coton Essorage Vidange de la lessive de la lessive. DE LA LESSIVE une lessive de lessive LA LESSIVE la lessive la lessive Coton Temp. Temp.
UTILISATION DE L’APPAREIL RÉGLAGE DE LA TEMPÉRATURE DE LAVAGE Coton Lavage Lavage Temp. Temp. Rinçage Rinçage Vitesse Vitesse Essorage Essorage MMemo emo Mixte Appuyez de manière répétitive sur la touche de température de lavage jusqu’au moment oùla température désirée (tietempérature de l’eau à la sor du robinet, apparaissent sur l’écran.
1.
DÉPLACEMENT DU LAVE-LINGE A Si vous déménagez il est conseillé de réinstallez les vis de bridages, que vous avez retirées lors de l’installation de la machine. 1. Enlevez les bouchons. 2. Serrez les vis avec une clé. 3. Enlevez le couvercle postérieur. 4. Montez les éléments stabilisants et les vis de transport. 5. Remontez le couvercle postérieur. Coton Temp.
Codes d’erreurs et fonctions spéciales Code Causes Err1 Err2 Solutions ¬ Fermeture porte incorrecte ¬ L’eau ne peut pas être vidangé dans un délai de 6 minutes ¬ Erreur sonde de température Fermer la porte correctement.Mettre la machine en route Nettoyer le filtre.Examiner si le tuyau de vidange est obstrué ou bloqué.
HAIER Europe Trading - Succursale France Immeuble "Le France" 115 - 123 Avenue Charles de Gaulle 92200 NEUILLY SUR SEINE ++ 33 1 73 79 48 05
AUTOMATIC DRUM WASHING MACHINE USER MANUAL HW70-B1486-F HW70-B1286-F HW80-B1486-F HW80-B1286-F Heavy Temp. Wash Silk Heavy Sport wash Delicate Wash Temp.
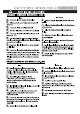
03 - 09 TABLE OF CONTENTS BEFORE USE 10 - 15 USING THE APPLIANCE >COMPONENTS ............................... 03 >PREPARATION ................................ 04 >SAFETY INSTRUCTIONS ................... 05 >INSTALLATION ................................ 06 >CONTROL PANEL ............................ 08 16- 20 MAINTENANCE >PROGRAM SELECTION ..................... 10 >DISPLAY CODES ............................. 18 >CONSUMPTION AND TECHNICAL DATA .. 11 >TROUBLESHOOTING........................
COMPONENTS BEFORE USE 03 THANKS FOR PURCHASING A HAIER PRODUCT Please read these instructions carefully before using this appliance. The instructions contain important information which will help you get the best out of the appliance and ensure safe and proper installation, use and maintenance. Keep this manual in a convenient place so you can always refer to it for the safe and proper use of the appliance.
04 BEFORE USE PREPARATION PREPARING THE MACHINE Remove all the packing materials to prevent unsteadiness, including the polystyrene base. Upon opening the package, water drops may be seen on the plastic bag and the porthole. This is normal phenomenon resulting from water tests in the factory. DESCRIPTION This diagram may be slightly different from the layout of the washing machine you have just purchased due to technical improvements.
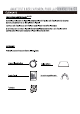
BEFORE USE SAFETY INSTRUCTIONS 05 BEFORE SWITCHING THE APPLIANCE ON FOR THE FIRST TIME DO ... ... Make sure that the transport bolt are removed. ... Use a separate earthed socket for the power supply. ... Make sure that the plug is accessible. ... Hold the plug and not the electric cable when unplugging the power supply. ... Make sure that the fuses in the power circuit are rated for 15A. ... Keep away from heat sources and direct sun light to prevent plastic and rubber components from aging. ...
06 INSTALLATION BEFORE USE DISMANTLE THE TRANSPORTATION BOLTS The transportation bolts are designed for clamping anti-vibration components inside of the washing machine during the transportation process. 1. Remove the back cover. 2. Remove the four bolts on the rear side and take out the synthetic stabilisers from within the machine. 3. Replace the back cover. 4. Fill the holes left by the bolts with blanking plugs. Note: 1.
07 BEFORE USE INLET HOSE 1. Connect the nut on the inlet hose to the connector on the water valve. 2. Apply inlet hose to a water tap with cold, fresh water. Note: Use the hose-set supplied with the appliance. Old hose-sets should not be reused. 1. 2. 1. Use the drain hose bracket to keep the end of the drain hose retained and prevent the outflow of water. Don't extend the length of the drain hose; if an extended hose is required, please consult a serviceman. 8 0 - 1 0 0cm DRAIN HOSE 1. 2.
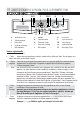
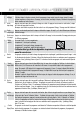
08 BEFORE USE CONTROL PANEL J I HG E DC F Cotton Wash Temp.
09 BEFORE USE F Display screen G Washing time Press the “Wash” button to set washing time. Press and hold this button to change the time continuously. Click this H I button up until the end. Note: This function is not applicable to “ Spin/Drain ” process Times of rinse Press the “Rinse” button to select the times of rinsing and the maximum allowable times of rinsing is 8. Spinning time Press the “Spin” button to select spinning time. The maximum allowable spinning time varies with programs.
10 USING THE APPLIANCE PROGRAM SELECTION PROGRAM MODES 2 2 2 1 Detergent compartment for prewash mode 3 2 Detergent compartment 1 1 Temperature Maximum Preset 1 ¬ Hand Wash - - to 40 °C 2 ¬ Wool 3 3 Compartment for softener and other additives Recommended Laundry Preset spin speed 30°C Cotton fabrics 800 rpm - - to 40 °C 30°C Woolen fabrics 600 rpm ¬ Delicate - - to 40 °C 30°C Cotton fabrics 800 rpm 4 ¬ Mix - - to 40 °C 40°C Cotton or synthetic 1000 rpm 5 ¬ Synthetic
11 USING THE APPLIANCE CONSUMPTION AND TECHNICAL DATA CONSUMPTION TABLE SPIN DRYING PERFORMANCE MAX. LOAD HW70-*86-F/HW80-*86-F TEMPERATURE ¬ Hand Wash 2kg/2 kg 30°C 0:38 / ¬ Wool 2kg/2 kg 30°C 0:35 / ¬ Delicate 2kg/2 kg 30°C 0:38 / ¬ Mix 5kg/5 kg 40°C Auto / ¬ Synthetic 3.5kg/4 kg 40°C Auto / ¬Cotton 7kg/8 kg 60°C Auto 53%/51% ¬ Daily Wash 3.5kg/4 kg 40°C 0:41 / ¬ Sport 25’ 3.5kg/4 kg 30°C 0:25 / ¬ Express 15‘ 2kg/2 kg -- -- 0:15 / ¬ Jeans 3.
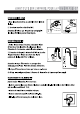
12 WASHING METHODS PLEASE NOTE USING THE APPLIANCE This washing machine is for domestic use only. If the machine is use for commercial purpose the guarantee will not be valid anymore.Do not use it for purposes other than that for which it was designed. Follow the instructions given on the label of each garment and wash only machine-washable garments. POWER SUPPLY Connect the washing machine to the power supply (220V to 240V~/50Hz). WATER CONNECTION Turn on the tap. The water must be clean and clear.
13 USING THE APPLIANCE LOADING THE MACHINE Heavy Temp. Wash Rinse Speed Spin Strong wash Auto Delay Pre-wash Soak Delicate Silk Sport wash Wool Silent Synthetic Quick Memory Spin Cotton Power Self-clean Start / Pause Press and hold 2seconds to set door unlocked Open the washer door, put in the laundry piece by piece. Close the door tightly.
14 USING THE APPLIANCE SETTING WASHING TEMPERATURE Press and hold down the temperature button until the desired temperature is selected . SETTING SPIN SPEED Press and hold down the speed button until the desired speed is selected.See "Operational functions" on the "Control panel" pages (08 and 09) for selecting temperature and spin speed. It is advisable to select the recommended value. WASHING Press the Start/Pause button. The washing machine will operate according to the preset programs.
15 USING THE APPLIANCE CARE CHART Resistant material Bleachable in cold water Don't dry clean Delicate fabric Do not bleach Dry flat Washable at 95 °C Iron at 200 °C Hung to dry Washable at 60 °C Iron at 150 °C Dry on clothes hanger Washable at 40 °C Iron at 100 °C Tumble dry, normal heat Washable at 30 °C Don't iron Tumble dry, reduced heat Hand wash Dry cleaning with any solvent Don't tumble dry Dry clean only Dry cleaning with pericloride Wool Seal Dry cleaning with aviation fuel
16 CLEANING & CARE C TE IN A M AFTER WASHING Turn off the water supply and pull out electricity plug after each wash. Open the washer door to prevent formation of moisture and odours. If the washing machine is left idle for a long period, drain the water in the machine and replace the drain hose. 1. 2. CLEANING THE DETERGENT DRAWER 1. Clean the detergent distribution drawer regularly. Swing out the drawer, flush it clean with water and then replace it. 2.
17 MAINTENANCE WATER INLET VALVE AND INLET VALVE FILTER To prevent blockage to the water supply by ingress of foreign substances, clean the water inlet valve and inlet valve filter regularly. MOVING THE MACHINE If the machine is to be moved to a distant location, replace the transportation bolts removed before installation to prevent damage as shown below. 1. 2. 3. 4. 5. Remove the back cover. Remove the blanking plugs. Insert the synthetic stabilisers and the transportation bolts.
18 DISPLAY CODES MAINTENANCE DISPLAY CODES AND SPECIAL FUNCTIONS CODES CAUSES SOLUTIONS Err1 Err2 ¬ Door is not properly shut. ¬ Drainage error, water not emptied within 6 minutes. ¬ Temperature sensor not properly connected or damaged. ¬ Heater error (Appears at the end of a cycle). ¬Water level not met in 8 minutes. _ Shut the door properlyˈand then press the Start/Pause button. _ Clean the filter and check the drain hose for blockage.
TROUBLESHOOTING MAINTENANCE 19 TROUBLESHOOTING The following circumstances do not constitute problems. Do not contact the Service Center until the problem has been confirmed. PROBLEM CAUSES SOLUTIONS Washing machine fails to operate. ¬ Poor connection to the power supply. ¬ Power failure. ¬ The washer door is not properly closed. ¬ Machine has not been switched on. _ _ _ _ Check connection to the power supply. Check the power supply. Close the washer door properly.
20 MAINTENANCE HAIER Europe Trading - Succursale France Immeuble "Le France" 115 - 123 Avenue Charles de Gaulle 92200 NEUILLY SUR SEINE ++ 33 1 73 79 48 05