LCD TV OWNER`S MANUAL MODEL S : L26A9A L32A9A L37A9A L26A8A L32A8A L37A8A Please READ this manual carefully before operating your TV, and retain it for future reference.
Congratulations on your purchase, and welcome to the " family " ! Dear Haier product owner: Thank you for your confidence in Haier. You`ve selected one of the best-built, best-backed products available today. We`ll do everything in our power to keep you happy with your purchase for many years to come. As a member of the Haier " family," you`re entitled to protection by one of the most comprehensive warranties and outstanding service networks in the industry. Thanks for investing in a Haier product.
Important Safety Instructions Important safeguards for you and your new product Your product has been manufactured and tested with your safety in mind. However, improper use can result in electrical shock or fire hazards. To avoid defeating the safeguards that have been built into your new product, please read and observe the following safety points when installing and using your new product, and save them for future reference. 1.
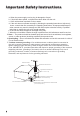
Important Safety Instructions a. When the power supply cord or plug is damaged or frayed. b. If liquid has been spilled, or objects have been fallen into the unit. c. If the unit has been exposed to rain or water. d. If the unit does not operate normally by following the operating instructions.
Table of Contents Warning .............................................1 Important Safety Instructions................2 Buttons and interface location..............5 Front control panel............................5 Rear control panel............................ 7 Remote controller............................... 8 Keys of remote controller..................... 9 Function introduction ....................... 9 Effective range ................................ 10 External Equipment Connections ........
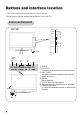
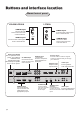
Buttons and interface location -This is a simplified representation of front panel. -Here shown may be somewhat different from your TV. Front control panel 26 ,32 TV/AV MENU VOLVOL+ CHCH+ POWER 6 7 5 4 3 2 1 Switch 37 Switch 1. Power 2.CH- /CH+ Program plus and minus, menu options 3.VOL-/VOL+ Volume increase and decrease, menu reset and entry 4.MENU Menu display 5.TV/AV: Source input select 6. Remote control signal receive window. 7.Remote Indicator In red when standby mode, in blue when Display.
Buttons and interface location Front control panel 26 ,32 TV/AV MENU VOLVOL+ CHCH+ POWER 5 4 3 2 1 Switch 37 Switch 1. Power 2.CH- /CH+ Program plus and minus, menu options 3.VOL-/VOL+ Volume increase and decrease, menu reset and entry 4.MENU Menu display 5.TV/AV: Source input select 6. Remote control signal receive window. 7.Remote Indicator In red when standby mode, in blue when Display.
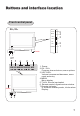
Buttons and interface location Rear Control panel L37A9A L26A9A/L32A9A VIDEO R AUDIO Input connect to hear stereo sound from an external device. L L VIDEO AUDIO VIDEO Input Connects the video signal from a video device. Power Cord Socket This TV operates on AC power. The voltage is indicated on the Specifications page. Never attempt to operate the TV on DC power. AUDIO Input connect to hear stereo sound from an external device.
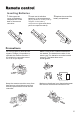
Remote control Inserting Batteries 1 .Slide open the cover of the battery compartment on the back of the remote controller. 2. Load two AA alkaline batteries in the compartment. paying attention to the polarity diagram in the battery compartment. (plus and minus poles to respective mark) 3.Replace the cover of the battery compartment. Precautions As strong light may interfere the signals, change your position to operate the remote controller if the television cannot be turned on or off as you expect.
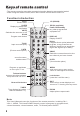
Keys of remote control - The remote controller cannot be operated unless the batteries are properly loaded. - When using the remote control, aim it at the remote control sensor on the TV. Function introduction STILL Picture static SLEEP Displaying sleep time, adjustable I/II (NICAM) PIP(No available) Power Off/Standby any other programmed equipment off. MUTE Switches the sound on or off MUTE STILL SCAN Program scan button SCAN SLEEP PIP ABC@ TV/AV Input source display P.
Remote control Effective range -Here showns may be somewhat different from your TV, is only the graphic solution, please take material object as. above 20 20 left 45 45 right below front 8m Ensure the remote control is pointed toward the remote control window on the display. No obstacles should be placed between the remote control and the remote control window.
External Equipment Connections Antenna Connection Generally speaking, to enjoy a clearer picture, we recommend that you use a CATV system or an outdoor antenna .In different places, the suitable antenna type and position are different.
External Equipment Connection NOTE: All cables shown are not included with the TV. Choose Your Connection There are several ways to connect your television, depending on the components you want to connect and the quality of the signal you want to achieve. The following are examples of some ways to connect your TV. Choose the connection which is best for you. VCR connection - To avoid picture noise (interference), leave an adequate distance between the VCR And TV. 1.
External Equipment Connections DVD connection How to connect 1 . Connect the DVD video outputs (Y, Pb/Cb, Pr/Cr) to the HDTV IN jacks on the TV and connect the DVD audio outputs to the HD-AUDIO jacks on the TV, as shown in the figure. Y Pb/Cb HD-AUDIO Pr/Cr IN2 2 . If your DVD only has an SCART output SCART2 Y/C SCART1 RGB PC/DVI AUDIO IN ANT IN IN1 Y Pb/Cb Pr/Cr HD-AUDIO jack, connect this to the SCART input on the TV. as shown in the figure. How to use 1 .
External Equipment Connections PC connection How to connect 1 . To get the best picture quality, adjust the PC graphics card to ( 1024x768),60Hz. port for video connections, depending on your PC connector. 3 . Then, make the corresponding audio connection. If using a sound card, adjust the PC sound as required. 2 . Use the TV`s PC IN How to use 1 . Turn on the PC and the TV. 2 . Use TV/AV on the remote control to select PC source. 3 . Check the image on your TV.
External Equipment Connections Connecting Headphones You can connect a set of headphones to your set if you wish to watch a TV programme without disturbing the other people in the room. Plug a set of headphones into the 3.5mm mini-jack socket on the rear panel of the set. Note Prolonged use of headphones at a high volume may damage your hearing. You will not receive sound from the speakers when you connect headphones to the system.
Set up your TV -There are several options you might need to set up in order for your TV to work properly. Read the instructions that follow. -In the manual, the OSD(on screen display) may be different from your TV`s, because it is just an example to help you with the TV operation. Switching ON/OFF the TV set 1 Please press down the power switch to switch on AC power supply and the power indicator will light .
Tuning menu This TV set has three methods to set channels, which are respectively full automatic, manual search fine tune. In this section, how to use the remote control to set channel is explained. You can also use buttons on the TV set to set channel. Automatic search 1 Press MENU button and then use CH+/button to select the TUNING menu. MENU 2 Press VOL+/- button and then use CH+/button to select Country, and use VOL+/button to set the country.
Tuning menu Manual search If excessive channel signals of unwanted programs are received in local area, manual search function is recommended. 1 2 Press MENU button and then use CH+/- button to select the TUNING menu. Press VOL+/- button and then use CH+/- button to select Tuning Program. MENU PICTURE AUDIO Tuning Program Country ADJUST Auto Search TUNING Program Table England FUNCTION 3 Press VOL+/- button to enter the submenu. TIMER 4 Press CH+/- button to select Manual Search.
Tuning menu Program Table 1 Press MENU button and then use CH+/button to select the TUNING menu. MENU 2 Press VOL+/- button and then use CH+/button to select Program Table. 3 Press VOL+/- button to enter the submenu. PICTURE AUDIO Tuning Program Country ADJUST Auto Search TUNING Program Table FUNCTION TIMER You can press CH.LIST button again to enter the submenu. 4 Press CH+/- button to select the edited channel, and press button corresponding to edit.
Tuning menu If the colour of some channel is abnormal Usually this should be set in the auto position. However if the colour displayed on the screen are incorrect, you can manually select the correct colour system. 1 Press MENU button and then use CH+/button to select the TUNING menu. 2 Press VOL+/- button and then use CH+/button to select Program Table. 3 MENU Press VOL+/- button to enter the submenu. 4 Press CH+/- button to select Color System.
Tuning menu Skip After the programs are presetting, you can skip some programs so that to select your favorite channels only. 1 Press MENU button and then use CH+/button to select the TUNING menu. 2 Press VOL+/- button and then use CH+/button to select Program Table. MENU 3 Press VOL+/- button to enter the submenu. PICTURE AUDIO Tuning Program Country ADJUST Auto Search TUNING Program Table England FUNCTION 4 Press CH+/- button to select Skip. TIMER 5 Press VOL-/+ button to set Skip as On.
Tuning menu You can watch TV program in a presetting channel. How to select the desired program 1 Using "Program number" buttons Press digit button to select the program. If 2-digit or 3-digit programs are selected , press digit buttons you needed continuously within 3 seconds . If selected channel program is set at Lock on mode and no password has been entered after initiation of the television, the screen will indicate require password entry.
Picture Adjustment The TV menu gives you an overview of the menus you can select. Note: Depending on the input signal, one or more menu items may not be selectable. picture modes The picture mode provides the pre-defined images settings. Press the P.STD button to select the option.
Sound Adjustment Sound modes The sound mode provides the pre-defined sound settings. Press the S.STD button to select the option.(Music/Personal/Standard/Hall) This select the modes for sound reproduction dependent on the broadcast signals or signals from external inputs received. Press CH+/- button to Select Audio Mode, press VOL+/- button to select the Music Personal Standard or Hall.
Sound Adjustment Eliminate sound When you need to pay attention to surrounded sounds, or there is a telephone calling you or there are some guests visiting you, the sound elimination (mute) function is very convenient. 1 Press the MUTE button on the remote control and "Mute" type face will display on the lower part of the screen. At this time, the sound of the TV set is turned off. 2 If you want to recover the sound, press the MUTE button again or directly press VOL+ button.
Time Setting Clock setting The clock will only work if the TV set is turned on or in standby. When the set is disconnect from the power supply or is turned off by the main power, the clock loses power and will need to be reset when the power is reconnected. 1 Press MENU button and then use CH+/button to select the TIMER menu. 2 Press CH -/+ button to select the Clock option.
Function menu It is possible to select language, OSD transparent, Menu Timer and Calendar of the menu as follows: Function setup 1 Press MENU button and then use CH+/button to select the FUNCTION menu. 2 Press VOL+/- button and then use CH+/button to select the desired option. MENU PICTURE AUDIO 3 Press VOL+/- button to adjust the option you have selected.
Adjust menu The TV menu gives you an overview of the menus you can select. Note: Depending on the input signal, one or more menu items may not be selectable. Adjustment Setup When PC input mode is set 1 Press MENU button and then use CH+/- button to select the ADJUST menu. 2 Press VOL+/- button and then use CH+/button to select the desired option. 3 Press VOL+/- button to adjust the option you have selected.
Adjust menu In PC input mode, H-Position and V-Position can be adjusted to eliminate transverse line interference and decentered picture as follows: Adjust This is used for adjusting H Position and V Position as well as relative parameters in PC and modes.(Phase Adjust is not available in HDMI) 1 Press MENU button and then use CH+/button to select the ADJUST menu. 2 Press VOL+/- button and then use CH+/button to select Adjust option.
Lock setup The television has the function of security default lock. Password needs to be entered when the program lock mode is to be set. Lock setup Press H.LOCK button on remote control, Password will appear on the screen. If password is correctly entered, the LOCK menu will be displayed. If the password is not correctly entered, you will be required to reenter the password and the cursor will remain onscreen. Press EXIT to exit the window.
Lock setup Prog Num Prog Num is opted for setting up preset channel. Press CH+/- button to select Prog Num. Press VOL+/- button, to select channel number.(The item is not available except TV signal.) Source Lock Source Lock is opted to hinder external input modes, such as AV, Scart and PC. Press CH+/- button to select the option, and press VOL+/- button to display Source Lock menu. Press CH+/- button to select desired option. Press VOL+/button to set up the mode of Source Lock.
Other functions NICAM If the broadcaster is transmitting Bilingual sound service. The / button on the remote controller will allow up to 2 separate languages to be selected. You can press the / button to make a choice. Display function If current program number, color system and sound system are to be displayed on the screen, press DISPLAY button, and all the related information will appear at right up corner of the screen. If the DISPLAY button is pressed again, the displayed information will disappear.
Teletext functions Teletext is an information system, broadcast by certain channels, which can be read like a newspaper . It also provides subtitles for people with hearing difficulties or those who are unfamiliar with the language in which a particular programme is being broadcast (cable networks, satellite channels, etc.). Teletext function operation MUTE STILL SCAN SLEEP PIP ABC@ DISPLAY DEF GHI$ JKL% MNO POR& STUV WXYZ TV/AV *#() SWAP P.
Teletext functions (MIX) While in Teletext mode press the button will show the teletext data superimposed on top of the TV picture. Press the button again to revert back to Full text. (HOLD) Pressing the button will stop the teletext page automatically updating. This feature is very useful where there are several teletext pages or data on the same page number. (ZOOM) Pressing the button to change from different screen display size.
Maintenance - Early malfunctions can be prevented. Careful and regular cleaning can extend the amount of time you will have your new TV. Be sure to turn the power off and unplug the power cord before you begin any cleaning. Cleaning the Screen 1 . Here`s a great way to keep the dust off your screen for a while. Wet a soft cloth in a mixture of lukewarm water and a little fabric softener or dish washing detergent. Wring the cloth until it`s almost dry, and then use it to wipe the screen. 2 .
Specifications and functions L26A9A L32A9A 1366X768(Dot) L37A9A 1366X768(Dot) 1366X768(Dot) ~150-240V , 50/60Hz PAL, SECAM, NTSC D/K,I,B/G,L,L Sound System External Antenna Impedance 75 ohm 5 20% 5% Storage Humidity Size (WxDxH) unit: mm main component Net Weight(Kg) 35 80% -15 Storage Temperature Model , L26A9A 679 246 12.
Troubleshooting For the sake of time and cost, it is strongly recommended that you check out the problem by yourself according to the instructions listed hereunder before contacting the after-sales service for technical assistance. No picture, no sound Verify if the television is properly plugged. Verify if the television is properly supplied power. Verify if electricity is available. Blank screen Verify if correct signals are input. Press TV/AV button to change signal input to TV input.
0090508429A 01