LCD TV RECEIVER USER’S MANUAL Please read this manual carefully before using your television and keep this manual In a good place for future reference.
TABLE OF CONTENT FOR YOUR SAFETY......................................................................................... 2 PRECAUTIONS AND REMINDERS............................................................ 3 IMPORTANT SAFETY INSTRUCTIONS.................................................... 4 PACKAGE CONTENTS.................................................................................. 5 PREPARATION..................................................................................................
SYMBOL SA 1965 SA 1966 SYMBOL DEFINITION DANGEROUS VOLTAGE: The lightning flash with arrowhead symbol, within an equilateral triangle, is intended to alert the user to the presence of uninsulated “dangerous voltage” within the product’s enclosure that may be of sufficient magnitude to constitute a risk of electrical shock to persons.
PRECAUTIONS AND REMINDERS Place unit on even surfaces. Unplug immediately if other foreign materials are put inside TV box or if the TV fell down. Do not cover or block any vents and openings. Inadequate ventilation may shorten the life of the display unit and cause overheating. Unplug immediately if is malfunction like no picture, no video/audio, smoke and bad odor from TV. Prohibit/Avoid opening TV cabinet. Avoid direct sunlight, dusty, high humidity and smoky areas.
IMPORTANT SAFETY INSTRUCTIONS Read before operating equipment 1. Read these instructions. 2. Keep these instructions. 3. Heed all warnings. 4. Follow all instructions. 5. Do not use this apparatus near water. 6. Clean only with a dry cloth. 7. Do not block any of the ventilation openings. Install in accordance with the manufacturers instructions. 8. Do not install near any heat sources such as radiators, heat registers, stoves, or other apparatus (including amplifiers) that produce heat. 9.
21. Wall or Ceiling Mounting – The appliance should be mounted to a wall or ceiling only as recommended by the manufacturer. 22. Power Lines – An outdoor antenna should be located away from power lines. 23. Outdoor Antenna Grounding – If an outside antenna is connected to the receiver, be sure the antenna system is grounded to provide some protection against voltage surges and built up static charges. Section 810 of the National Electric Code, ANSI/NFPA No.
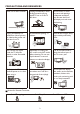
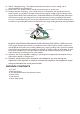
PREPARATION For 32" model IMPORTANT: Do not apply pressure to the screen display area which may compromise the integrity of the display. The manufacturer’s warranty does not cover user abuse or improper installations. PREPARING YOUR LCD HDTV FOR WALL MOUNTING For 42" model We suggest that you keep your TV at least 2.36 inches (60 mm) from the wall to prevent cable interference. Before mounting your TV on the wall, you need to remove the base.
flame sources, such as lighted candles, should be placed on or in the vicinity. Avoid heat, direct sunlight and exposure to rain or water. The equipment shall not be exposed to dripping or splashing. The TV will be turned on in a minute with display on the screen. Power Key 2. Connect the antenna cable or CATV cable to the aerial socket TV ANTENNA at the back of the TV set. Vol 3. Remote control: Remove the cover of the battery compartment. Insert the 2 batteries supplied (Type AAA 1.5V). USB 4.
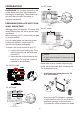
PERIPHERAL CONNECTION GUIDE ⑨ 19-32 AC POWER 26/32 ⑭⑫ ⑩⑨ ⑪ ⑧ ⑦ 42 ① COMMON INTERFACE 19/22 ① R ② ③ ④ ⑤ 42 AUDIO L VIDEO ⑤ ⑥ ⑭⑫ ⑨⑩ ⑪ ⑧ ⑬ ⑦ ② ③ ④ ⑥ ⑮ HDMI 3 ⑫ ⑩ ⑪ ⑧ ⑬ ⑦ ① COMMON INTERFACE (CI) – Conditional Access Module (CAM) use only. Please contact your service provider for details. ②、③、④ AV IN – Connect the primary source for composite video devices, such as a VCR or video game. Use the white and red connectors to connect the external audio from the same source.
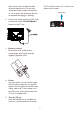
OPERATING INSTRUCTIONS TO USE THE FRONT PANEL CONTROL 1 2 3 4 5 6 7 1 VOL + VOL +: Press to increase the sound volume level. 2. VOL - VOL - : Press to decrease the sound volume level. 3. CH ▲ CH ▲: Press to select the next higher Programme number. 4. CH ▼ CH ▼: Press to select the next lower Programme number. 5. MENU Menu key: Press to open or exit the OSD (on-screen display) menu. 6. INPUT Input key: Press to select the input source. 7.
TO USE THE REMOTE CONTROL POWER Press to turn ON/OFF (standby) the TV. ZOOM Select the display aspect from Auto, Normal (4:3), Wide (16:9), subtitle, full screen, or 14:9 mode. SOURCE Press repeatedly to choose the various input sources. DUAL Press to select from mono, stereo, Dual I, or Dual II. Number buttons Press to enter TV channel number to select channel. AUDIO ADJ Press to choose from Personal, Speech, Music. EPG Press to display the Electronic Programme Guide.
TELETEXT Press to display or close the Teletext. Vol MIX Display the Teletext with TV. SIZE Press to change the font size: Full screen, Top half and Bottom half. SUBPAGE Display the sub page (when available). INDEX Press to return to page 100 or the index page. SUBTITLE • In TV mode: It works only for turning on the subtitle and change to the next page marked as subtitle. • In Text mode: Select the next page marked as a subtitle page and request it as the display page.
VIEWING MODE ILLUSTRATIONS Normal Mode The original content would be at the centre of the screen. 16:9 Content 4:3 Content Wide Mode The original content in this mode has to fill the entire screen of the display. 16:9 Content 4:3 Content ZOOM Mode For those wide format images which are originally programmed into 4:3 frames with black bars around, this mode would stretch the image in both width and height for full display with active data.
42" CONNECTING EQUIPMENT Coaxial (RF) Using Your Antenna or Digital Cable for DTV. 19"/22"/26"/32" 1. Turn off the HDTV. 2. Connect the coaxial (RF) connector from your antenna or cable (out-of-the-wall, not from the Cable Box) to the TV ANTENNA connector at the rear of the HDTV 3. Turn on the HDTV. 42" 4. Select ATV/DTV using the SOURCE button on the remote control or the control key on the side of the TV. Using the Antenna or Cable for your VCR 19"/22"/26"/32" 1. Turn off the HDTV. 2.
4. Select HDMI using the SOURCE button on the remote, side of the HDTV, or directly by pressing the HDMI button on the Remote Control. 4. Select ATV/DTV using the SOURCE button on the remote control or the control key on the side of the TV. NOTE NOTE The HDMI input on the HDTV supports High-bandwidth Digital Content Protection (HDCP). HDCP encrypts the transmission between the video source and the digital display for added security and protection.
Using Component Video 7. Select YPbPr using the SOURCE button on the remote, side of the HDTV or directly by pressing the YPbPr button on the Remote Control. Connecting your HDTV Set-Top Box (Better): 19"/22"/26"/32" NOTE Refer to your HDTV Set-Top Box user manual for more information about the video output requirements of the product or consult your cable or satellite operator. Connecting Your Basic Set-Top Box 42" Using Composite Video 1. Turn off the HDTV and HDTV Set-Top Box. 1.
19"/22"/26"/32" Connecting your DVD Player (Best) 19"/22"/26"/32" 42" 42" 1. Turn off the HDTV and Set-Top Box. 1. Turn off the HDTV and DVD player. 2. Using a Coax (RF) cable, connect one end to the TV OUT (RF) on your Set Top Box and the other end to the TV input at the rear of the HDTV. 2. Connect a HDMI cable to the HDMI output of your DVD player and the other end to the HDMI Input at the rear of the HDTV. 3. Turn on the HDTV and Set-Top Box. 4.
Using Component Video 7. Select YPbPr using the SOURCE button on the remote, side of the HDTV or directly by pressing the YPbPr button on the Remote Control. Connecting your DVD Player (Better) 19"/22"/26"/32" NOTE Refer to your DVD player user manual for more information about the video output requirements of the product. Using SCART (19”/22” only support one scart) Connecting your DVD Player (Good): 42" 19"/22"/26"/32" 1. Turn off the HDTV and DVD player. 42" 2.
Using Composite (AV) Video 1. Turn off the HDTV and VCR or Video Camera. Connecting your DVD Player (Good) 2. Connect the SCART socket of your VCR or Video Camera to the SCART socket of the HDTV. 3. Turn on the HDTV and VCR or Video Camera. 4. Select AV using the SOURCE button on the remote, side of the HDTV or directly by pressing the VIDEO button on the Remote Control. NOTE Refer to your VCR or Video Camera user manual for more information about the video output requirements of the product. 1.
setting from Standard,Vivid, Movie, Eco, or Personal. the remote, side of the HDTV or directly by pressing the PC button on the Remote. 2. Brightness: To brighten the dark parts of the picture. NOTE 3. Contrast: To sharpen the picture quality. F or the best picture quality when connecting a computer through VGA, set your computer timing mode to native resolution of panel.
SOUND MENU 6. AVL: Choose On or Off to adjust volume to be consistent across programmes and channels automatically. The Sound menu provides audio adjustment for user to modify the audio setting. Picture Sound TV Features Parental OK Enter Picture Sound TV Sound Mode Equalizer 120Hz Equalizer 500Hz Equalizer 1.5KHz Equalizer 5KHz Equalizer 10KHz Balance Virtual Surround Digital Audio Out Select SPDIF Delay AVL Type The following functions are only available for digital channels with audio signals. 7.
3. 1st and 2nd Audio: Use this function when two or more audio languages are broadcast. This is the language to be used for digital channels if it is available. [Channel skip] - To prevent certain programs from being viewed by pressing CH + / - buttons on the remote control, the program position can be skipped. 4. Channels: Enter the channels submenu, and choose from Channel Scan, Update Scan, Single RF Scan, Analog Manual Scan, Channel Skip, Channel Sort, Channel Edit, Decoder, and Analog CH Fine Tune.
teletext language to the regional location. Picture Menu Language English Sound Picture Format Wide TV Subtitle Time Features Teletext Language Parental Reset Default OK Enter 6. Common Interface: This menu appears with your CI supplier information. 7. HDMI Scan Info (HDMI only): [Automatic] - Set to underscan or overscan automatically when the video signal is detected.
Tip: Remember that 5351 is the default Change Password code. If your access code has been changed or you have forgotten the code, you can always get in by inputting the default code. 5. Clear All: To clear all the settings in the parental submenu. Menu Language English Sound Picture Format Wide TV Subtitle Time Features Teletext Language Parental Reset Default OK COMMON INTERFACE MODULE - Picture Common Interface Enter Select EXIT fig. 63 Exit 3.
Over Air Download Picture Software ID : XXXXXXXX No CI card presented. A New Version of software is detected.Do you want to upgrade it? Sound TV Features Accept Remind me Later Parental Select EXIT Back Next 2. Press ▲ ▼ to confirm if you would like to “Accept” this new software or “Reject “ and use ► button to action update new software. fig. 67 5. When module is removed, the “Common Interface” menu will disappear from the screen.
TIPS 3. After the programming , please use ▲ ▼ to confirm if you would like to restart the TV. The software will be updated completely after restart the TV. Care of the screen Do not rub or strike the screen with anything hard as this may scratch, mar, or damage the screen permanently. Unplug the power cord before cleaning the screen. Dust the TV by wiping the screen and the cabinet with a soft, clean cloth. If the screen requires additional cleaning, use a clean, damp cloth.
PRODUCT SPECIFICATION NOTE * This model complies with the specifications listed below. * Designs and specifications are subject to change without notice. * These models may not be compatible with features and/or specifications that may be added in the future. Model No. LT19A1 LT22A1 LT26A1 LT32A1 LT42A1 32” 42” DISPLAY Viewable 18.
WALL MOUNTING VESA-compatible wall bracket (W x H) 100x100 mm Screw type Metric 4x10 mm Metric 4x10 mm Metric 4x10 mm Metric 6x10 mm Metric 6x10 mm 100x100 mm 200x100 mm 200x200 mm 400x200 mm POWER Power Consumption 50W 55W 120W 130W 200W Standby < 1W Mains Power AC100-240V~, AC100-240V~, AC220-240V~, AC220-240V~, AC220-240V~, 50/60Hz 50/60Hz 50/60Hz 50/60Hz 50/60Hz Audio Power 3W + 3W 3W + 3W 5W + 5W 5W + 5W Ambient Temperature 5°C - 35°C PACKAGE CONTENTS Supplied Accessories TV unit
BEFORE CALLING SERVICE Please make these simple checks before calling service. These tips may save you time and money since charges for receiver installation and adjustments of customer controls are not covered under your warranty. Symptoms Items to Check and Actions to follow “Ghost ” or double image * This may be caused by obstruction to the antenna due to high rise buildings or hills. Using a highly directional antenna may improve the picture.
GLOSSARY HDTV HDTV displays are technically defined as being capable of displaying a minimum of 720p or 1080i active scan lines. HDMI Inputs High-Definition Multimedia Interface Audio / Video Inputs Located on the rear of the receiver, these connectors (RCA phono type plug) are used for the input of audio and video signals. Designed for use with VCRs (or other accessories) in order to receive higher picture resolution and offer sound connection options.
APPENDIX Appendix 1 VGA Timing table Item H.Freq.(KHz) Mode Resolution V.Freq.(KHz) 1 31.469 IBM VGA 640x350 70.086 2 31.469 IBM VGA 720x400 70.087 3 31.469 IBM VGA 640x480 59.94 4 35 MACINTOSH 640x480 67 5 37.861 VESA 640x480 72.809 6 37.5 VESA 640x480 75 7 35.156 VESA 800x600 56.25 8 37.879 VESA 800x600 60.317 9 48.077 VESA 800x600 72.188 10 46.875 VESA 800x600 75 11 49.7 MACINTOSH 832x624 75 12 48.363 VESA 1024x768 60.004 13 56.
Appendix 2 HDMI (High Definition Multimedia Interface) support format 1. Support 480i/480p, 576i/576p, 720p, 1080i, 1080p(42"only) format with HDCP. 2. Digital interface with 4 channels TMDS signal.
SPECIFICATIONS INFORMATION Connecting to Power Check that the voltage marked on the product corresponds with your supply voltage. This product is fitted with a 16A plug (Or 10A Plug). If this plug is unsuitable or needs to be replaced, please note the following : Plug Replacement If you need to replace the fitted plug. WARNING : Never connect live or neutral wires to the earth terminal of the plug. Only fit an approved 16A plug . If in doubt, consult a qualified electrician.
33
34
Q41G19MV672 1A