Deluxe Aluminium Pet Door Product codes: #1162, #1166, #1167, #1168, #1169, #1170, #1171, #1172 IMPORTANT! READ AND FOLLOW THESE INSTRUCTIONS CAREFULLY AND KEEP FOR FUTURE REFERENCE.
WARNINGS WARNING Please read these cautions and notes carefully before attempting installation. For any questions or concerns, contact Customer Support at www.hakunapets.com/help. If your home has children as well as pets it is important to remember that children can misuse the pet door and gain access to potential hazards on the other side. You may contravene municipal laws and be found guilty of an offence if there was a swimming pool on the other side of the pet door.
PARTS LIST / TOOLS REQUIRED Parts List A. Inner door frame F B. Outer door frame C. Locking cover D D. 4 x Metal screws E. 2 x Partition large F.
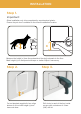
INSTALLATION Step 1. Important: Glass installation only to be completed by a professional glazier. Ensure the pet door is suitable for the chosen installation location. X X Measure the height (x) from the underside of the dog’s stomach to the floor. Mark height (x) on door/panel with tape or similar. Adjust if necessary. Step 2. Step 3. X Cut out template supplied in box, align bottom of cut out with height (x) and trace onto door.
INSTALLATION Step 4. Step 5. Using a reciprocating jigsaw, cut out the opening, cutting along the pencil outline. Insert outer frame into opening and mark screw holes. Drill each of the screw holes using a 8mm (5/16”) drill bit. Step 6. X Measure the thickness of the door/panel and add 10mm (3/8”) (x) so the tunnel protrudes 5mm (3/16”) on each side. If required, cut partitions down to correct size.
INSTALLATION Step 7. Fit all four partitions into outer door frame, use duct tape to secure the corners then place into opening. Step 8. Screw inner door frame into door/panel. Tighten with a Phillips headscrew driver. If screws protrude, trim using a hacksaw. WARNING: Over tightening of screws will cause damage. Take care when trimming bolts to size as cutting on an angle may cause sharp edges or damage to the frame.
SECURITY SCREEN INSTALL Step 1. Important: If installing into a sliding door, check pet door does not interfere with door operation or any other doors. Take the measurements needed to cut the opening by following Steps 1-3 of the previous instructions. Using an angle grinder, cut out the opening. Step 2. X X Measure the thickness of the door/panel and add 10mm (3/8”) (x) so the tunnel protrudes 5mm (3/16”) on each side. If required, cut partitions down to correct size.
SECURITY SCREEN INSTALL Step 3. Fit all four partitions into outer door frame, use duct tape to secure the corners then place into opening. If the security screen has insect mesh, place a bead of construction silicon around the internal section of the pet door and on the mesh surface. Apply this around the cut out in order to hold the mesh in place when both frames are joined. Step 4. Outside Inside Insert inner door frame into security screen. If screws protrude, trim using a hacksaw.
GLASS DOOR INSTALL Step 1. Important: Contact a professional glazier to cut out the opening for the pet door. If installing into a sliding door, check pet door does not interfere with door operation or any other doors. Refer to Steps 1 and 2 of “Installation”. Place a bead of construction silicon around the internal section of the pet door and on the surface around the cut out to provide a weather seal. Tunnel partitions will need to be cut to size as per Step 6 of “Installation”. Step 2.
LOCKING SECURITY PANEL Step 1. You can control your pet’s access using the locking security panel. Simply slide the panel into the channel on the inside frame until latch clips over the bottom of the frame.
FLAP ADJUSTMENT & REPLACEMENT Flap Adjustment 1. Loosen screws on flap holder. 2. Adjust flap up or down to desired height, for less noise or magnet strength adjust the flap to a higher position. 3. Ensure flap is parallel with lower frame. 4. Tighten flap holder screws. Flap Replacement 1. Loosen screws on flap holder. 2. Use a flat blade screwdriver to pry open the flap holder. 3. Replace flap and close flap holder, press until you hear a click. 4.
TRAINING Before starting your training, assess whether your dog would be more motivated to come inside through the pet door or go outside through it. If your dog loves being inside the house, you should start this training with them outside. If they’re always excited to get outside, start with them inside the house. 1. With your dog on one side of the pet door and you on the other, lift the flap of the pet door all the way up and call them, using an excited voice.
WARRANTY CERTIFICATE Congratulations! You have made an excellent choice of this quality product. Our commitment to quality also includes our service. Should you, contrary to expectations, experience defects due to manufacturing faults, we will provide you with a warranty against defects as follows: WARRANTY The product is guaranteed to be free from defects in workmanship and parts for a period of 3 years from the date of purchase.
Thankyou ! for making a purchase with Hakuna Pets. Providing our customers with a positive experience is our #1 priority and we value your feedback. If you have anything less than 5 star satisfaction or you require any assistance with spare parts please contact us directly at: www.hakunapets.