
Installation Guide


Halco Lighting Technologies | 2940 Pacic Drive | Norcross, GA 30071 | Toll Free 800.677.3334 | Phone 770.242.3612 | Fax 800.880.0822 | halcolighting.com | Atlanta | Carlstadt | Cleveland | Houston | Los Angeles | Phoenix
© 2016 Halco Lighting Technologies, LLC. All rights reserved. Halco is a registered trademark of Halco Lighting Technologies. All sizes and specications are subject to change. 06-22-16.
INSTALLATION INSTRUCTIONS Continued:
6. Connect the Orange connectors together (see FIG. 4B).
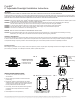
7. Insert torsion springs into luminaire housing brackets
(see FIG 5).
8. Gently push up trim and torsion springs so they begin
to expand and lift trim in place (see FIG. 6).
INSTALLATION into Existing Recessed LED Luminaire with Compatible orange connectors:
1. Turn OFF Power at switch and fuse box or circuit breaker
2. Remove existing trim installed in recessed luminaire (if necessary).
3. Discard medium base adapter.
4. Connect the orange connectors together (see FIG. 2B).
5. Insert torsion springs into luminaire brackets (see FIG. 2A).
6. Gently push up trim and torsion springs so they begin to expand and lift trim in place (see FIG. 3).
Min. Lamp Compartment Dimensions
135mm (53/8 in) DIA X 190mm (71/2 in) HEIGHT When used in
5 inch recessed Luminaire
Min. Lamp Compartment Dimensions
188mm (7.4 in) DIA X 111mm (4.4 in) HEIGHT When used in
6 inch recessed Luminaire
FIG. 4B Connect the orange
connectors
FIG. 2B Connect the orange
connectors
FIG. 1B Diagram of recessed luminaire
FIG. 6
FIG. 6
FIG. 4A
FIG. 1A
FIG. 5
FIG. 2A
Terminals
THE ADJUSTABLE KIT IS ACCEPTED AS A COMPONENT
OF THE LUMINAIRE WHERE THE SUITABILITY OF THE
COMBINATION SHALL BE DETERMINED BY UL OR
AUTHORITIES HAVING JURISDICTION.