
Installation Guide


© 2018 Halco Lighting Technologies, LLC. All rights reserved. Halco and ProLED are registered trademarks of Halco Lighting Technologies. All sizes and specications are subject to change. Print Edition 12-18-18.
Halco Lighting Technologies | 2940 Pacic Drive | Norcross, GA 30071 | Toll Free 800.677.3334 | Phone 770.242.3612 | Fax 800.880.0822 | halcolighting.com | Atlanta | Carlstadt | Cleveland | Houston | Los Angeles | Phoenix
STRIP LIGHT
Installation Instructions
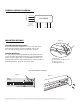
LED DRIVER
BLACK (Line)
WHITE (Neutral)
GREEN (Grd)
120-277V
Blue (-)
Red (+)
Purple (Dim+)
Grey (Dim-)
Dimming Wire
to 0-10v IEC
complaint control
Lead wire to LED load
GENERAL WIRING DIAGRAM
CHAIN MOUNTING WITH V-HOOK
Attach manufacturer-supplied V-hooks to each end of the
luminaire base. Attach customer-supplied chain to the
V-hooks and mounting surface. As shown in point B.
SURFACE MOUNTING
For easy surface mounting installation, remove the lens and
secure the luminaire base by inserting customer-supplied #8
anchor screws toggle bolts, or other suitable fasteners into
V-hook/surface mount slots or keyhole slot on the top side of
the luminaire base. As shown in point B and C.
MOUNTING OPTIONS
A: End Cap
B: V-Hook/Surface Mount Slots
C: Keyhole Slots
D: Wiring Knockouts
Figure 1
Figure 2
Figure 3
D
A
B
C
B
Easy Surface Mount Installation
– – – – – – – – – – – – –
– – – – – – – – – – –
STRIP LIGHT
Installation Instructions
LED DRIVER
BLACK (Line)
WHITE (Neutral)
GREEN (Grd)
120-277V
Blue (-)
Red (+)
Purple (Dim+)
Grey (Dim-)
Dimming Wire
to 0-10v IEC
complaint control
Lead wire to LED load
GENERAL WIRING DIAGRAM
CHAIN MOUNTING WITH V-HOOK
Attach manufacturer-supplied V-hooks to each end of the
luminaire base. Attach customer-supplied chain to the
V-hooks and mounting surface. As shown in point B.
SURFACE MOUNTING
For easy surface mounting installation, remove the lens and
secure the luminaire base by inserting customer-supplied #8
anchor screws toggle bolts, or other suitable fasteners into
V-hook/surface mount slots or keyhole slot on the top side of
the luminaire base. As shown in point B and C.
MOUNTING OPTIONS
A: End Cap
B: V-Hook/Surface Mount Slots
C: Keyhole Slots
D: Wiring Knockouts
Figure 1
Figure 2
Figure 3
D
A
B
C
B
Easy Surface Mount Installation
– – – – – – – – – – – – –
– – – – – – – – – – –