
Installation Guide


Halco Lighting Technologies | 2940 Pacic Drive | Norcross, GA 30071 | Toll Free 800.677.3334 | Phone 770.242.3612 | Fax 800.880.0822 | halcolighting.com | Atlanta | Carlstadt | Cleveland | Houston | Los Angeles | Phoenix
© 2017 Halco Lighting Technologies, LLC. All rights reserved. Halco is a registered trademark of Halco Lighting Technologies. All sizes and specications are subject to change. 06-01-17.
J-BOX (Min Volume:18 in
3
, min Length: 3.25 in, Height: 2.20 in)
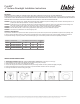
1. Before installation, cut the wires of installation harness close to the socket adaptor (see g#1).
2. Next make 2 pigtail connections. The black j-box wire (hot wire) should be connected to the black pigtail wire of the installation harness. The white
j-box wire (neutral wire) should be connected to the white pigtail wire (see g#2).
3. On the back of the downlight, press the two clips towards the center and remove bracket from clips.
4. Fasten the bracket to the j-box. If necessary, use a drill. Note the #6 pointed screws may also be used as a replacement for the bracket screws (see
g#3).
5. The green ground wire that is attached to the xture should be cut at the end and the insulation stripped back ½”. Attach ground wire to housing.
6. Finally, make the connection between the male (installation harness) and female (surface downlight) orange connectors(see g#4) Carefully push all
connections into the j-box.
7. Push the downlight into the j-box, making sure the clips snap into the bracket (see gure#5).
8. The downlight should be ush with the ceiling (see g#6).