
Instructions / Assembly


Installation instructions
CAUTION: Always turn off power at fuse box or circuit breaker before
removing or installing any light fixture.
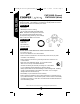
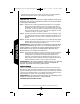
Step 1: This mounting plate has been designed to work with a variety of
different junction boxes. Line up the knockout holes in the mounting
plate with the screw bosses in your junction box. Drill out the matching
holes in the mounting plate using an electric drill and a 1/8˝ drill bit or
knock out the holes with a punch and hammer.
Step 2: Take the gasket included with this mounting plate and position it
behind the mounting plate. Line up the screws in the mounting plate
with the appropriate hole pattern in the gasket and remove gasket
material in those holes.
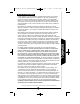
Step 3: Connect lampholder wires to supply wires from house (white to white
and black to black) using wire nuts.
WARNING: Fixture should be installed by persons with experience in
household wiring or by a qualified electrician. The electrical system,
and the method of electrically connecting the fixture to it, must be in
accordance with the National Electrical Code and building codes.
Step 4: Attach the mounting plate to your junction box using the screws included
with your junction box, making sure that the gasket is properly aligned
and that all screws are tightly secured. To prevent moisture from
entering the junction box, apply a bead of silicone sealant around the
edge of the mounting plate where it attaches to the junction box.
WARNING: Do not touch fixture during use as the fixture housing gets
extremely hot. Turn off fixture and allow to cool before replacing bulb.
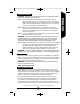
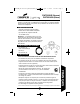
Aiming the light
Position each fixture head and tighten the nuts to the faceplate. For additional
aiming, loosen the knob at the elbow joint of the light head. Tilt fixture head up
or down to desired position, then retighten knob. Fixture heads must be aimed
down a minimum of 15 degrees below horizontal.
WARNING: Deviation from the assembly instructions may result in a
risk of fire or electric shock.
SAVE THESE INSTRUCTIONS.
Two-year limited warranty
Cooper Lighting, LLC (“the Company”) warrants this product (the “product”)
against defects in material or workmanship for a period of two years from date
of original purchase, and agrees to repair or, at the Company’s option, replace a
defective product without charge for either replacement parts or labor during
such time. This does not include labor to remove or install fixtures.
This warranty is extended only to the original purchaser of the product. A
purchasers receipt or other proof of date of original purchase acceptable to
the Company is required before warranty performance shall be rendered.
This warranty only covers product failure due to defects in materials or work-
manship which occurs in normal use. It does not cover the bulb or failure of the
3
ENGLISH
Call for customer service and/or missing or damaged parts (800-334-6871)
PWT250BR_WH 825-0156.qxd:PWT250PCW_PC I.S. 325-.qxd 5/19/08 5:45 PM Page 3