Digital Photo Frame Digitaler Bilderrahmen Operating Instructions Bedienungsanleitung Mode d‘emploi Instrucciones de uso Istruzioni per l‘uso Gebruiksaanwijzing Instrukcja obsługi Használati útmutató Návod k použití Návod na použitie Manual de instruções Manual de utilizare 00095290 00118560 00118548 00118551 00118577 GB D F E I NL PL H CZ SK P RO
A GB 10 B 3 9 8
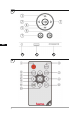
Design and functionality A A: Digital picture frame – Control and connection panel 1 ∧ 2 3 < > 4 ►II 5 ∨ 6 Control button up / switch to next file VOL– / left control button VOL+ / right control button Play/Pause / OK/ENTER button Control button down / switch to previous file ESC / back button MENU = 2x 7 ON/OFF button 8 SD/MMC/SDHC card slot USB (type A) Socket for power supply adapter 9 10 B B: Remote control 1 POWER ON/OFF 2 SETUP EXIT to system settings 3 ROTATE Rotate photo
Contents 1. Explanation of Warning Symbols and Notes ........................................... 6 2. Package Contents........................... 6 3. Safety Instructions ......................... 6 4. Defective Pixels .............................. 7 5. Getting Started............................... 8 5.1 Setting up ..........................................8 5.2 Wall mounting ...................................8 5.3 Inserting or changing the battery.......9 GB 5.4 Connecting the power supply............
Thank you for choosing a Hama product. Take your time and read the following instructions and information completely. Please keep these instructions in a safe place for future reference. If you sell the device, please pass these operating instructions on to the new owner. 1. Explanation of Warning Symbols and Notes Warning This symbol is used to indicate safety instructions or to draw your attention to specific hazards and risks.
Warning - Batterien • Immediately remove and dispose of dead batteries from the product. • Only use batteries (or rechargeable batteries) that match the specified type. • When inserting batteries, note the correct polarity (+ and - markings) and insert the batteries accordingly. Failure to do so could result in the batteries leaking or exploding. • Do not overcharge batteries. • Keep batteries out of the reach of children.
5. Getting Started 5.1 Setting up • Screw the foot into the threaded hole on the back of the device. • Remove the protection foil from the display. • Set the product on a flat, level surface where it will not slip. • Do not place any other objects on top of the device. 5.2 Wall mounting Alternatively, you may use the threaded hole on the back of the device to mount it to the wall using a VESA-compatible wall bracket. VESA specification in the corresponding technical data.
5.3 Inserting or changing the battery • Open the battery compartment of the remote control • Insert a type CR2025 button cell battery, observing polarity. • Remove the contact breaker strip from the battery if present. • Close the battery compartment. Make sure that the cover closes easily and tightly. 2 1 GB 5.4 Connecting the power supply Warning • Only connect the product to a socket that has been approved for the device. The socket must be installed close to the product and easily accessible.
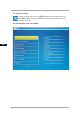
6. Operation 6.1 Using the menu The device is equipped with a user-friendly menu. The menu appears on the screen. The following types of storage media can be read: • SD/SDHC - cards (up to 32 GB) • USB storage media Switch on the device by pressing the ON/OFF switch GB You open the main menu using the [MENU] button. In the menu, use the [◄][►] buttons to move around, and select the desired function. When you confirm your selection by pressing [OK], a corresponding submenu appears.
6.
Language Select the desired language menu/operating language Photo Sequence Function menu for setting the picture sequence: either random or sorted by name Slide Mode Function for displaying up to four images simultaneously Slide Speed Select the time interval at which the images change Photo Effect Select between three photo colour effects: colour, monochrome, or sepia Slide Effect Function menu for setting the image transitions Photo Mode Adjust the photo to fit the screen Display Set the b
7. Functions 7.1 Photos The device starts a photo slide show automatically when a storage medium is inserted. If no storage medium has been inserted, the device uses the photos stored on the internal memory. You can navigate in the photo menu as follows: • Use the [◄][►][▲][▼] buttons on the device or remote control to select the symbol and then press [OK]. • In the default setting, the device displays the slide show upon start-up.
7.2 Calendar Use the [◄][►][▲][▼] buttons on the device or remote control to select the symbol and then press [OK]. GB You can perform the following functions: • You can change the year using the [◄][►] buttons. • You can change the month using the [▲][▼] buttons. NOTE • You can make additional changes to the settings in the calendar settings menu.
7.3 Folder Use the [◄][►][▲][▼] buttons on the device or remote control to select the symbol and then press [OK]. GB Use the [▲][▼] buttons to select a file and then press the [►] button on the remote control or 3 on your device. A new menu window appears. You can use this window to save all of the files from the storage medium in the internal memory. • Select Ja / Yes and then press [OK] to transfer the selected file from the storage medium to the internal memory.
8. Additional functions 8.1 Slide show variations 8.2 Causes of errors and error rectification The following table can be used to localise and rectify minor errors with the device: General information Error DPF General information Display is blank Device turns off No image appears Possible cause Solution Device is switched off Switch on the device. Power supply adapter not connected correctly Ensure that the power supply adapter is plugged in and connected to the device.
9. Care and Maintenance The display on your device is located behind protective glass. • Only clean the display with a dry, soft cloth. • Do not apply pressure to the screen surface when you clean the device. • To keep from damaging the surface, do not use solvents or alcohol-based cleaners to clean the device. Note For gentle cleaning and care of the display, we recommend that you use a microfibre cleaning cloth. • Clean the rest of the device with a dry cloth.
12. Technical specifications Note We reserve the right to make technical and design changes without prior notice. Digital Picture Frame 00118560 Power supply input 100-240 V AC / 50/60 Hz / 0,4 A Max Power supply output 5 V DC / 1.0A Power consumption < 4.2 W Dimensions 182 x 54 x 157 mm Weight ca. 400 g Recommended ambient temperature for device 0°C - 40°C (32 - 104 F) Relative humidity 10 - 80 % (non-condensing) Display 20,32 cm (8.
Digital Picture Frame 00118548 GB 19 Power supply input 100-240 V AC / 50/60 Hz / 0,4 A Max Power supply output 5 V DC / 1.0A Power consumption < 4.2 W Dimensions 182 x 54 x 157 mm (with the base) 182 x 4 x 157 mm (without the base) Weight ca. 400 g Recommended ambient temperature for device 0°C - 40°C (32 - 104 F) Relative humidity 10 - 80 % (non-condensing) Display 20,32 cm (8.
Digital Picture Frame 00095290 Power supply input 100-240 V AC / 50/60 Hz / 0,4 A Max Power supply output 5 V DC / 1.0A Power consumption < 4.5 W Dimensions 200 x 56 x 165 mm (with the base) 234 x 8 x 198 mm (without the base) Weight ca. 386 g Recommended ambient temperature for device 0°C - 40°C (32 - 104 F) Relative humidity 10 - 80 % (non-condensing) Display 20,32 cm (8.
Digital Picture Frame 00118551 GB 21 Power supply input 100-240 V AC / 50/60 Hz / 0,4 A Max Power supply output 5 V DC / 1.0A Power consumption < 4.2 W Dimensions 185 x 56 x 158 mm Weight ca. 390 g Recommended ambient temperature for device 0°C - 40°C (32 - 104 F) Relative humidity 10 - 80 % (non-condensing) Display 20,32 cm (8.
Digital Picture Frame 00118577 Power supply input 100-240 V AC / 50/60 Hz / 0,4 A Max Power supply output 5 V DC / 1 A Power consumption < 4W Dimensions 180 x 56 x 123 mm Weight ca.
13. Menu structure Photo Photo slide show File Calendar Settings Language Photo Sequence Slide Mode Slide Speed Photo Effect Slide Effect Photo Mode Display Set Time / Date Set Time Format Auto Power On Auto Power Off Reset Setting Exit GB 14.
GB 24
A D 10 B 25 9 8
Bedienungselemente und Anzeigen A A: Digitaler Bilderrahmen – Bedien- und Anschlussfeld B B: Fernbedienung 1 POWER 2 SETUP 3 ROTATE Avanti ZOOM Sinistra On/Off Indietro alle impostazioni di sistema Ruotare la foto in senso antiorario 1 ∧ Steuerungstaste Aufwärts / zur nächste Datei wechseln 2 VOL -/ Links - Steuerungstaste 3 < > 4 ►II Play/Pause/OK/ENTER - Taste 4 Steuerungstaste Abwärts / zur letzte Datei wechseln Funzione di zoom immagine Guardare foto precedente Tasto di conferma;
Inhaltsverzeichnis 1. Erklärung von Warnsymbolen und Hinweisen.................................. 28 2. Packungsinhalt ............................. 28 3. Sicherheitshinweise...................... 28 4. Pixelfehler..................................... 29 5. Inbetriebnahme............................ 30 5.1 Aufstellen ........................................30 5.2 Wandmontage .................................30 5.3 Batterie einlegen, bzw. wechseln .....31 5.4 Anschluss der Stromversorgung .......31 D 6.
Vielen Dank, dass Sie sich für ein Hama Produkt entschieden haben! Nehmen Sie sich Zeit und lesen Sie die folgenden Anweisungen und Hinweise zunächst ganz durch. Bewahren Sie diese Bedienungsanleitung anschließend an einem sicheren Ort auf, um bei Bedarf darin nachschlagen zu können. Sollten Sie das Produkt veräußern, geben Sie diese Bedienungsanleitung an den neuen Eigentümer weiter. 1.
• Nehmen Sie keine Veränderungen am Produkt vor. Dadurch verlieren sie jegliche Gewährleistungsansprüche. • Versuchen Sie nicht, das Produkt selbst zu warten oder zu reparieren. Überlassen Sie jegliche Wartungsarbeit dem zuständigen Fachpersonal. • Halten Sie Kinder unbedingt von dem Verpackungsmaterial fern, es besteht Erstickungsgefahr. • Entsorgen Sie das Verpackungsmaterial sofort gemäß den örtlich gültigen Entsorgungsvorschriften.
5. Inbetriebnahme 5.1 Aufstellen • Schrauben Sie den Standfuß in die dafür vorgesehene Gewindeöffnung auf der Rückseite des Produktes ein. • Entfernen Sie die Displayschutzfolie. • Stellen Sie das Produkt auf eine ebene, waagerechte und rutschfeste Fläche. • Stellen Sie keine anderen Gegenstände auf das Produkt. 5.2 Wandmontage Alternativ können Sie die Befestigungsvorbereitung auf der Rückseite des Produktes für eine Wandmontage verwenden, bzw.
5.3 Batterie einlegen, bzw. wechseln • Öffnen Sie das Batteriefach der Fernbedienung • Legen Sie die Knopfzelle des Typs CR2025 polrichtig ein. • Wahlweise entfernen Sie den Kontaktunterbrecherstreifen der Batterie. • Schließen Sie das Batteriefach wieder. Beachten Sie dabei, dass die Verriegelung sauber einrastet. 2 1 D 5.4 Anschluss der Stromversorgung Warnung • Betreiben Sie das Produkt nur an einer dafür zugelassenen Steckdose.
6. Bedienung und Betrieb 6.1 Die Menüführung Das Gerät ist mit einer benutzerfreundlichen Menüführung ausgestattet. Die Menüführung wird am Bildschirm eingeblendet. Folgende Speichermedien können gelesen werden: • SD/SDHC - Karten (bis 32 GB) • USB Speichermedien Schalten Sie das Gerät ein, indem Sie den ON/OFF (Ein/Aus) Schalter betätigen. D Sie rufen das Hauptmenü mit der [MENÜ]-Taste auf. Im Menü bewegen Sie sich mit den [◄][►]-Tasten und wählen die gewünschte Funktion.
6.2 Systemeinstellungen Um in das Setupmenü zu gelangen, drücken Sie nun die [SETUP]-Taste auf ihrer Fernbedienung, oder bewegen Sie sich mit den [◄][►]-Tasten auf der Rückseite des Gerätes oder der Fernbedienung auf den Menüpunkt.
Sprache Wählen Sie die gewünschte Menü/Bediensprache aus Bild Reihenfolge Funktionsmenü zum einstellen der Bildablauffolge, Zufällig oder sortiert nach Datei-Erstell-Datum Splitscreen-Modus Mit dieser Funktion können bis zu 4 Bilder gleichzeitig angezeigt werden Diashow Intervall Wählen Sie die Zeitdauer aus, mit dem die Bilder ablaufen sollen Foto Effekt Hier können Sie zwischen drei Foto-Farb-Effekten wählen: Farbe, Monochrom, Sepia Bildübergänge Funktionsmenü zum einstellen der Bildübergänge
7. Funktionen 7.1 Photo Das Gerät startet automatisch mit der Photo-Diashow sobald Sie ein Speichermedium eingelegt haben. Bei nicht eingelegtem Speichermedium, startet das Gerät mit den abgespeicherten Daten des internen Speichers. • Wählen Sie mit Hilfe der [◄][►][▲][▼]-Tasten auf Ihrem Gerät oder der Fernbedienung das Symbol aus und bestätigen Sie die Auswahl mit [OK] • Das Gerät startet standardmäßig mit der Slideshow.
7.2 Kalender Drücken Sie mit den [◄][►][▲][▼] auf ihrem Gerät oder der Fernbedienung auf das Symbol und drücken Sie die [OK]-Taste. D Folgende Funktionen können Sie ausführen: • Mit Hilfe der [◄][►]-Taste könne Sie das Jahr verändern • Mit Hilfe der [▲][▼]-Tasten können Sie den Monat wechseln Hinweis • Im Kalender-Einstellungs-Menü können Sie weitere Einstellungen vornehmen.
7.3 Ordner Drücken Sie mit den [◄][►][▲][▼] auf ihrem Gerät oder der Fernbedienung auf das Symbol und drücken Sie die [OK]-Taste. D Wählen Sie mit den [▲][▼]-Tasten die gewünschte Datei aus und drücken Sie anschließend die [►]-Taste auf ihrer Fernbedienung oder Taste 3 auf ihrem Gerät. Es erscheint nun ein neues Menüfenster mithilfe Sie alle auf dem Speichermedium befindlichen Dateien auf den internen Speicher speichern können.
8. Zusatzfunktionen 8.1 Photo-Slideshow-Varianten 8.2 Fehlerursachen und -behebung Die nachfolgende Tabelle hilft bei der Lokalisierung und Behebung kleinerer Störungen: Allgemein Fehler Keine Anzeige auf dem Display DPF Gerät schaltet plötzlich ab Kein Bild wird angezeigt Mögliche Ursache Behebung Gerät ist ausgeschaltet Schalten Sie das Gerät ein. Netzadapter nicht korrekt angeschlossen Stellen Sie sicher, dass der Netzadapter in der Steckdose steckt und am Gerät angeschlossen ist.
9. Wartung und Pflege Das Display des Gerätes befindet sich hinter einem Schutzglas. • Reinigen Sie das Display nur mit einem trocken, weichen Tuch. • Üben Sie beim Reinigen keinen Druck auf die Bildschirmfläche aus. • Verwenden Sie zur Reinigung keine Lösungsmittel- oder alkoholhaltigen Reiniger um die Oberfläche nicht zu beschädigen. Hinweis Zur schonenden Reinigung und Pflege des Displays empfehlen wir Ihnen ein MicrofaserReinigungstuch. • Reinigen Sie den Rest des Gerätes mit einem trocken Tuch.
12. Technische Daten Hinweis Änderungen von Design und technischen Daten bleiben vorbehalten und bedürfen keiner Ankündigung. Digitaler Bilderrahmen 00118560 Stromversorgung Eingang 100-240 V AC / 50/60 Hz / 0,4 A Max Stromversorgung Ausgang 5 V DC / 1.0A Leistungsaufnahme < 4.2 W Abmessungen 182 x 54 x 157 mm Gewicht ca. 400 g Empfohlene Geräteumgebung 0°C - 40°C (32 - 104 F) Relative Luftfeuchtigkeit 10 - 80 % (nicht kondensierend) Display 20,32 cm (8.
Digitaler Bilderrahmen 00118548 Stromversorgung Eingang D 41 100-240 V AC / 50/60 Hz / 0,4 A Max Stromversorgung Ausgang 5 V DC / 1.0A Leistungsaufnahme < 4.2 W Abmessungen 182 x 54 x 157 mm (mit Standfuß) 182 x 4 x 157 mm (ohne Standfuß) Gewicht ca. 400 g Empfohlene Geräteumgebung 0°C - 40°C (32 - 104 F) Relative Luftfeuchtigkeit 10 - 80 % (nicht kondensierend) Display 20,32 cm (8.
Digitaler Bilderrahmen 00095290 Stromversorgung Eingang 100-240 V AC / 50/60 Hz / 0,4 A Max Stromversorgung Ausgang 5 V DC / 1.0A Leistungsaufnahme < 4.5 W Abmessungen 200 x 56 x 165 mm (mit Standfuß) 200 x 8 x 165 mm (ohne Standfuß) Gewicht ca. 386 g Empfohlene Geräteumgebung 0°C - 40°C (32 - 104 F) Relative Luftfeuchtigkeit 10 - 80 % (nicht kondensierend) Display 20,32 cm (8.
Digitaler Bilderrahmen 00118551 Stromversorgung Eingang D 43 100-240 V AC / 50/60 Hz / 0,4 A Max Stromversorgung Ausgang 5 V DC / 1.0A Leistungsaufnahme < 4.2 W Abmessungen 185 x 56 x 158 mm Gewicht ca. 390 g Empfohlene Geräteumgebung 0°C - 40°C (32 - 104 F) Relative Luftfeuchtigkeit 10 - 80 % (nicht kondensierend) Display 20,32 cm (8.
Digitaler Bilderrahmen 00118577 Stromversorgung Eingang 100-240 V AC / 50/60 Hz / 0,4 A Max Stromversorgung Ausgang 5 V DC / 1 A Leistungsaufnahme < 4W Abmessungen 180 x 56 x 123 mm Gewicht ca.
13. Menüstruktur Foto Foto Diashow Datei Kalender Einstellungen Sprache Bild Reihenfolge Splitscreen-Modus Diashow Intervall Foto Effekt Bildübergänge Bildgröße Monitor Einstellungen Uhrzeit / Datum einstellen Zeitformen einstellen Autom. Einschalten Autom.
14. Entsorgungshinweise Hinweis zum Umweltschutz: Ab dem Zeitpunkt der Umsetzung der europäischen Richtlinien 2012/19/EU und 2006/66/EG in nationales Recht gilt folgendes: Elektrische und elektronische Geräte sowie Batterien dürfen nicht mit dem Hausmüll entsorgt werden. Der Verbraucher ist gesetzlich verpflichtet, elektrische und elektronische Geräte sowie Batterien am Ende ihrer Lebensdauer an den dafür eingerichteten, öffentlichen Sammelstellen oder an die Verkaufsstelle zurückzugeben.
A F 10 B 47 9 8
Éléments de commande et d'affichage A: Cadre photo numérique – Panneau de commande et de connexion Touche de contrôle vers le haut / Aller vers le fichier suivant 1 ∧ 2 Touche Ctrl VOL - / vers la gauche 3 < > 4 ►II 5 ∨ Touche lecture/pause/OK/ENTER Touche de contrôle vers le bas / Aller vers le dernier fichier Quitter / Touche de retour MENU = 2x 6 7 8 9 10 Touche Ctrl VOL + / vers la droite Touche MARCHE/ARRÊT Emplacement pour carte SD/ MMC/SDHC Port USB type A Prise de raccordement pour a
Sommaire 1. Explication des symboles d‘avertissement et des remarques ... 50 2. Package Contents......................... 50 3. Consignes de sécurité................... 50 4. Erreur de pixels............................. 51 5. Mise en service ............................. 52 5.1. Installation......................................52 5.2 Installation murale...........................52 5.3 Insertion/remplacement de la pile ....53 5.4 Connexion de l’alimentation électrique .....................................
Nous vous remercions d’avoir choisi un produit Hama. Veuillez prendre le temps de lire l‘ensemble des remarques et consignes suivantes. Veuillez conserver ce mode d‘emploi à portée de main afin de pouvoir le consulter en cas de besoin. Transmettez-le au nouveau propriétaire avec l’appareil le cas échéant. 1.
Avertissement - Piles • Retirez les piles usagées immédiatement du produit pour les recycler. • Utilisez exclusivement des batteries (ou des piles) du type indiqué. • Respectez impérativement la polarité de la pile (marquage + et -) lors de l‘insertion dans le boîtier ; risques d‘écoulement et d‘explosion des piles si tel n‘est pas le cas. • Ne surchargez pas les piles. • Conservez les piles hors de portée des enfants. • Ne court-circuitez pas les batteries/piles et éloignez-les des objets métalliques.
5. Mise en service 5.1. Installation • Vissez le pied dans le filetage prévu à cet effet à l’arrière de l’appareil conformément. • Retirez le film protecteur situé sur l’écran. • Placez l‘appareil sur une surface plane horizontale antidérapante. • Ne placez aucun objet sur l‘appareil. 5.2 Installation murale Vous pouvez également utiliser le dispositif de fixation situé sur la face arrière de l’appareil afin de l’installer à une paroi ou utiliser un support mural compatible VESA.
5.3 Insertion/remplacement de la pile • Ouvrez le compartiment à pile de la télécommande • Insérez une pile bouton de type CR 2025 conformément aux indications polarité • Retirez le film de protection situé sur la pile. • Refermez le compartiment à pile. Veuillez contrôler le bon verrouillage du couvercle. 2 1 F 5.4 Connexion de l’alimentation électrique Avertissement • Utilisez l‘appareil exclusivement branché à une prise de courant appropriée.
6. Commande et utilisation 6.1 Gestion du menu L‘appareil est équipé d’une gestion de menu conviviale. La gestion du menu apparaît à l‘écran. L‘appareil est capable de lire les supports d‘enregistrement suivants: • Cartes SD/SDHC (jusqu’à 32 Go) • Supports d‘enregistrement USB Mettez l‘appareil sous tension en actionnant l‘interrupteur de MARCHE/ARRÊT. F Vous pouvez également y accéder en appuyant sur la touche [MENU]. Dans le menu, utilisez les touches [◄][►] afin de sélectionner une fonction.
6.
Langue Sélection de la langue de menu/d'utilisation souhaitée Sélectionnez le périphérique Menu de fonctions pour définir l'ordre d'affichage des photos : ordre aléatoire ou triées par nom Modo de défilement Cette fonction vous permet d'afficher simultanément jusqu'à quatre photos à l'écran Intervalle Sélection de la fréquence de défilement des photos Effet Photot Cette fonction vous permet de sélectionner un des trois effets visuels : couleurs, monochrome, sépia Effets Ecouter Menu de fonctions
7. Fonctions 7.1 Photo L‘appareil ouvre automatiquement le diaporama dès que vous insérez un support d‘enregistrement. L‘appareil ouvre les données sauvegardées sur la mémoire interne si aucun support d‘enregistrement externe n‘a été inséré. Vous pouvez également naviguer dans le menu photo comme suit : • Appuyez sur le symbole à l‘aide des touches [◄][►][▲][▼] de l‘appareil ou de la télécommande, puis appuyez sur la touche [OK]. • L‘appareil démarre par défaut par le diaporama.
7.2 Calendrier Appuyez sur le symbole à l‘aide des touches [◄][►][▲][▼] de l‘appareil ou de la télécommande, puis appuyez sur la touche [OK]. F Vous pouvez sélectionner les fonctions suivantes : • Vous pouvez changer l‘année à l‘aide de la touche [◄][►]. • Vous pouvez changer le mois à l‘aide des touches [▲][▼]. REMARQUE • Le menu de configuration calendrier vous permet d’effectuer d‘autres paramétrages.
7.3 Dossier Appuyez sur le symbole à l‘aide des touches [◄][►][▲][▼] de l‘appareil ou de la télécommande, puis appuyez sur la touche [OK]. F Sélectionnez un fichier à l‘aide des touches [▲][▼], puis appuyez sur la touche [►] de la télécommande ou sur la touche 3 de l‘appareil. Une nouvelle fenêtre de menu, à l‘aide de laquelle vous pouvez enregistrer toutes les données du support d‘enregistrement sur la mémoire interne, apparaît.
8. Fonctions supplémentaires 8.1 Variantes de diaporamas photos 8.2 Causes et élimination des pannes Le tableau suivant vous aide à localiser et à éliminer les petits dysfonctionnements : Généralités Problème Généralités Pas d´affichage à l´écran DPF (cadre photo numérique) L’appareil se met soudainement hors tension Cause possible Dépannage L´appareil est éteint Allumez l´appareil.
9. Soins et entretien L´écran de l´appareil est protégé par un verre. • Nettoyez l´écran uniquement avec un chiffon sec et doux. • Lors du nettoyage, n´exercez aucune pression sur la surface de l´écran. • Pour le nettoyage, n´utilisez aucun produit de nettoyage contenant de l´alcool ou de détergent afin de ne pas abimer la surface du dessus. Remarque Pour le nettoyage et l´entretien en douceur de l´écran nous vous recommandons un chiffon de nettoyage en microfibres.
12. Caractéristiques techniques Remarque Sous réserve de modifications techniques et de modifications du design sans préavis. Remarques générales 00118560 Alimentation en électricité, entrée 100-240 V AC / 50/60 Hz / 0,4 A Max Alimentation en électricité, sortie 5 V DC / 1.0A Puissance absorbée < 4.2 W Dimensions 182 x 54 x 157 mm Poids ca. 400 g Température recommandée pour l‘appareil 0°C - 40°C (32 - 104 F) Humidité relative de l’air 10 - 80 % (sans condensation) Ecran 20,32 cm (8.
Remarques générales 00118548 F 63 Alimentation en électricité, entrée 100-240 V AC / 50/60 Hz / 0,4 A Max Alimentation en électricité, sortie 5 V DC / 1.0A Puissance absorbée < 4.2 W Dimensions 182 x 54 x 157 mm (with the base) 182 x 4 x 157 mm (without the base) Poids ca. 400 g Température recommandée pour l‘appareil 0°C - 40°C (32 - 104 F) Humidité relative de l’air 10 - 80 % (non-condensing) Ecran 20,32 cm (8.
Remarques générales 00095290 Alimentation en électricité, entrée 100-240 V AC / 50/60 Hz / 0,4 A Max Alimentation en électricité, sortie 5 V DC / 1.0A Puissance absorbée < 4.5 W Dimensions 200 x 56 x 165 mm (with the base) 200 x 8 x 165 mm (without the base) Poids ca. 386 g Température recommandée pour l‘appareil 0°C - 40°C (32 - 104 F) Humidité relative de l’air 10 - 80 % (non-condensing) Ecran 20,32 cm (8.
Remarques générales 00118551 F 65 Alimentation en électricité, entrée 100-240 V AC / 50/60 Hz / 0,4 A Max Alimentation en électricité, sortie 5 V DC / 1.0A Puissance absorbée < 4.2 W Dimensions 185 x 56 x 158 mm Poids ca. 390 g Température recommandée pour l‘appareil 0°C - 40°C (32 - 104 F) Humidité relative de l’air 10 - 80 % (non-condensing) Ecran 20,32 cm (8.
Remarques générales 00118577 Alimentation en électricité, entrée 100-240 V AC / 50/60 Hz / 0,4 A Max Alimentation en électricité, sortie 5 V DC / 1 A Puissance absorbée < 4W Dimensions 180 x 56 x 123 mm Poids ca.
13. Menu structure Foto Foto Diashow Datei Kalender Einstellungen Sprache Bild Reihenfolge Splitscreen-Modus Diashow Intervall Foto Effekt Bildübergänge Bildgröße Monitor Einstellungen Uhrzeit / Datum einstellen Zeitformen einstellen Autom. Einschalten Autom.Ausschalten Zurücksetzen Beenden F 14.
F 68
A E 10 B 69 9 8
Elementos de manejo e indicadores A A: Marco digital – Panel de manejo y conexiones Tecla de control Hacia arriba/ Cambiar al siguiente archivo 1 ∧ 2 Tecla de control VOL -/A la izquierda 3 < > 4 ►II 5 ∨ Tecla Reproducir/Pausa/OK/INTRO Tecla de control Hacia abajo/ Cambiar al último archivo Tecla Salir/Volver MENU = 2x 6 7 8 9 10 B B: Mando a distancia 1 POWER Encendido/apagado 2 SETUP Volver a los ajustes del sistema 3 ROTATE Girar la fotografía en sentido no horario.
Índice 1. Explicación de los símbolos de aviso y de las indicaciones .......... 72 2. Package Contents......................... 72 3. Instrucciones de seguridad .......... 72 4. Fallo de píxel ................................ 73 5. Puesta en funcionamiento ........... 74 5.1. Instalación ......................................74 5.2 Montaje en la pared.........................74 5.3 Colocación o cambio de la pila ........75 5.4 Conexión de la alimentación de corriente ........................................
Le agradecemos que se haya decidido por un producto de Hama. Tómese tiempo y léase primero las siguientes instrucciones e indicaciones. Después, guarde estas instrucciones de manejo en un lugar seguro para poder consultarlas cuando sea necesario. Si vende el aparato, entregue estas instrucciones de manejo al nuevo propietario. 1.
Aviso - Pilas • Retire y deseche de inmediato las pilas gastadas del producto. • Utilice exclusivamente pilas recargables (o pilas) que sean del mismo tipo. • Observe siempre la correcta polaridad (inscripciones + y -) de las pilas y coloque éstas de forma correspondiente. La no observación de lo anterior conlleva el riesgo de derrame o explosión de las pilas. • No sobrecargue las pilas. • Mantenga las pilas fuera del alcance de los niños.
5. Puesta en funcionamiento 5.1. Instalación • Atornille el soporte tal y como aparece representado en la abertura roscada prevista para ello situada en la parte posterior del producto. • Retire la lámina protectora de la pantalla. • Coloque el producto sobre una superficie plana, horizontal y antideslizante. • No coloque objetos sobre el producto. 5.
5.3 Colocación o cambio de la pila • Abra el compartimento de pilas del mando a distancia. • Coloque la pila de botón tipo CR2025 asegurándose de que la polaridad sea la correcta. • Si lo desea, retire la tira interruptora de contacto de la pila. • Cierre de nuevo el compartimento de pilas. Al hacerlo, asegúrese de que el cierre encaje completamente y sin impedimentos. 2 1 E 5.4 Conexión de la alimentación de corriente Aviso • Utilice el producto sólo conectado a una toma de corriente autorizada.
6. Manejo y funcionamiento 6.1 La guía de menús El aparato está equipado con una guía de menús de fácil uso. La guía de menús se visualiza en la pantalla. The following types of storage media can be read: • Tarjetas SD/SDHC (hasta 32 GB) • Medios de memoria USB Encienda el aparato pulsando el conmutador ON/OFF. E El menú principal se puede llamar con la tecla [MENÚ]. En el menú, puede moverse con las teclas [◄][►] y seleccionar la función que desee.
6.2 Ajustes del sistema Para ir al menú de configuración, pulse ahora la tecla [SETUP] en el mando a distancia o desplácese con ayuda de las teclas [◄][►] del lado posterior del aparato o del mando a distancia hasta la opción de menú Ajustes.
Idomia Seleccione el idioma de menú/manejo que desee Imagen para la reproducción Menú de funciones para ajustar la secuencia de las imágenes, bien aleatoria, bien ordenadas por nombre Modo de visualización Con esta función se pueden visualizar hasta 4 imágenes simultáneamente Intervalo de diapositiva Elija el intervalo de tiempo en el que deben cambiar las imágenes.
7. Funciones 7.1 Foto El aparato arranca automáticamente con la sesión de diapositivas en cuanto se le ha insertado un medio de memoria. Si no se ha insertado un medio de memoria, el aparato arranca con los datos guardados en la memoria interna. También puede navegar en el menú de fotografía del siguiente modo • Con las teclas [◄][►][▲][▼] del aparato o del mando a distancia, haga clic sobre el símbolo y pulse la tecla [OK]. • El aparato se inicia de serie con la sesión de diapositivas.
7.2 Calendario Con las teclas [◄][►][▲][▼] del aparato o del mando a distancia, haga clic sobre el símbolo y pulse la tecla [OK]. E Las funciones siguientes se pueden ejecutar: • Con ayuda de la tecla [◄][►] puede cambiar el año. • Con ayuda de las teclas [▲][▼] puede cambiar el mes. NOTA • En el menú de ajustes de calendario puede realizar otros ajustes.
7.3 Carpeta Con las teclas [◄][►][▲][▼] del aparato o del mando a distancia, haga clic sobre el símbolo y pulse la tecla [OK]. E Seleccione el archivo que desee con las teclas [▲][▼] y pulse seguidamente la tecla[►] del mando a distancia o la tecla 3 del aparato. Ahora aparece una nueva ventana de menú con ayuda de la cual puede guardar todos los archivos del medio de memoria en la memoria interna.
8. Funciones adicionales 8.1 Variantes de la sesión de diapositivas 8.2 Causas y solución de fallos La siguiente tabla le ayudará a localizar y solucionar pequeños fallos: General Fallo Ninguna indicación en el display Posible causa Solución El aparato está apagado Encienda el aparato. Asegúrese de que el adaptaEl adaptador de red no está dor de red está enchufado a la correctamente conectado toma de corriente y conectado al aparato.
9. Mantenimiento y cuidado La pantalla del aparato se encuentra detrás de un cristal protector. • Limpie la pantalla sólo con un paño seco y suave. • Durante la limpieza, no ejerza presión sobre la pantalla. • No utilice limpiadores que contengan disolventes o alcohol, ello podría dañar la superficie. Nota Para una limpieza cuidadosa de la pantalla, recomendamos utilizar un paño de microfibra. • Limpie el resto del aparato sólo con un paño seco. Si la suciedad es fuerte, humedezca el paño levemente. 10.
12. Datos técnicos Nota El diseño y los datos técnicos pueden verse sometidos a cambios sin previo aviso. Marco digital 00118560 Entrada de alimentación de corriente 100-240 V AC / 50/60 Hz / 0,4 A Max Salida de alimentación de corriente 5 V DC / 1.0A Consumo de potencia < 4.2 W Dimensiones (An x Al x Pro) 182 x 54 x 157 mm Peso ca. 400 g Entorno recomendado para el aparato 0°C - 40°C (32 - 104 F) Humedad relativa del aire 10 - 80 % (non-condensing) Pantalla 20,32 cm (8.
Marco digital 00118548 E 85 Entrada de alimentación de corriente 100-240 V AC / 50/60 Hz / 0,4 A Max Salida de alimentación de corriente 5 V DC / 1.0A Consumo de potencia < 4.2 W Dimensiones (An x Al x Pro) 182 x 54 x 157 mm (with the base) 182 x 4 x 157 mm (without the base) Peso ca. 400 g Entorno recomendado para el aparato 0°C - 40°C (32 - 104 F) Humedad relativa del aire 10 - 80 % (non-condensing) Pantalla 20,32 cm (8.
Marco digital 00095290 Entrada de alimentación de corriente 100-240 V AC / 50/60 Hz / 0,4 A Max Salida de alimentación de corriente 5 V DC / 1.0A Consumo de potencia < 4.5 W Dimensiones (An x Al x Pro) 200 x 56 x 165 mm (with the base) 200 x 8 x 165 mm (without the base) Peso ca. 386 g Entorno recomendado para el aparato 0°C - 40°C (32 - 104 F) Humedad relativa del aire 10 - 80 % (non-condensing) Pantalla 20,32 cm (8.
Marco digital 00118551 E 87 Entrada de alimentación de corriente 100-240 V AC / 50/60 Hz / 0,4 A Max Salida de alimentación de corriente 5 V DC / 1.0A Consumo de potencia < 4.2 W Dimensiones (An x Al x Pro) 185 x 56 x 158 mm Peso ca. 390 g Entorno recomendado para el aparato 0°C - 40°C (32 - 104 F) Humedad relativa del aire 10 - 80 % (non-condensing) Pantalla 20,32 cm (8.
Marco digital 00118577 Entrada de alimentación de corriente 100-240 V AC / 50/60 Hz / 0,4 A Max Salida de alimentación de corriente 5 V DC / 1 A Consumo de potencia < 4W Dimensiones (An x Al x Pro) 180 x 56 x 123 mm Peso ca.
13. Estructura de menú del DPF Foto Sesión de diapositivas de fotos Archivo Calendario Ajustes Idomia Imagen para la reproducción Modo de visualización Intervalo de diapositiva Efecto de foto Efecto de diapositiva Modo de foto Visualización Ajustar hora / fecha Ajustar formato de hora Auto Encendido Auto Apagado Reiniciar ajustes Salir E 14.
E 90
A 10 I B 91 9 8
Struttura e funzionamentoe A: Cornice digitale – Quadro dei comandi e degli attacchi 1 ∧ 2 < 3 > 4 ►II 5 ∨ 6 Tasto di controllo in su / vai al file successivo VOL -/ a sinistra - tasto di controllo VOL +/ a destra - tasto di controllo Tasto play/pausa/OK/ENTER Tasto di controllo in giù / vai all’ultimo file Tasto EXIT / indietro MENU = 2x 7 Tasto ON/OFF 8 1 slot SD/MMC/SDHC USB (tipo A) Presa di allacciamento per adattatore di rete 9 10 B B: Telecomando 2 POWER SETUP 3 ROTATE 4 Aufw
Contenuto 1. Spiegazione dei simboli di avvertimento e delle indicazioni ...... 94 2. Package Contents......................... 94 3. Avvertenze di sicurezza ................ 94 4. Errori nei pixel .............................. 95 5. Messa in esercizio......................... 96 5.1. Installazione ...................................96 5.2 Montaggio a parete .........................96 5.3 Inserimento o sostituzione della batteria........................................97 5.
Grazie per avere acquistato un prodotto Hama! Prima della messa in esercizio, leggete attentamente le seguenti istruzioni e avvertenze, quindi conservatele in un luogo sicuro per una eventuale consultazione. In caso di cessione dell‘apparecchio, consegnate anche le presenti istruzioni al nuovo proprietario. 1.
Attenzione - batterie • Rimuovere e smaltire immediatamente le batterie scariche. • Utilizzare unicamente accumulatori (o batterie) conformi al tipo indicato. • Attenersi sempre alla corretta polarità (scritte + e -) delle batterie e inserirle di conseguenza. La mancata osservanza comporta la perdita di potenza o il rischio di esplosione delle batterie. • Non scaricare completamente le batterie. • Conservare le batterie al di fuori della portata dei bambini.
5. Messa in esercizio 5.1. Installazione • Avvitate il piedino negli appositi fori sul retro della cornice. • Rimuovere la pellicola protettiva del display. • Mettere la cornice su una superficie piana, orizzontale e antiscivolo. • Non appoggiare oggetti sulla cornice. 5.2 Montaggio a parete In alternativa si può utilizzare il fissaggio per il montaggio a parete predisposto sul retro della cornice oppure si può fissare la cornice nei supporti a parete compatibili con gli standard VESA.
5.3 Inserimento o sostituzione della batteria • Aprire il vano batterie dal telecomando (fig. B) • Inserire la batteria a bottone del tipo CR2025 con la polarità corretta. • Rimuovere l’interruttore di contatto della batteria. • Richiudere nuovamente il vano batterie. Prestare attenzione che il coperchio sia ben chiuso. 2 1 5.
6. Impiego e funzionamento 6.1 La guida a menu L‘apparecchio è dotato di una guida a menu di facile uso. La guida a menu viene visualizzata sullo schermo. Collegare un corrispondente supporto di memoria all’apparecchio. Possono essere letti i seguenti supporti di memoria: • Schede SD/SDHC (fino a 32 GB) • Supporti di memoria USB Inserire l’apparecchio premendo il pulsante ON/OFF. I Il menu principale viene richiamato mediante il pulsante [MENU].
6.2 Impostazioni di sistema Per giungere nel menu del set up, premere il tasto [SETUP] sul telecomando o muoversi con i tasti [◄][►] sul retro dell’apparecchio o sul telecomando nella voce di menu.
Lingua Selezionare il menu/la lingua desiderati Riproduzione foto ordine Menu funzioni per impostare la sequenza immagini, casuale o ordinate per nome Dividi schermo Con questa funzione si possono visualizzare contemporaneamente fino a quattro immagini Intervallo Slideshow Scegliere la durata di visualizzazione delle immagini Effetto foto Qui è possibile scegliere tre effetti cromatici per le foto: colore, monocromo, seppia Effetti dissolvenza Menu funzioni per l’impostazione della transizione im
7. Funzioni 7.1 Foto Appena si inserisce un supporto di memoria, l’apparecchio si avvia automaticamente in modalità Presentazione. Se non si inserisce un supporto di memoria, l’apparecchio si avvia con i dati memorizzati della memoria interna. Nel menu Foto si può navigare anche come segue. • Nel menu principale, andare alle impostazioni mediante i tasti [◄][►][▲][▼] , quindi premere [OK] oppure premere sul telecomando il simbolo. • Come standard, l’apparecchio si porta in modalità Presentazione.
7.2 Calendario Premere con i tasti [◄][►][▲][▼] sull‘apparecchio o sul telecomando il simbolo e premere il tasto [OK]. I È possibile eseguire le seguenti funzioni: • Con i tasti [◄][►] è possibile cambiare il mese. • Con i tasti [▲][▼] è possibile cambiare l‘anno. NOTA • Nel menu Impostazioni calendario è possibile effettuare altre impostazioni.
7.3 Cartella Premere con i tasti [◄][►][▲][▼] sull‘apparecchio o sul telecomando il simbol e premere il tasto [OK]. I Selezionare con i tasti [▲][▼] il file desiderato, quindi premere il tasto [►] sul telecomando o il tasto 3 ull‘apparecchio. Appare una nuova finestra di menu mediante cui è possibile salvare nella memoria interna tutti i file selezionati sulla memory card.
8. Funzioni supplementari 8.1 Varianti presentazione foto 8.2 Problemi e relativa risoluzione La seguente tabella costituisce un ausilio per la localizzazione e l‘eliminazione di piccoli guasti: In generale Guasto Sul display non viene visualizzato nulla Possibile causa Eliminazione L'apparecchio è spento. Accendere l'apparecchio. Adattatore di rete non collegato correttamente. Assicurarsi che l'adattatore di rete sia inserito nella presa di corrente e collegato al apparecchio.
9. Cura e manutenzione Il display dell‘apparecchio si trova dietro un vetro di protezione. • Pulire il display solo con un panno asciutto e morbido. • Durante la pulizia, non esercitare pressione sulla superficie del display. • Per la pulizia, non utilizzare solventi, né detergenti alcolici per evitare di danneggiare la superficie. Avvertenza Per la pulizia delicata e la cura del display, consigliamo un panno detergente in microfibra. • Pulire il resto dell‘apparecchio con un panno asciutto.
12. Dati tecnici Nota Con riserva di modifiche tecniche e di design senza preavviso. Cornice foto digitale 00118560 Ingresso alimentazione elettrica 100-240 V AC / 50/60 Hz / 0,4 A Max Uscita alimentazione elettrica 5 V DC / 1.0A Potenza assorbita < 4.2 W Misure (L x H x P) 182 x 54 x 157 mm Peso ca. 400 g Temperatura ambiente raccomandata 0°C - 40°C (32 - 104 F) Umidità relativa dell’aria 10 - 80 % (non-condensing) Display 20,32 cm (8.
Cornice foto digitale 00118548 I 107 Ingresso alimentazione elettrica 100-240 V AC / 50/60 Hz / 0,4 A Max Uscita alimentazione elettrica 5 V DC / 1.0A Potenza assorbita < 4.2 W Misure (L x H x P) 182 x 54 x 157 mm (with the base) 182 x 4 x 157 mm (without the base) Peso ca. 400 g Temperatura ambiente raccomandata 0°C - 40°C (32 - 104 F) Umidità relativa dell’aria 10 - 80 % (non-condensing) Display 20,32 cm (8.
Cornice foto digitale 00095290 Ingresso alimentazione elettrica 100-240 V AC / 50/60 Hz / 0,4 A Max Uscita alimentazione elettrica 5 V DC / 1.0A Potenza assorbita < 4.5 W Misure (L x H x P) 200 x 56 x 165 mm (with the base) 200 x 8 x 165 mm (without the base) Peso ca. 386 g Temperatura ambiente raccomandata 0°C - 40°C (32 - 104 F) Umidità relativa dell’aria 10 - 80 % (non-condensing) Display 20,32 cm (8.
Cornice foto digitale 00118551 I 109 Ingresso alimentazione elettrica 100-240 V AC / 50/60 Hz / 0,4 A Max Uscita alimentazione elettrica 5 V DC / 1.0A Potenza assorbita < 4.2 W Misure (L x H x P) 185 x 56 x 158 mm Peso ca. 390 g Temperatura ambiente raccomandata 0°C - 40°C (32 - 104 F) Umidità relativa dell’aria 10 - 80 % (non-condensing) Display 20,32 cm (8.
Cornice foto digitale 00118577 Ingresso alimentazione elettrica 100-240 V AC / 50/60 Hz / 0,4 A Max Uscita alimentazione elettrica 5 V DC / 1 A Potenza assorbita < 4W Misure (L x H x P) 180 x 56 x 123 mm Peso ca.
13. Struttura del menu del DPF Foto Slideshow immagini Cartelle/File Calendario Impostazioni Lingua Riproduzione foto ordine Dividi schermo Intervallo Slideshow Effetto foto Effetti dissolvenza Dimensioni foto Esposizione Tempo - Impostazioni ora/data Regola formata di tempo Accensione automatica / Auto Au Spegnimento automatico / Auto Chiuso Formattazione memoria interna Reset Esci / Uscire I 14.
I 112
A 10 NL B 113 9 8
Bedieningselementen en weergaven/indicaties A: Digitale fotolijst – Bedienings- en aansluitveld 1 ∧ 2 3 < > 4 ►II 5 6 ∨ Besturingstoets Omhoog / naar volgende bestand wisselen VOL -/ Links - besturingstoets VOL +/ Rechts - besturingstoets Play/Pauze/OK/ENTER – toets Besturingstoets Omlaag / naar laatste bestand wisselen ESC / Terug – toets MENU = 2x 7 IN/UIT- toets 8 SD/MMC/SDHC kaartslot USB (type A) Aansluitpoort voor voedingsadapter 9 10 B B: Afstandsbediening 1 POWER On/Off 2 SETUP
Inhoudsopgave 1. Verklaring van waarschuwingssymbolen en instructies ................. 116 2. Inhoud van de verpakking ......... 116 10. Uitsluiting van garantie en aansprakelijkheid ........................... 127 3. Veiligheidsinstructies ................. 116 11. Service en support.................... 127 4. Pixelfouten ................................. 117 12. Technische gegevens ................ 128 5. Inbedrijfstelling .......................... 118 13. Menustructuur van de DPF....... 133 5.1.
Hartelijk dank dat u voor een product van Hama heeft gekozen. Neem de tijd om de volgende aanwijzingen en instructies volledig door te lezen. Berg deze gebruiksaanwijzing vervolgens op een goede plek op zodat u hem als naslagwerk kunt gebruiken. Op zodat u hem als naslagwerk kunt gebruiken. Mocht u het toestel verkopen, geeft u dan ook deze gebruiksaanwijzing aan de nieuwe eigenaar. 1.
Waarschuwing - batterijen • Lege batterijen direct uit het product verwijderen en afvoeren. • Gebruik uitsluitend accu’s (of batterijen), welke met het vermelde type overeenstemmen. • Let absoluut op de correcte polariteit (opschrift + en -) van de batterijen en plaats deze dienovereenkomstig in het batterijvakje. Indien de batterijen verkeerd worden geplaatst kunnen deze gaan lekken of zelfs exploderen. • De batterijen niet overontladen. • Batterijen buiten het bereik van kinderen opbergen.
5. Inbedrijfstelling 5.1. Opstellen • Schroef de standaard zoals is afgebeeld in het daarvoor bedoelde tapgat op de achterzijde van het product. • Verwijder de display-beschermfolie. • Zet het product op een vlak, horizontaal en antislip oppervlak naar. • Plaats geen andere voorwerpen op het product. 5.2 Wandmontage Alternatief kunt u de montagevoorbereiding op de achterzijde van het product voor een wandmontage gebruiken. Zo kunt u bijv. het product aan VESA compatibele wandhouders bevestigen.
5.3 Batterij plaatsen of vervangen • Open het batterijvak van de afstandsbediening (afb. B). • Plaats de knoopcel van het type CR2025 en let daarbij op de juiste polariteit (+) en (-). • Indien van toepassing het contactonderbrekerstrookje van de batterij verwijderen. • Sluit het batterijvak weer. Let erop dat de vergrendeling van het deksel correct vastklikt. 2 1 5.4 Aansluiten van de spanningsvoorziening Waarschuwing • Sluit het product alleen aan op een daarvoor geschikt en intact stopcontact.
6. Bediening en gebruik 6.1 Menu Het toestel is uitgerust met een gebruiksvriendelijk menu. Het menu verschijnt op het beeldscherm. De volgende opslagmedia kunnen gelezen worden: • SD/SDHC - cards (tot 32 GB) • USB-opslagmedia Schakel het toestel in met de ON/OFF-schakelaar. NL U roept het hoofdmenu op met de [MENÜ]-knop. In het menu navigeert u met de [◄][►]-knoppen, daarmee selecteert u de gewenste functie. Als u uw selectie met de [OK]-knop bevestigt, verschijnt het bijbehorende submenu.
6.
Taal Selecteer de door u gewenste menu- / bedieningstaal Selecteer het apparaat Functiemenu voor het instellen van de fotopresentatie, willekeurig of op naam gesorteerd Diavoorstellingdmodus Met deze functie kunnen maximaal 4 foto´s tegelijkertijd worden weergegeven Diasnelheid Selecteer de tijd die tussen het afbeelden van de foto´s moet liggen Foto effect Hier kunt u uit drie foto-kleureffecten kiezen: kleur, monochroom, sepia Dia effect Functiemenu voor het instellen van de foto-overgangen Fo
7. Functies 7.1 Foto Het toestel wordt automatisch gestart met de fotodiashow zodra u een opslagmedium heeft geplaatst. Als er geen opslagmedium in het toestel aanwezig is, start het toestel met de opgeslagen gegevens op het interne geheugen. U kunt ook als volgt binnen het fotomenu navigeren: • Druk met de [◄][►][▲][▼]-toetsen op uw toestel of met afstandsbediening op het symbool en druk op [OK]. • Het toestel start standaard met de diashow.
7.2 Kalender Druk met de [◄][►][▲][▼]-toetsen op uw toestel of met de afstandsbediening op het symbool en druk op [OK]. NL U kunt de volgende functies uitvoeren: • Met behulp van de [◄][►]-toets kunt u het jaar wijzigen. • Met behulp van de [▲][▼]-toetsen kunt u een andere maand instellen. AANWIJZING • In het kalender-instellingenmenu kunt u verdere instellingen uitvoeren.
7.3 Map Druk met de [◄][►][▲][▼]-toetsen op uw toestel of met de afstandsbediening op het symbool en druk op [OK]. NL Selecteer met de [▲][▼]-toetsen het gewenste bestand en druk vervolgens op de [►]-toets op uw afstandsbediening of op toets 3 van uw toestel. Er verschijnt nu een nieuw menuvenster waarmee u alle bestanden van het opslagmedium naar het interne geheugen kunt kopiëren.
8. Extra functies 8.1 Foto-slideshow-varianten 8.2 Storingsoorzaken en verhelpen van storingen De volgende tabel helpt bij het opsporen en verhelpen van kleinere storingen: Mogelijke oorzaak Oplossing Toestel is uitgeschakeld Schakel het toestel in.
9. Care and Maintenance Het display van het toestel bevindt zich achter beschermend glas. • Reinig het display alleen met een droge, zachte doek. • Oefen bij het reinigen geen druk uit op het display. • Gebruik voor de reiniging geen middelen die oplosmiddelen of alcohol bevatten om te voorkomen dat het scherm beschadigd raakt. Aanwijzing Om het display tijdens reiniging en onderhoud te ontzien is het aan te bevelen een microvezeldoek te gebruiken. • Reinig de rest van het toestel met een droge doek.
12. Technische gegevens Aanwijzing Wijzigingen van design en technische gegevens blijven voorbehouden en hoeven niet vooraf te worden aangekondigd. Digitale fotolijst 00118560 Spanningsvoorziening ingang 100-240 V AC / 50/60 Hz / 0,4 A Max Spanningsvoorziening uitgang 5 V DC / 1.0A Vermogensopname < 4.2 W Afmetingen (B x H x D) 182 x 54 x 157 mm Gewicht ca. 400 g Aanbevolen omgevingstemperatuur 0°C - 40°C (32 - 104 F) Relatieve luchtvochtigheid 10 - 80 % (non-condensing) Display 20,32 cm (8.
Digitale fotolijst 00118548 Spanningsvoorziening ingang NL 129 100-240 V AC / 50/60 Hz / 0,4 A Max Spanningsvoorziening uitgang 5 V DC / 1.0A Vermogensopname < 4.2 W Afmetingen (B x H x D) 182 x 54 x 157 mm (with the base) 182 x 4 x 157 mm (without the base) Gewicht ca. 400 g Aanbevolen omgevingstemperatuur 0°C - 40°C (32 - 104 F) Relatieve luchtvochtigheid 10 - 80 % (non-condensing) Display 20,32 cm (8.
Digitale fotolijst 00095290 Spanningsvoorziening ingang 100-240 V AC / 50/60 Hz / 0,4 A Max Spanningsvoorziening uitgang 5 V DC / 1.0A Vermogensopname < 4.5 W Afmetingen (B x H x D) 200 x 56 x 165 mm (with the base) 200 x 8 x 165 mm (without the base) Gewicht ca. 386 g Aanbevolen omgevingstemperatuur 0°C - 40°C (32 - 104 F) Relatieve luchtvochtigheid 10 - 80 % (non-condensing) Display 20,32 cm (8.
Digitale fotolijst 00118551 Spanningsvoorziening ingang NL 131 100-240 V AC / 50/60 Hz / 0,4 A Max Spanningsvoorziening uitgang 5 V DC / 1.0A Vermogensopname < 4.2 W Afmetingen (B x H x D) 185 x 56 x 158 mm Gewicht ca. 390 g Aanbevolen omgevingstemperatuur 0°C - 40°C (32 - 104 F) Relatieve luchtvochtigheid 10 - 80 % (non-condensing) Display 20,32 cm (8.
Digitale fotolijst 00118577 Spanningsvoorziening ingang 100-240 V AC / 50/60 Hz / 0,4 A Max Spanningsvoorziening uitgang 5 V DC / 1 A Vermogensopname < 4W Afmetingen (B x H x D) 180 x 56 x 123 mm Gewicht ca.
13. Menustructuur van de DPF Foto Foto-diashow Bestand Tijdschema Het Plaatsen Taal Selecteer het apparaat Diavoorstellingdmodus Diasnelheid Foto effect Dia effect Fotomodus Beeld Instellen Tijd Tijdnotatie instellen Auto Macht On Auto Macht Uit Resetten Afsluiten NL 14.
NL 134
A 10 B PL 135 9 8
Elementy obsługi i sygnalizacji A A: Elektroniczna ramka do zdjęć – Pole obsługowe i przyłączeniowe 1 ∧ 2 3 < > 4 ►II 5 ∨ 6 Przycisk sterujący Do góry / przejście do następnego pliku Przycisk sterujący VOL -/ Lewo Przycisk sterujący VOL +/ Prawo Przycisk Play/Pauza/OK/ENTER Przycisk sterujący W dół / przejście do poprzedniego pliku Przycisk EXIT / Powrót MENU = 2x 7 Przycisk WŁ./WYŁ.
Spis treści 1. Objaśnienie symboli ostrzegawczych i wskazówek......... 138 2. Zawartość opakowania .............. 138 3. Wskazówki bezpieczeństwa ....... 138 4. Błędy pikselowe.......................... 139 5. Uruchamianie ............................. 140 5.1 Ustawianie.....................................140 5.2 Montaż na ścianie..........................140 5.3 Wkładanie lub wymiana baterii......141 5.4 Podłączanie zasilanie elektrycznego141 6. Obsługa....................................... 142 6.
Dziękujemy za zakup naszego produktu! Przed pierwszym użyciem należy dokładnie przeczytać instrukcję obsługi. Instrukcję należy przechować, gdyż może być jeszcze potrzebna. 1. Objaśnienie symboli ostrzegawczych i wskazówek Ostrzeżenie Używane w celu zwrócenia uwagi na szczególne niebezpieczeństwo lub ryzyko. Wskazówki Używane w celu zwrócenia uwagi na szczególnie przydatne informacje. 2.
Ostrzeżenie - baterie • Natychmiast usunąć z produktu zużyte baterie i poddać je utylizacji. • Używać wyłącznie akumulatorów (lub baterii) odpowiadających podanemu typowi. • Wkładając baterie, zwrócić koniecznie uwagę na właściwe podłączenie biegunów (znak + i -). Nieprzestrzeganie grozi wyciekiem lub wybuchem baterii. • Nie przeciążać baterii. • Przechowywać baterie poza zasięgiem dzieci. • Nie zwierać akumulatorów / baterii oraz trzymać je z dala od odkrytych przedmiotów metalowych.
5. Uruchamianie 5.1 Ustawianie • Przykręcić podpórkę do otworu gwintowanego znajdującego się z tyłu produktu, jak przedstawiono na rysunku. • Usunąć z ekranu folię zabezpieczającą. • Ustawić produkt na równej, poziomej i antypoślizgowej powierzchni. • Nie ustawiać na urządzeniu innych przedmiotów. 5.2 Montaż na ścianie Alternatywnie można skorzystać z otworów mocujących do montażu na ścianie, znajdujących się z tyłu produktu lub zamocować produkt na uchwytach ściennych kompatybilnych z VESA.
5.3 Wkładanie lub wymiana baterii • Otworzyć schowek na baterie pilota • Włożyć baterię guzikową typu CR2025, zwracając uwagę na właściwą biegunowość. • Ewentualnie usunąć pasek przerywacza stykowego baterii. • Ponownie zamknąć schowek na baterię. Zwrócić przy tym uwagę, aby blokada dokładnie się zatrzasnęła. 2 1 5.4 Podłączanie zasilanie elektrycznego Ostrzeżenie • Podłączać produkt tylko do odpowiedniego gniazda wtykowego. Gniazdo wtykowe musi znajdować się w pobliżu produktu i być łatwo dostępne.
6. Obsługa 6.1 Struktura menu Urządzenie posiada przyjazne dla użytkownika menu. Informacje menu wyświetlane są na ekranie. Zastosować można następujące nośniki danych: • Karty SD/SDHC (do 32 GB) • nośniki danych USB Aby włączyć urządzenie, należy nacisnąć wyłącznik zasilania ON/OFF. PL Główne menu otwiera się przyciskiem [MENÜ]. Nawigacja w menu i wybór funkcji odbywa się za pomocą przycisków [◄][►]. Po potwierdzeniu wyboru przyciskiem [OK] pojawia się odpowiednie podmenu.
6.2 Ustawienia systemowe Aby przejść do menu ustawień, nacisnąć przycisk [SETUP] na pilocie albo za pomocą przycisków [◄][►] z tyłu urządzenia bądź na pilocie wybrać punkt menu „Ustawienia”.
Język Wybór żądanego języka menu Zdjęcie kolejności odtwarzania Menu funkcyjne do ustawiania kolejności wyświetlania obrazów, losowo lub sortowanie wg nazw plików Podział w pokazie slajdów Funkcja ta umożliwia jednoczesne wyświetlanie maks.
7. Funkcje 7.1 Zdjęcia Urządzenie uruchamia się zawsze automatycznie w trybie pokazu slajdów po podłączeniu nośnika danych. Jeżeli nośnik danych nie jest podłączony, urządzenie uruchamia wyświetlanie danych zapisanych w wewnętrznej pamięci. W menu Zdjęcia można też nawigować w następujący sposób: • Wybrać przyciskami [◄][►][▲][▼] na urządzeniu lub pilocie symbol i nacisnąć przycisk [OK]. • Urządzenia uruchamia się domyślnie w trybie pokazu slajdów.
7.2 Kalendarz Wybrać przyciskami [◄][►][▲][▼] na urządzeniu lub pilocie symbol i nacisnąć przycisk [OK]. PL Możliwe są następujące funkcje: • You can change the year using the [◄][►] buttons. • You can change the month using the [▲][▼] buttons. WSKAZÓWKA • W menu ustawień kalendarza można dokonać dalszych ustawień.
7.3 Folder Wybrać przyciskami [◄][►][▲][▼] na urządzeniu lub pilocie symbol i nacisnąć przycisk [OK]. PL Przyciskami [▲][▼] wybrać plik, a następnie nacisnąć przycisk [►] na pilocie zdalnego sterowania lub przycisk 3 na urządzeniu. Pojawia się nowe okno menu, które umożliwia zapisanie wszystkich plików z nośnika danych na wewnętrznym dysku twardym. • Po potwierdzeniu Tak / Yes przyciskiem [OK] wszystkie wybrane pliki są przenoszone z nośnika danych na dysk wewnętrzny.
8. Funkcje dodatkowe 8.1 Warianty pokazu zdjęć / slajdów 8.2 Przyczyny usterek i ich usuwanie Poniższa tabela pomaga w wyszukiwaniu i i usuwaniu drobnych usterek: Ogólnie Brak wskaźników na ekranie Urządzenie wyłącza się nagle DPF Ogólnie Usterka Zdjęcia nie są wyświetlane Możliwa przyczyna Usuwanie Urządzenie jest wyłączone. Włączyć urządzenie.
9. Czyszczenie Ekran urządzenia jest zabezpieczony szkłem ochronnym. • Czyścić ekran tylko suchą, miękką ściereczką. • Podczas czyszczenia nie wywierać nacisku na powierzchnię ekranu. • Nie używać do czyszczenia detergentów zawierających rozpuszczalniki bądź alkohol, aby nie uszkodzić powierzchni. Wskazówki Do łagodnego czyszczenia ekranu zalecamy użycie ściereczki z mikrowłókien. • Pozostałe części urządzenia czyścić suchą ściereczką. W razie silnego zabrudzenia ściereczkę można lekko zwilżyć. 10.
12. Obsługiwane formaty plików Wskazówka Zmiany wzornictwa i danych technicznych zastrzeżone bez wcześniejszego powiadomienia. Elektroniczna ramka do zdjęć 00118560 Zasilanie na wejściu 100-240 V AC / 50/60 Hz / 0,4 A Max Zasilanie na wyjściu 5 V DC / 1.0A Pobór mocy < 4.2 W Wymiary (szer. x wys. x gł.) 182 x 54 x 157 mm Waga ca. 400 g Zalecana temperatura otoczenia 0°C - 40°C (32 - 104 F) Względna wilgotność powietrza 10 - 80 % (non-condensing) Wyświetlacz 20,32 cm (8.
Elektroniczna ramka do zdjęć 00118548 PL 151 Zasilanie na wejściu 100-240 V AC / 50/60 Hz / 0,4 A Max Zasilanie na wyjściu 5 V DC / 1.0A Pobór mocy < 4.2 W Wymiary (szer. x wys. x gł.) 182 x 54 x 157mm (with the base) 182 x 4 x 157 mm (without the base) Waga ca. 400 g Zalecana temperatura otoczenia 0°C - 40°C (32 - 104 F) Względna wilgotność powietrza 10 - 80 % (non-condensing) Wyświetlacz 20,32 cm (8.
Elektroniczna ramka do zdjęć 00095290 Zasilanie na wejściu 100-240 V AC / 50/60 Hz / 0,4 A Max Zasilanie na wyjściu 5 V DC / 1.0A Pobór mocy < 4.5 W Wymiary (szer. x wys. x gł.) 200 x 56 x 165 mm (with the base) 200 x 8 x 165 mm (without the base) Waga ca. 386 g Zalecana temperatura otoczenia 0°C - 40°C (32 - 104 F) Względna wilgotność powietrza 10 - 80 % (non-condensing) Wyświetlacz 20,32 cm (8.
Elektroniczna ramka do zdjęć 00118551 PL 153 Zasilanie na wejściu 100-240 V AC / 50/60 Hz / 0,4 A Max Zasilanie na wyjściu 5 V DC / 1.0A Pobór mocy < 4.2 W Wymiary (szer. x wys. x gł.) 185 x 56 x 158 mm Waga ca. 390 g Zalecana temperatura otoczenia 0°C - 40°C (32 - 104 F) Względna wilgotność powietrza 10 - 80 % (non-condensing) Wyświetlacz 20,32 cm (8.
Elektroniczna ramka do zdjęć 00118577 Zasilanie na wejściu 100-240 V AC / 50/60 Hz / 0,4 A Max Zasilanie na wyjściu 5 V DC / 1 A Pobór mocy < 4W Wymiary (szer. x wys. x gł.) 180 x 56 x 123 mm Waga ca.
13. Struktura menu Zdjęcie Pokaz zdjęć / slajdów Plik Kalendarz Ustalić Język Zdjęcie kolejności odtwarzania Podział w pokazie slajdów Odstęp w pokazie slajdów Wpływ Fotografia Efekt pokazu slajodów Rozmiar obrazu Wystawa Czas Ustawianie formatu czasu Auto Włączony / Auto Na Auto Wyłączony Resetowanie ustawień Exit PL 14.
PL 156
A 10 B H 157 9 8
Kezelőelemek és kijelzők A: Digitális képkeret – Kezelő- és csatlakozómező 1 ∧ 2 3 < > 4 ►II 5 6 ∨ Vezérlőgomb felfelé / váltás a következő fájlra VOL -/ balra - vezérlőgomb VOL +/ jobbra - vezérlőgomb Play/Pause/OK/ENTER - gomb Vezérlőgomb lefelé / váltás az utolsó fájlra EXIT / Vissza - gomb MENU = 2x 7 BE/KI - gomb 8 SD/MMC/SDHC kártyahely USB (A típus) Csatlakozóaljzat hálózati adapterhez 9 10 B B: Távirányító 1 POWER On/Off 2 SETUP Vissza a rendszer beállításhoz 3 ROTATE Fotó
Tartalomjegyzék 1. Figyelmeztető szimbólumok és előírások ismertetése ..................... 160 2. A csomag tartalma ..................... 160 3. Biztonsági utasítások ................. 160 4. Képponthiba............................... 161 5. Üzembevétel ............................... 162 5.1 Felállítás ........................................162 5.2 Fali szerelés....................................162 5.3 Az elem behelyezése, ill. cseréje.....163 5.4 Az áramellátás csatlakoztatása ......163 6.
Köszönjük, hogy ezt a Hama terméket választotta! Kérjük, hogy felszerelés előtt szánjon rá időt és olvassa el végig az alábbi útmutatót. A későbbiekben tartsa biztonságos helyen ezt a füzetet, hogy ha szükség van rá, bármikor megtalálja. Ha eladja ezt a terméket, vele együtt adja tovább ezt az útmutatót is az új tulajdonosnak. 1. Figyelmeztető szimbólumok és előírások ismertetése Figyelmeztetés Figyelmeztető jeleket használunk a biztonsági tényezők bemutatására, ill.
• Ne kísérelje meg a készülék saját karbantartását vagy javítását. Bármely karbantartási munkát bízzon illetékes szakemberre. • Feltétlenül tartsa távol a gyermekeket a csomagolóanyagtól, mert fulladásveszély áll fenn. • Azonnal ártalmatlanítsa a csomagolóanyagot a helyileg érvényes ártalmatlanítási előírások szerint. Figyelmeztetés - elemeket • Haladéktalanul távolítsa el a lemerült elemeket a termékből, majd ártalmatlanítsa őket.
5. Üzembevétel 5.1 Felállítás • Csavarja be a tartólábat az ábra szerint a termék hátoldalán erre előirányzott menetnyílásba. • Távolítsa el a kijelzővédő fóliát. • Állítsa a terméket sík, vízszintes és csúszásmentes felületre. • Ne állítson más tárgyakat a termékre. 5.2 Fali szerelés Alternatívaként használhatja a termék hátoldalán lévő rögzítõ-elõkészítést fali felszereléshez, illetve rögzítheti a terméket VESA kompatibilis fali tartókra. VESA megadva a mindenkori műszaki adatokban.
5.3 Az elem behelyezése, ill. cseréje • Nyissa ki a távirányító elemfiókját • Helyezze be helyes polaritással a CR2025 típusú gombelemet. • Tetszés szerint távolítsa el az elem megszakító szalagját. • Zárja vissza az elemfiókot. Ügyeljen, hogy a retesz tisztán kattanjon be. 2 1 5.4 Az áramellátás csatlakoztatása Figyelmeztetés • Kizárólag egy erre a célra engedélyezett csatlakozó aljzattal üzemeltesse a terméket.
6. Kezelés és használat 6.1 A menüvezetés A készülék felhasználóbarát menüvezetést tartalmaz. A menüvezetés a kijelzőn jelenik meg. Az alábbi tárolómédiumok olvasása lehetséges: • SD/SDHC - cards (32 GB-ig) • USB tárolóeszköz A készülék bekapcsolásához működtesse az ON/OFF (be/ki) kapcsolót. H A főmenüt a [MENÜ] gombbal hívhatja be. A menüben mozogjon a [◄][►] gombokkal és válassza ki a kívánt funkciót. Amikor választását az [OK] gombbal megerősíti, megfelelő almenü jelenik meg.
6.2 Rendszerbeállítások A setup-menübe lépéshez nyomja meg a [SETUP] gombot távirányítóján, vagy mozogjon a [◄][►] gombokkal a készülék hátlapján, vagy a távirányító “Beállítások“ menüpontjában.
Nyelv Válassza ki a kívánt menü/kezelés nyelvet Kép lejátszás érdekében Funkciómenü a kép megjelenítési sorrend, véletlen vagy név szerinti rendezés beállítására Csúsztassuk módban Ezzel a funkcióval akár négy kép is megjeleníthető egyszerre Csúsztassuk sebessége Válassza ki a képek váltásának időtartamát Fotó hatás Itt három fotó-színeffektusból választhat: színes, monokróm és szépia Csúsztassuk hatás Funkciómenü a képátmenetek beállítására Fotó mód Fotó illesztése a kijelzőhöz Megjelenít It
7. Funkciók 7.1 Fotó A készülék automatikusan a fotó-diavetítéssel indul, amint behelyezett egy tárolóeszközt. Be nem helyezett tárolóeszköz esetén a készülék a belső memóriában tárolt adatokkal indul. A következő módon is navigálhat a fotó menüben: • Nyomja meg a [◄][►][▲][▼] gombokat a készüléken, vagy a távirányítón a gombot, majd az [OK] gombot. • A készülék alapbeállításként a diavetítéssel indul.
7.2 Naptár Nyomja meg a [◄][►][▲][▼] gombokat a készüléken, vagy a távirányítón a gombot, majd az [OK] gombot. A következõ funkciókat használhatja: • A [◄][►] gombbal módosíthatja az évet. • A [▲][▼] gombokkal hónapot válthat. H MEGJEGYZÉS • A Naptár beállítás menüben további beállításokat végezhet el.
7.3 Mappa Nyomja meg a [◄][►][▲][▼] gombokat a készüléken, vagy a távirányítón a gombot, majd az [OK] gombot]. Válassza ki a [▲][▼] gombbal a kívánt fájlt, majd nyomja meg távirányítóján a [►] gombot, vagy a készüléken a 3 gombot. Ekkor új menüablak jelenik meg, amelynek segítségével a tárolóeszközön található összes fájlt a belső memóriába mentheti. H • Az Igen / Yes [OK] gombbal való megerősítés után a tárolóeszközön kiválasztott fájl átkerül a belső memóriába.
8. Kiegészítő funkciók 8.1 Photo-Slideshow variációk 8.2 Causes of errors and error rectification The following table can be used to localise and rectify minor errors with the device: DPF Általános Általános Hiba Nincs kijelzés a kijelzőn A készülék hirtelen kikapcsol Nem jelenik meg kép Lehetséges ok Megszüntetés Készülék kikapcsolva Kapcsolja be a készüléket.
9. Karbantartás és ápolás A készülék kijelzője védőüveg mögött helyezkedik el. • A kijelzőt csak egy száraz, puha kendővel tisztítsa. • A tisztítás közben ne gyakoroljon nyomást a képernyőfelületre. • Ne használjon oldószert vagy alkoholtartalmú tisztítószert a tisztításhoz, mert a felület megsérülhet. Hivatkozás A kijelző kíméletes tisztításához és ápolásához mikroszálas tisztítókendőt ajánlunk. • A készülék többi részét száraz kendővel tisztítsa. Erős szennyeződésnél a kendő kissé benedvesíthető. 10.
12. Támogatott fájlformátumok Megjegyzés A dizájn és a műszaki adatok módosításának joga fenntartva, és előzetes bejelentést nem igényel. Digitális képkeret 00118560 Tápellátás (bemenet) 100-240 V AC / 50/60 Hz / 0,4 A Max Tápellátás (kimenet) 5 V DC / 1.0A Teljesítményfelvétel < 4.2 W Méretek (sz x ma x mé) 182 x 54 x 157 mm Súly ca. 400 g Ajánlott környezet 0°C - 40°C (32 - 104 F) Relatív páratartalom 10 - 80 % (non-condensing) Kijelző 20,32 cm (8.
Digitális képkeret 00118548 Tápellátás (bemenet) H 173 100-240 V AC / 50/60 Hz / 0,4 A Max Tápellátás (kimenet) 5 V DC / 1.0A Teljesítményfelvétel < 4.2 W Méretek (sz x ma x mé) 182 x 54 x 157 mm (with the base) 182 x 4 x 157 mm (without the base) Súly ca. 400 g Ajánlott környezet 0°C - 40°C (32 - 104 F) Relatív páratartalom 10 - 80 % (non-condensing) Kijelző 20,32 cm (8.
Digitális képkeret 00095290 Tápellátás (bemenet) 100-240 V AC / 50/60 Hz / 0,4 A Max Tápellátás (kimenet) 5 V DC / 1.0A Teljesítményfelvétel < 4.5 W Méretek (sz x ma x mé) 200 x 56 x 165 mm (with the base) 200 x 8 x 165 mm (without the base) Súly ca. 386 g Ajánlott környezet 0°C - 40°C (32 - 104 F) Relatív páratartalom 10 - 80 % (non-condensing) Kijelző 20,32 cm (8.
Digitális képkeret 00118551 Tápellátás (bemenet) H 175 100-240 V AC / 50/60 Hz / 0,4 A Max Tápellátás (kimenet) 5 V DC / 1.0A Teljesítményfelvétel < 4.2 W Méretek (sz x ma x mé) 185 x 56 x 158 mm Súly ca. 390 g Ajánlott környezet 0°C - 40°C (32 - 104 F) Relatív páratartalom 10 - 80 % (non-condensing) Kijelző 20,32 cm (8.
Digitális képkeret 00118577 Tápellátás (bemenet) 100-240 V AC / 50/60 Hz / 0,4 A Max Tápellátás (kimenet) 5 V DC / 1 A Teljesítményfelvétel < 4W Méretek (sz x ma x mé) 180 x 56 x 123 mm Súly ca.
13. Menüszerkezet Fotó Fotó diavetítés Fájl Naptári Beállítás Nyelv Kép lejátszás érdekében Csúsztassuk módban Csúsztassuk sebessége Fotó hatás Csúsztassuk hatás Fotó mód Megjelenít Set time/date Set time format Auto Power On Auto Power Off / Automatikus kikapcsolás Reset beállítás Kiléptetési H 14.
H 178
A 10 B CZ 179 9 8
Ovládací prvky a indikace A A: Digitaler Bilderrahmen – Bedien- und Anschlussfeld 1 ∧ Steuerungstaste Aufwärts / zur nächste Datei wechseln B B: Fernbedienung 1 POWER 2 SETUP On /Off (Zap./Vyp.) Zpět na systémové nastavení 3 ROTATE Otáčení fotografie proti směru otáčení hod. ručiček.
Obsah 1. Vysvětlení výstražných symbolů a pokynů .......................... 182 2. Obsah balení............................... 182 3. Bezpečnostní pokyny.................. 182 4. Chyba pixelů............................... 183 5. Uvedení do provozu.................... 184 5.1 Instalace ........................................184 5.2 Nástěnná montáž...........................184 5.3 Vložení resp. výměna baterie..........185 5.4 Připojení napájení..........................185 6. Obsluha a provoz..............
Děkujeme, že jste si vybrali výrobek Hama. Přečtěte si, prosím, všechny následující pokyny a informace. Uchovejte tento text pro případné budoucí použití. Pokud výrobek prodáte, předejte tento text novému majiteli. 1. Vysvětlení výstražných symbolů a pokynů Upozornění Tento symbol označuje bezpečnostní upozornění, které poukazuje na určitá rizika a nebezpečí. Poznámka Tento symbol označuje dodatečné informace nebo důležité poznámky. 2.
Upozornění - baterie • Použité baterie odstraňte a likvidujte z výrobku ihned. • Používejte výhradně akumulátory (nebo baterie) odpovídající udanému typu. • Při vkládání baterií vždy dbejte správné polarity (označení + a -) a • baterie vkládejte podle uvedené polarity. Při nedodržení hrozí nebezpečí vytečení baterií nebo exploze. • Baterie zcela nevybíjejte. • Baterie uchovávejte mimo dosah dětí. • Akumulátory/baterie nezkratujte a zabraňte jejich umístění v blízkosti holých kovových předmětů.
5. Uvedení do provozu 5.1 Instalace • Podle vyobrazení zašroubujte nožku do určeného závitového otvoru na zadní straně výrobku. • Sejměte ochrannou fólii displeje. • Výrobek postavte na rovnou, vodorovnou a neklouzavou plochu. • Na výrobek neumisťujte žádné další předměty. 5.2 Nástěnná montáž Alternativně můžete připravené upevnění na zadní straně výrobku použít pro nástěnnou montáž, resp. můžete výrobek upevnit na nástěnných držácích kompatibilních s VESA. Údaj VESA v příslušných technických údajích.
5.3 Vložení resp. výměna baterie • Otevřete přihrádku na baterie dálkového ovládání • Vložte knoflíkový článek typu CR2025, dbejte na správné pólování. • Volitelně odstraňte proužek na přerušení kontaktu baterie. • Kryt přihrádky na baterie opět uzavřete. Dbejte na to, aby zapadlo blokování. 2 1 5.4 Připojení napájení Upozornění • Výrobek provozujte pouze připojený ke schválené zásuvce. Zásuvka se musí nacházet v blízkosti výrobku a být snadno přístupná.
6. Obsluha a provoz 6.1 Vedení menu Přístroj je vybaven jednoduchým vedením menu. Vedení menu se zobrazuje na obrazovce. Pomocí přístroje můžete číst tato paměťová média: • Karty SD/SDHC (do 32 GB) • USB média Stisknutím tlačítka ON/OFF (zap./vyp.) přístroj zapněte. Hlavní menu vyvoláte pomocí tlačítka [MENU]. V menu se pohybujete pomocí tlačítek [◄][►] a volíte tak i požadovanou funkci. Po potvrzení Vaší volby tlačítkem [OK] se zobrazí odpovídající podmenu.
6.
Jazyk Zvolte požadovaný jazyk menu/obsluhy Sekvence fotografií Menu funkce pro nastavení pořadí snímků, náhodně nebo tříděno podle názvu Režim prezentace Při použití této funkce mohou být současně zobrazovány až 4 snímky. Rychlost prezentace Zvolte dobu, po kterou se mají snímky zobrazovat.
7. Funkce 7.1 Foto Přístroj se automaticky spustí s diashow snímků, jakmile vložíte paměťové médium. Pokud není vloženo paměťové médium, přístroj se spustí s uloženými daty interní paměti. V menu fotografie můžete navigovat také takto • Pomocí tlačítek [◄][►][▲][▼] na Vašem přístroji nebo na dálkovém ovládání stiskněte symbol a stiskněte tlačítko [OK]. • Přístroj se automaticky spouští se slideshow.
7.2 Kalendář Pomocí tlačítek [◄][►][▲][▼] na Vašem přístroji nebo na dálkovém ovládání stiskněte symbol a stiskněte tlačítko [OK]. Můžete provádět tyto funkce: • Pomocí tlačítka [◄][►] můžete měnit rok. • Pomocí tlačítek [▲][▼] můžete měnit měsíc. CZ UPOZORNĚNÍ V menu nastavení kalendáře můžete provádět další nastavení.
7.3 Složka Pomocí tlačítek [◄][►][▲][▼] na Vašem přístroji nebo na dálkovém ovládání stiskněte symbol a stiskněte tlačítko [OK]. Pomocí tlačítek [▲][▼] zvolte požadovaný soubor a poté stiskněte tlačítko [►] na Vašem dálkovém ovládání nebo tlačítko 3 na Vašem přístroji. Nyní se zobrazí nové okénko menu, pomocí kterého můžete do interní paměti ukládat všechny soubory, které se nachází na paměťovém médiu.
8. Přídavné funkce 8.1 Varianty promítání fotografií 8.2 Příčiny poruch a jejich odstranění Níže uvedená tabulka Vám napomůže při lokalizaci a odstranění menších závad: Obecně Žádné zobrazení na displeji Přístroj se neočekávaně vypne DPF Obecně Porucha Nezobrazuje se žádná fotografie. Možná příčina Odstranění Přístroj je vypnutý Zapněte přístroj. Ujistěte se, že je síťový adaptér Síťový adaptér není správně zastrčen v zásuvce a připojen k připojen. přístroji.
9. Údržba a čištění Displej přístroje se nachází za ochranným sklem. • Displej čistěte pouze suchým a měkkým hadříkem. • Při čištění na povrch obrazovky netlačte. • Aby nedošlo k poškození povrchu, nepoužívejte při čištění čisticí prostředky obsahující rozpouštědla nebo alkohol. UPOZORNĚNÍ Pro šetrné čištění a údržbu displeje Vám doporučujeme čisticí hadřík z mikrovlákna. • Zbývající části přístroje čistěte suchým hadříkem. Při silném znečištění můžete použít vlhký hadřík. 10.
12. Technické údaje Upozornění • Změny designu a technických údajů zůstávají vyhrazeny a nevyžadují předchozí ohlášení. Digitální fotorámeček 00118560 Napájení vstup 100-240 V AC / 50/60 Hz / 0,4 A Max Napájení výstup 5 V DC / 2.0 A Příkon < 4.2 W Rozměry (Š x V x H) 182 x 54 x 157 mm Hmotnost ca. 400 g Doporučené okolí přístroje 0°C - 40°C (32 - 104 F) Relativní vlhkost vzduchu 10 - 80 % (non-condensing) Displej 20,32 cm (8.
Digitální fotorámeček 00118548 CZ 195 Napájení vstup 100-240 V AC / 50/60 Hz / 0,4 A Max Napájení výstup 5 V DC / 2.0 A Příkon < 4.2 W Rozměry (Š x V x H) 182 x 54 x 157 mm (with the base) 182 x 4 x 157 mm (without the base) Hmotnost ca. 400 g Doporučené okolí přístroje 0°C - 40°C (32 - 104 F) Relativní vlhkost vzduchu 10 - 80 % (non-condensing) Displej 20,32 cm (8.
Digitální fotorámeček 00095290 Napájení vstup 100-240 V AC / 50/60 Hz / 0,4 A Max Napájení výstup 5 V DC / 2.0 A Příkon < 4.5 W Rozměry (Š x V x H) 200 x 56 x 165 mm (with the base) 200 x 8 x 165 mm (without the base) Hmotnost ca. 386 g Doporučené okolí přístroje 0°C - 40°C (32 - 104 F) Relativní vlhkost vzduchu 10 - 80 % (non-condensing) Displej 20,32 cm (8.
Digitální fotorámeček 00118551 CZ 197 Napájení vstup 100-240 V AC / 50/60 Hz / 0,4 A Max Napájení výstup 9 V DC / 1.5 A Příkon < 4.2 W Rozměry (Š x V x H) 185 x 56 x 158 mm Hmotnost ca. 390 g Doporučené okolí přístroje 0°C - 40°C (32 - 104 F) Relativní vlhkost vzduchu 10 - 80 % (non-condensing) Displej 20,32 cm (8.
Digitální fotorámeček 00118577 Napájení vstup 100-240 V AC / 50/60 Hz / 0,4 A Max Napájení výstup 5 V DC / 1.5 A Příkon < 4W Rozměry (Š x V x H) 180 x 56 x 123 mm Hmotnost ca.
13. Struktura menu DPF Fotografie Promítání fotografií Soubor Kalendář Nastavení Jazyk Sekvence fotografií Režim prezentace Rychlost prezentace Foto efekt Přechodový efekt Režim foto Nastavení zobrazení Nastavení času/data Nastavení formátu ćasu Automatické zapnutí Automatické vypnutí Reset nastavení Exit 14.
CZ 200
A 10 B SK 201 9 8
Konštrukcia a funkcia A A: Digitálny fotorámik – Ovládacie a pripájacie pole 1 ∧ 2 < 3 > 4 ►II 5 ∨ 6 7 8 9 10 Ovládací kláves nahor / prejsť na ďalší súbor VOL -/ ovládací kláves so šípkou doľava VOL +/ ovládací kláves so šípkou doprava Kláves Play/Pause/OK/ENTER Ovládací kláves nadol / prejsť na posledný súbor Tlačidlo Exit / Späť MENU = 2x Kláves ZAP/VYP Slot pre pamäťové karty SD/ MMC/SDHC USB (typ A) Pripojovacia zdierka pre sieťový adaptér B B: Diaľkový ovládač 1 POWER Zapnúť/vypnúť
Obsah 1. Vysvetlenie výstražných symbolov a upozornení .................. 204 2. Obsah balenia............................. 204 3. Bezpečnostné upozornenia ........ 204 4. Pixelová chyba............................ 205 5. Uvedenie do prevádzky .............. 206 5.1 Inštalácia .......................................206 5.2 Montáž na stenu............................206 5.3 Vloženie resp. výmena batérie........207 5.4 Pripojenie napájania ......................207 6. Obsluha a používanie .................
Ďakujeme, že ste sa rozhodli pre výrobok Hama. Prečítajte si všetky nasledujúce pokyny a informácie. Uchovajte tento návod na použitie pre prípadné budúce použitie. Pokiaľ výrobok predáte, dajte tento návod novému majiteľovi. 1. Vysvetlenie výstražných symbolov a upozornení Upozornenie Tento symbol označuje bezpečnostné upozornenie, ktoré poukazuje na určité riziká a nebezpečenstva. Poznámka Tento symbol označuje dodatočné informácie, alebo dôležité poznámky. 2.
Upozornenie - batérie • Spotrebované batérie bezodkladne odstráňte z výrobku a likvidujte ich. • Používajte výlučne nové akumulátory (alebo batérie) zodpovedajúce uvedenému typu. • Dbajte bezpodmienečne na správnu polaritu batérií (značenie + a -) a vložte ich príslušne. V prípade nerešpektovania hrozí nebezpečenstvo vytečenia alebo výbuchu batérií. • Batérie nevybíjajte do úplného vybitia. • Batérie uchovávajte mimo dosahu detí.
5. Uvedenie do prevádzky 5.1 Inštalácia • Naskrutkujte nožičku podľa znázornenia do príslušného závitového otvoru na zadnej strane výrobku. • Odstráňte fóliu na ochranu displeja. • Postavte výrobok na rovnú, vodorovnú a nekĺzavú plochu. • Na výrobok nepokladajte žiadne iné predmety. 5.2 Montáž na stenu Alternatívne môžete na zadnej strane výrobku použiť upevňovacie zariadenie pre montáž na stenu resp. môžete výrobok upevniť na nástenných držiakoch kompatibilných so štandardom VESA.
5.3 Vloženie resp. výmena batérie • Otvorte batériovú priehradku diaľkového ovládania • Vložte gombíkovú batériu typu CR2025 so správnym pólovaním. • Voliteľne odstráňte pásik prerušovača kontaktov batérie. • Zatvorte opäť batériovú priehradku. Dbajte pritom, aby blokovanie správne zacvakne. 2 1 5.4 Pripojenie napájania Upozornenie • Výrobok napájajte iba zo schválenej zásuvky. Zásuvka musí byť umiestnená v blízkosti výrobku a musí byť ľahko prístupná.
6. Obsluha a používanie 6.1 Ovládanie pomocou menu Prístroj je vybavený ovládacím menu, ktoré je optimalizované pre jednoduché používanie. Ovládacie menu sa zobrazuje na displeji. Je možné čítať z nasledujúcich pamäťových médií: • Pamäťové karty SD/SDHC (do 32 GB) • USB úložné médiá Prístroj zapnite aktivovaním spínača ON/OFF (ZAP/VYP). Tlačidlom [MENU] vyvoláte hlavné menu. V menu sa pohybujte pomocou tlačidiel [◄][►] a zvoľte požadovanú funkciu.
6.2 Systémové nastavenia Na prepnutie do nastavovacieho menu stlačte tlačidlo [SETUP] na vašom diaľkovom ovládači alebo sa pohybujte tlačidlami [◄][►] na zadnej strane prístroja alebo na diaľkovom ovládači na položku menu “Nastavenie“.
Jazyk Zvoľte požadovaný jazyk menu/ovládania Sekvencia fotografií Funkčné menu pre nastavenie poradia zobrazovania, buď náhodne alebo triedené podľa názvov Režim prezentácie Pomocou tejto funkcie je možné súčasne zobraziť až 4 snímky Rýchlosť prezentácie Zvoľte časový interval, v akom sa majú obrázky meniť Fotoefekt Tu môžete voliť z troch fotografických farebných efektov: farba, monochromatický, sepia Prechodové efekty Funkčné menu pre nastavenie prechodu snímok Fotografický mód Vycentrovať fo
7. Funkcie 7.1 Foto Hneď po vložení pamäťového média sa prístroj automaticky spustí s foto prezentáciou. Ak nie je vložené pamäťové médium, spúšťa sa prístroj s údajmi uloženými v internej pamäti. Vo fotografickom menu môžete navigovať aj takto • Pomocou tlačidiel [◄][►][▲][▼] na vašom prístroji alebo na diaľkovom ovládači stlačte symbol a stlačte tlačidlo [OK] • Prístroj sa štandardne spúšťa s prezentáciou.
7.4 Kalendár Pomocou tlačidiel [◄][►][▲][▼] na vašom prístroji alebo na diaľkovom ovládači stlačte symbol a stlačte tlačidlo [OK]. Môžete vykonať nasledujúce funkcie: • Tlačidlom [◄][►] môžete zmeniť údaj roka • Tlačidlami [▲][▼] môžete prepnúť mesiac SK UPOZORNENIE • V menu nastavení kalendára môžete robiť ďalšie nastavenia.
7.3 Priečinok Pomocou tlačidiel [◄][►][▲][▼] na vašom prístroji alebo na diaľkovom ovládači stlačte symbol a stlačte tlačidlo [OK]. Pomocou tlačidiel [▲][▼] zvoľte želaný súbor a stlačte potom tlačidlo [►] na diaľkovom ovládači alebo tlačidlo 3 na prístroji. Zobrazí sa nové okno menu, pomocou ktorého môžete ukladať všetky súbory z pamäťového média do internej pamäti. SK • Po potvrdení Áno / Yes tlačidlom [OK] bude zvolený súbor prenesený z pamäťového média do internej pamäte.
8. Doplnkové funkcie 8.5 varianty foto prezentácie 8.2 Príčiny chýb a ich odstránenie Nasledujúca tabuľka Vám pomôže pri lokalizácii a odstránení menších porúch: DFR Všeobecné Všeobecné Chyba Na displeji sa nič nezobrazuje Zariadenie sa nečekane vypne Nezobrazuje sa žiadny obrázok Možná príčina Odstránenie Prístroj je vypnutý Zapnite prístroj. Sieťový adaptér nie je správne pripojený Uistite sa, že je sieťový adaptér pripojený do zásuvky a prístroja.
9. Údržba a starostlivosť Displej prístroja je umiestnený za ochranným sklom. • Displej čistite iba suchou, jemnou utierkou. • Pri čistení na obrazovku netlačte. • Pri čistení nepoužívajte rozpúšťadlá alebo čistiace prostriedky s obsahom alkoholu, aby ste nepoškodili povrch prístroja. Poznámka Pre šetrné čistenie a ošetrovanie displeja vám odporúčame utierku z mikrovlákna. • Zvyšok prístroja vyčistite suchou utierkou. V prípade silného znečistenia je možné utierku mierne navlhčiť. 10.
12. Technické údaje Upozornenie Zmeny dizajnu a technických údajov sú vyhradené a nevyžadujú predchádzajúce oznámenie. Digitálny fotorámik 00118560 Napájanie na vstupe 100-240 V AC / 50/60 Hz / 0,4 A Max napájanie na výstupe 5 V DC / 1.0A Príkon < 4.2 W Rozmery (Š x V x H) 182 x 54 x 157 mm Hmotnosť ca. 400 g Odporúčané prostredie prístroja 0°C - 40°C (32 - 104 F) Relatívna vlhkosť vzduchu 10 - 80 % (non-condensing) Displej 20,32 cm (8.
Digitálny fotorámik 00118548 SK 217 Napájanie na vstupe 100-240 V AC / 50/60 Hz / 0,4 A Max napájanie na výstupe 5 V DC / 1.0A Príkon < 4.2 W Rozmery (Š x V x H) 182 x 54 x 157 mm (with the base) 182 x 4 x 157 mm (without the base) Hmotnosť ca. 400 g Odporúčané prostredie prístroja 0°C - 40°C (32 - 104 F) Relatívna vlhkosť vzduchu 10 - 80 % (non-condensing) Displej 20,32 cm (8.
Digitálny fotorámik 00095290 Napájanie na vstupe 100-240 V AC / 50/60 Hz / 0,4 A Max napájanie na výstupe 5 V DC / 1.0A Príkon < 4.5 W Rozmery (Š x V x H) 200 x 56 x 165 mm (with the base) 200 x 8 x 165 mm (without the base) Hmotnosť ca. 386 g Odporúčané prostredie prístroja 0°C - 40°C (32 - 104 F) Relatívna vlhkosť vzduchu 10 - 80 % (non-condensing) Displej 20,32 cm (8.
Digitálny fotorámik 00118551 SK 219 Napájanie na vstupe 100-240 V AC / 50/60 Hz / 0,4 A Max napájanie na výstupe 5 V DC / 1.0A Príkon < 4.2 W Rozmery (Š x V x H) 185 x 56 x 158 mm Hmotnosť ca. 390 g Odporúčané prostredie prístroja 0°C - 40°C (32 - 104 F) Relatívna vlhkosť vzduchu 10 - 80 % (non-condensing) Displej 20,32 cm (8.
Digitálny fotorámik 00118577 Napájanie na vstupe 100-240 V AC / 50/60 Hz / 0,4 A Max napájanie na výstupe 5 V DC / 1 A Príkon < 4W Rozmery (Š x V x H) 180 x 56 x 123 mm Hmotnosť ca.
13. Štruktúra menu Foto Foto prezentácia Súbor Kalendár Nastavenie Jazyk Sekvencia fotografií Režim prezentácie Rýchlosť prezentácie Fotoefekt Prechodové efekty Fotografický mód Displej Nastavenie času/datumu Nastavenie formátu času Automatické zapnutie Automatické vypnutie Resetovať nastavenie Exit 14.
SK 222
A 10 B P 223 9 8
Elementos de comando e indicadores A A: Moldura digital – Painel de operação e ligação 1 ∧ 2 < 3 > 4 ►II 5 ∨ 6 7 8 9 10 Botão de comando para cima / mudar para o ficheiro seguinte Botão de comando VOL -/ para a esquerda Botão de comando VOL +/ para a direita Botão de reprodução/pausa/ OK/ENTER Botão de comando para baixo / mudar para o último ficheiro Botão Sair / Retroceder MENU = 2x Botão LIGAR / DESLIGAR Leitor de cartões SD/MMC/ SDHC USB (Tipo A) Tomada de ligação para o adaptador de rede
Índice 1. Descrição dos símbolos de aviso e das notas............................ 226 2. Conteúdo da embalagem ........... 226 3. Indicações de segurança ............ 226 4. Erros de píxeis ............................ 227 5. Colocação em funcionamento.... 228 5.1 Posicionamento .............................228 5.2 Montagem na parede ....................228 5.3 Inserção e substituição da pilha.....229 5.4 Ligação à alimentação elétrica.......229 6. Operação e funcionamento........ 230 6.
Agradecemos que se tenha decidido por este produto Hama! Antes de utilizar o produto, leia completamente estas indicações e informações. Guarde, depois, estas informações num local seguro para consultas futuras. Se transmitir o produto para um novo proprietário, entregue também as instruções de utilização. 1. Descrição dos símbolos de aviso e das notas Aviso É utilizado para identificar informações de segurança ou chamar a atenção para perigos e riscos especiais.
• Elimine imediatamente o material da embalagem em conformidade com as normas locais aplicáveis. Aviso - pilhas • Retire imediatamente pilhas gastas do produto e elimine-as adequadamente. • Utilize exclusivamente baterias (ou pilhas) que correspondam ao tipo indicado. • Ao colocar as pilhas, tenha em atenção a polaridade correcta (inscrições + e -). A não observação da polaridade correcta poderá levar ao derrama das pilhas ou explosão. • Não sobrecarregue as pilhas.
5. Colocação em funcionamento 5.1 Posicionamento • Aparafuse a base de apoio, conforme ilustrado, na abertura roscada prevista para o efeito na parte traseira do produto. • Retire a película de proteção do visor. • Coloque o produto numa superfície plana, horizontal e antiderrapante. • Não coloque nenhum objeto sobre o produto. 5.
5.3 Inserção e substituição da pilha • Abra o compartimento da pilha do telecomando. • Coloque a pilha do tipo CR2025, com a polaridade correta. • Em alternativa, retire a fita isoladora da pilha. • Volte a fechar o compartimento da pilha. Certifique-se de que o bloqueio encaixa corretamente. 2 1 5.4 Ligação à alimentação elétrica Aviso • Ligue o produto apenas a uma tomada elétrica adequada. A tomada elétrica deve estar localizada na proximidade do produto e deve ser facilmente acessível.
6. Operação e funcionamento 6.1 A navegação do menu Este aparelho encontra-se equipado com uma navegação do menu de fácil utilização. Os seguintes dispositivos de memória são suportados: • Cartões SD/SDHC (até 32 GB) • Dispositivos de memória USB Ligue o aparelho, premindo o botão ON/OFF (LIG/DESLIG) Chame o menu principal com o botão [MENU]. Dentro do menu, movimente-se com os botões [◄][►] e seleccione a função pretendida.
6.2 Configurações do sistema Para aceder ao menu das configurações, prima o botão [SETUP] do telecomando ou chame o item de menu „Definições“ usando os botões [◄][►] do lado de trás do aparelho ou do telecomando.
Linguagem Seleccione o idioma de menu/operação pretendido Imagem ordem de reprodução Menu de funções para definir a sequência da apresentação das imagens: arbitrária ou ordenada por nome Aspecto do ecrã Com esta função podem ser visualizadas até quatro imagens simultâneas Intervalo entre slides Seleccione a duração para a visualização das imagens.
7. Funções 7.1 Fotografias O aparelho inicia automaticamente a apresentação de diapositivos logo que é inserido um suporte de dados. Se não for inserido um suporte de dados externo, o aparelho inicia a apresentação de diapositivos com as informações da memória interna. Pode também navegar no menu de fotografias do seguinte modo: • Seleccione o símbolo com os botões [◄][►][▲][▼] do aparelho ou do telecomando e prima, depois, o botão [OK]. • O aparelho é iniciado de série com a apresentação de diapositivos.
7.2 Calendário Seleccione o símbolo com os botões [◄][►][▲][▼] do aparelho ou do telecomando e prima, depois, o botão [OK]. Neste modo estão disponíveis as seguintes funções: NOTA • Se activou a função de alarme, isto é indicado com o respectivo símbolo de alarme . P • No menu de calendário pode realizar configurações adicionais.
7.3 Pastas Seleccione o símbolo com os botões [◄][►][▲][▼] do aparelho ou do telecomando e prima, depois, o botão [OK]. Com os botões [▲][▼] , seleccione o ficheiro pretendido e prima, depois, o botão [►] do telecomando ou o botão 3 do aparelho. É agora exibida uma nova janela de menu através da qual poderá memorizar todos os ficheiros do dispositivo de memória externo na memória interna do aparelho.
8. Funções adicionais 8.1 Variantes de apresentações de diapositivos de fotografias 8.2 Causas e resolução de erros A seguinte tabela auxilia à localização e resolução de menores avarias: Aspectos gerais Problema Sem exibição no visor Possível causa Resolução O aparelho está desligado Ligue o aparelho. O adaptador de rede não está correctamente ligado Certifique-se de que o adaptador de rede está encaixado na tomada e ligado ao aparelho. Verifique os fusíveis domésticos.
9. Manutenção e conservação O visor do aparelho encontra-se atrás de um vidro de protecção. • Limpe o visor apenas com um pano seco e suave. • Durante a limpeza, não exerça pressão sobre a interface do ecrã. • Para a limpeza, não utilize produtos de limpeza com solventes ou álcool para não danificar a superfície. Nota Para a limpeza suave e conservação do visor, recomendamos que utilize um pano de limpeza de microfibras. • Limpe o resto do aparelho com um pano seco.
12. Formatos de ficheiro suportados Nota Reserva-se o direito a alterações técnicas e de design sem aviso prévio. Moldura digital 00118560 Entrada de alimentação elétrica 100-240 V AC / 50/60 Hz / 0,4 A Max Saída de alimentação elétrica 5 V DC / 1.0A Consumo de energia < 4.2 W Dimensões (L x A x P) 182 x 54 x 157 mm Peso ca. 400 g Ambiente recomendado 0°C - 40°C (32 - 104 F) Humidade relativa 10 - 80 % (non-condensing) Visor 20,32 cm (8.
Moldura digital 00118548 P 239 Entrada de alimentação elétrica 100-240 V AC / 50/60 Hz / 0,4 A Max Saída de alimentação elétrica 5 V DC / 1.0A Consumo de energia < 4.2 W Dimensões (L x A x P) 182 x 54 x 157 mm (with the base) 182 x 4 x 157 mm (without the base) Peso ca. 400 g Ambiente recomendado 0°C - 40°C (32 - 104 F) Humidade relativa 10 - 80 % (non-condensing) Visor 20,32 cm (8.
Moldura digital 00095290 Entrada de alimentação elétrica 100-240 V AC / 50/60 Hz / 0,4 A Max Saída de alimentação elétrica 5 V DC / 1.0A Consumo de energia < 4.5 W Dimensões (L x A x P) 200 x 56 x 165 mm (with the base) 200 x 8 x 165 mm (without the base) Peso ca. 386 g Ambiente recomendado 0°C - 40°C (32 - 104 F) Humidade relativa 10 - 80 % (non-condensing) Visor 20,32 cm (8.
Moldura digital 00118551 P 241 Entrada de alimentação elétrica 100-240 V AC / 50/60 Hz / 0,4 A Max Saída de alimentação elétrica 5 V DC / 1.0A Consumo de energia < 4.2 W Dimensões (L x A x P) 185 x 56 x 158 mm Peso ca. 390 g Ambiente recomendado 0°C - 40°C (32 - 104 F) Humidade relativa 10 - 80 % (non-condensing) Visor 20,32 cm (8.
Moldura digital 00118577 Entrada de alimentação elétrica 100-240 V AC / 50/60 Hz / 0,4 A Max Saída de alimentação elétrica 5 V DC / 1 A Consumo de energia < 4W Dimensões (L x A x P) 180 x 56 x 123 mm Peso ca.
13. Estrutura do menu Fotografia Apresentação de diapositivos Ficheiro Calendário Configurações Linguagem Imagem ordem de reprodução Aspecto do ecrã Intervalo entre slides Efeito nas fotografias Efeito de transção Modo Foto Mostrador Acerto de hora/data Acertar o formato de hora Auto Ligado Auto Desligado Report parãmetros Exit 14.
P 244
A 10 B RO 245 9 8
Elemente de comandă şi afișaje A A: Ramă foto digitală Câmp de comandă și contact 1 Tastă comandă în sus / ∧ 2 Trecere la fișierul următor < 3 Tastă comandă VOL -/ Stânga > 6 Tastă comandă VOL +/ Dreapta Tastă Play/Pause/OK/ENTER Tastă comandă în jos / 7 Trecere la ultimul fișier 8 Tastă Exit / Înapoi 9 MENIU = 2x Tastă DESCHIS/îNCHIS Slot cartelă SD/MMC/SDHC USB (Tip A) Fișă de contact pentru adaptor rețea 4 ►II 5 ∨ 10 B B: Telecomandă 2 POWER SETUP 3 ROTATE 4 Înainte ZOOM Stânga 1
Cuprins 1. Explicarea simbolurilor de avertizare și indicații ................. 248 2. Conținutul pachetului................. 248 3. Instrucțiuni de siguranță............ 248 4. Erori pixeli .................................. 249 5. Punere în funcțiune .................... 250 5.1 Amplasare .....................................250 5.2 Montare pe perete .........................250 5.3 Introducerea respectiv înlocuirea bateriilor ............................251 5.4 Conectare la alimentarea cu curent251 6.
Vă mulţumim că aţi optat pentru un produs Hama. Pentru început vă rugăm să vă lăsați puțin timp și să citiți complet următoarele instrucțiuni și indicații. Vă rugăm să păstraţi manualul de utilizare la loc sigur pentru o consultare ulterioară în caz de nevoie. În caz de înstrăinare a aparatului vă rugăm să predați și acest manual noului proprietar. 1.
Avertizare - Baterii • Îndepărtați imediat bateriile folosite din produs și reciclați-le. • Utilizați numai acumulatoare (sau baterii) corespunzătoare tipului indicat. • Atenție în mod deosebit la polaritatea corectă a bateriilor (marcajele + şi -) și la introducerea lor conform cu acestea. În cazul nerespectării vă expuneți pericolului scurgerilor sau exploziei bateriilor. • Bateriile nu se încarcă. • Păstrați bateriile astfel încât să nu fie la îndemâna copiilor.
5. Punere în funcțiune 5.1 Amplasare • Înșurubați piciorul suport în orificiul cu filet de pe spatele produsului. • Îndepărtați folia de protecție a ecranului. • Plasați produsul pe o suprafață netedă, orizontală și nealunecoasă. • Nu plasați alte obiecte pe produs. 5.2 Montare pe perete Alternativ puteți folosi mecanismul de fixare de pe spatele produsului pentru o montare pe perete, respectiv îl puteți fixa la un suport de perete VESA compatibil. Detalii VESA în respectivele date tehnice.
5.3 Introducerea respectiv înlocuirea bateriilor • Deschideți compartimentul bateriilor telecomenzii. • Plasați bateria plată tip CR2025 cu polaritatea corectă. • Îndepărtați întrerupătorul de contact al bateriei. • Închideți compartimentul bateriilor. Dispozitivul de închidere trebuie să fie blocat. 2 1 5.4 Conectare la alimentarea cu curent Avertizare • Exploatați produsul numai la o priză aprobată în acest sens. Priză trebuie să fie plasată în apropierea produsului și să fie ușor accesibilă.
6. Deservire și funcționare 6.1 Navigare meniu Aparatul este dotat cu o navigare prin meniu ușor de utilizat. Navigarea se inserează pe ecran. Următoarele medii de stocare pot fi citite: • Cartele SD/SDHC (până la 32 GB) • Medii de stocare USB Porniți aparatul prin acționarea comutatorului ON/OFF (Deschis/Închis). Apelați meniul principal cu tasta [MENIU]. În meniu navigați cu tastele [◄][►] și alegeți funcția dorită. Când confirmați alegerea cu tasta [OK] apare un submeniu corespunzător.
6.2 Setări sistem Pentru a ajunge în structura meniului apăsați tasta [SETUP] de la telecomandă sau navigați cu ajutorul tastelor [◄][►] de pe spatele aparatului sau telecomenzii pe butonul meniului.
Limbă Selectați limba dorită pentru meniu/deservire Ordinea imaginilor Funcție a meniului pentru setarea ordinii redării imaginilor, întâmplător sau sortate după data producerii fișierului Mod Splitscreen Cu această funcție puteți afișa simultan până la 4 imagini Interval Dia Show Selectați durata de timp cu care imaginile urmează să se deruleze Efect imagine Aici puteți alege între trei efecte de culoare pentru imagini: culoare, monocrom, sepia Transfer imagine Funcție a meniului pentru setarea
7. Funcții 7.1 Imagine De îndată ce un mediu stocare a fost introdus aparatul pornește automat cu redarea imaginilor în format Dia Show. Dacă nu se introduce nici un mediu de stocare aparatul pornește cu prezentarea datelor aflate în memoria internă. • Cu autorul tastelor [◄][►][▲][▼] de la aparat sau telecomandă selectați simbolul ! și confirmați cu [OK]. • Aparatul pornește standardizat cu redarea Slide Show.
7.2 Calendar Apăsați cu tastele [◄][►][▲][▼] de la aparat sau telecomandă pe simbolul ! și apăsați tasta [OK]. Puteți executa următoarele funcțiuni: • Cu ajutorul tastelor [◄][►] puteți modifica anul • Cu ajutorul tastelor [▲][▼] puteți schimba luna Instrucțiune • În meniul Setări Calendar puteți efectua și alte setări.
7.3 Fișier Apăsați cu tastele [◄][►][▲][▼] de la aparat sau telecomandă pe simbolul ! și apăsați tasta [OK]. Cu ajutorul tastelor [▲][▼] selectați fișierul dorit și în final apăsați tasta [►] la telecomandă sau tasta 3 la aparat. Apare o nouă fereastră de meniu cu ajutorul căreia puteți memora pe memoria internă toate fișierele din mediul de stocare. • Prin confirmarea Da / Yes cu tasta [OK] fișierul selectat de pe mediul de stocare este transferat în memoria internă.
8. Funcțiuni suplimentare 8.1 Variante Slide Show imagini 8.
9. Curăţare Ecranul este situat in spatele unei protecții din sticlă. • Ştergeţi afişajul cu o cârpă uscată şi moale. • Nu apăsaţi pe ecran atunci când îl ştergeţi. • Pentru a nu deteriora suprafaţa, nu folosiţi solvenţi sau agenţi de curăţare care conţin alcool Instrucțiune Pentru o curățare delicată și îngrijirea ecranului, vă recomandăm să folosiți o lavetă de curățare din microfibră. • Ștergeţi restul aparatului cu o cârpă moale. Cârpa poate fi umedă în cazul în care aparatul este foarte murdar. 10.
12. Date tehnice Instrucțiune Ne rezervăm dreptul la modificări de design şi date tehnice fără ca acestea să necesite o notificare. Ramă foto digitală 00118560 Intrare alimentare cu curent 100-240 V AC / 50/60 Hz / 0,4 A Max Ieșire alimentare cu curent 5 V DC / 1.0A Consum de putere < 4.2 W Dimensiuni 182 x 54 x 157 mm Greutate ca. 400 g Ambianță recomandată 0°C - 40°C (32 - 104 F) Umiditate relativă a aerului 10 - 80 % (necondensabil) Display 20,32 cm (8.
Ramă foto digitală 00118548 RO 261 Intrare alimentare cu curent 100-240 V AC / 50/60 Hz / 0,4 A Max Ieșire alimentare cu curent 5 V DC / 1.0A Consum de putere < 4.2 W Dimensiuni 182 x 54 x 157 mm (cu picior suport) 182 x 4 x 157 mm (fără picior suport) Greutate ca. 400 g Ambianță recomandată 0°C - 40°C (32 - 104 F) Umiditate relativă a aerului 10 - 80 % (necondensabil) Display 20,32 cm (8.
Ramă foto digitală 00095290 Intrare alimentare cu curent 100-240 V AC / 50/60 Hz / 0,4 A Max Ieșire alimentare cu curent 5 V DC / 1.0A Consum de putere < 4.5 W Dimensiuni 200 x 56 x 165 mm (cu picior suport) 200 x 8 x 165 mm (fără picior suport) Greutate ca. 386 g Ambianță recomandată 0°C - 40°C (32 - 104 F) Umiditate relativă a aerului 10 - 80 % (necondensabil) Display 20,32 cm (8.
Ramă foto digitală 00118551 RO 263 Intrare alimentare cu curent 100-240 V AC / 50/60 Hz / 0,4 A Max Ieșire alimentare cu curent 5 V DC / 1.0A Consum de putere < 4.2 W Dimensiuni 185 x 56 x 158 mm Greutate ca. 390 g Ambianță recomandată 0°C - 40°C (32 - 104 F) Umiditate relativă a aerului 10 - 80 % (necondensabil) Display 20,32 cm (8.
Ramă foto digitală 00118577 Intrare alimentare cu curent 100-240 V AC / 50/60 Hz / 0,4 A Max Ieșire alimentare cu curent 5 V DC / 1 A Consum de putere < 4W Dimensiuni 180 x 56 x 123 mm Greutate ca.
13.
14. Informații pentru reciclare Instrucţiuni pentru protecţia mediului înconjurător: Din momentul aplicării directivelor europene 2012/19/EU şi 2006/66/EU în dreptul național sunt valabile următoarele: Aparatele electrice şi electronice nu pot fi salubrizate cu gunoiul menajer. Consumatorul este obligat conform legii să predea aparatele electrice și electronice la sfârșitul duratei de utilizare la locurile de colectare publice sau înapoi de unde au fost cumpărate.
All listed brands are trademarks of the corresponding companies. Errors and omissions excepted, and subject to technical changes. Our general terms of delivery and payment are applied. 00118577/09.16 Hama GmbH & Co KG 86652 Monheim / Germany www.hama.