C:\data\Projector\AirShot\AirShot_FMData\2634400112_VPLCX8676_AirShot\2634400112_VPLCX8676_AirShot\2634400112\2634400112VPLCX8676WW\01COV.
C:\data\Projector\AirShot\AirShot_FMData\2634400112_VPLCX8676_AirShot\2634400112_VPLCX8676_AirShot\2634400112\2634400112VPLCX8676WW\01COVTOC.fm © 2005 Sony Corporation. All rights reserved. • The software described herein may also be governed by the terms of a separate user license agreement. For usage of the software, refer to the end user license agreements of each software.
masterpage: Right C:\data\Projector\AirShot\AirShot_FMData\2634400112_VPLCX8676_AirShot\2634400112_VPLCX8676_AirShot\2634400112\2634400112VPLCX8676WW\02C01.fm Before Operation Features This unit is equipped with the Air Shot Version 2 (wireless connection) function. Any image of a computer can be projected by using the projector without connecting cables. Images from several computers can also be easily switched and projected.
masterpage: Left C:\data\Projector\AirShot\AirShot_FMData\2634400112_VPLCX8676_AirShot\2634400112_VPLCX8676_AirShot\2634400112\2634400112VPLCX8676WW\02C01.fm 2 Light. For the update program and instructions, refer to the folder “Air Shot Version 2 Light” in the supplied CDROM. Preparation Preparing the Computer System Requirements Recommended system requirements for the installed Projector Station for Air Shot Version 2 are as follows.
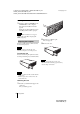
C:\data\Projector\AirShot\AirShot_FMData\2634400112_VPLCX8676_AirShot\2634400112_VPLCX8676_AirShot\2634400112\2634400112VPLCX8676WW\02C01.fm Computer WIRELESS LAN 5 MEMORY masterpage: Right Use [Safe to remove hardware] to stop the device and then remove the USB wireless LAN module. Then slide the switch to [WIRELESS LAN] and connect the USB wireless LAN module into the USB terminal.
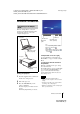
masterpage: Left C:\data\Projector\AirShot\AirShot_FMData\2634400112_VPLCX8676_AirShot\2634400112_VPLCX8676_AirShot\2634400112\2634400112VPLCX8676WW\02C01.fm Installing from the CD-ROM 1 Insert the supplied CD-ROM into the CD-ROM drive of the computer. The application installation window appears. Follow the step 3 and following steps in “Installing from the USB” on page 4. Note If the installation window does not appear automatically, click [My Computer]-[CDROM] - [Dp_Inst]. 2 The card pops out.
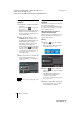
masterpage: Right C:\data\Projector\AirShot\AirShot_FMData\2634400112_VPLCX8676_AirShot\2634400112_VPLCX8676_AirShot\2634400112\2634400112VPLCX8676WW\02C01.fm Wireless Connection Connecting in the Simple Mode When the Simple Mode is selected in automatic setup during installation, make the following settings to connect the computer and projector: VPL-CX86 1000000 201 Meeting Room 43.2.60.
C:\data\Projector\AirShot\AirShot_FMData\2634400112_VPLCX8676_AirShot\2634400112_VPLCX8676_AirShot\2634400112\2634400112VPLCX8676WW\02C01.fm Setting and connecting the computer 1 Start the Projector Station for Air Shot Version 2. When it starts, the [ ] icon appears in the task tray. When [Create Shortcut Icon into Startup Folder.] is selected at installation, the Projector Station for Air Shot Version 2 starts automatically.
masterpage: Right C:\data\Projector\AirShot\AirShot_FMData\2634400112_VPLCX8676_AirShot\2634400112_VPLCX8676_AirShot\2634400112\2634400112VPLCX8676WW\02C01.fm 4 When the projector to be used is listed, select the projector and click the [Select] button. When multiple projectors are connected When the projector to be used is not listed, click the [Add] button and enter the serial number (seven-digit-number). The projector is added to the list.
masterpage: Left C:\data\Projector\AirShot\AirShot_FMData\2634400112_VPLCX8676_AirShot\2634400112_VPLCX8676_AirShot\2634400112\2634400112VPLCX8676WW\02C01.fm Items Functions Items Functions 7[Tool bar select] button When the button is clicked, only the tool bar for the projector control is displayed. When the button is clicked, the whole main window is displayed. qdProjector control buttons With the buttons, you can operate the projector selected on the controlled projector select menu.
masterpage: Right C:\data\Projector\AirShot\AirShot_FMData\2634400112_VPLCX8676_AirShot\2634400112_VPLCX8676_AirShot\2634400112\2634400112VPLCX8676WW\02C01.fm Connecting in the Manual Mode Connecting to several projectors at the same time Projector module (IEEE802.11b/g applicable product).
C:\data\Projector\AirShot\AirShot_FMData\2634400112_VPLCX8676_AirShot\2634400112_VPLCX8676_AirShot\2634400112\2634400112VPLCX8676WW\02C01.fm masterpage: Left Setting up the projector Using the software keyboard 1 When inputting characters or numbers, the software keyboard is displayed. Insert the supplied wireless LAN card into the slot of the projector. 1 For details, see page 6. 2 Turn on the projector. 3 Press the AIR SHOT key on the remote commander.
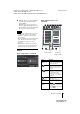
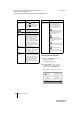
masterpage: Right C:\data\Projector\AirShot\AirShot_FMData\2634400112_VPLCX8676_AirShot\2634400112_VPLCX8676_AirShot\2634400112\2634400112VPLCX8676WW\02C01.fm Setting each mode In the initial display of the Air Shot 2 setting menu, the left edge of the mode currently used is displayed in light blue. You can switch the mode to be used and change the mode name and settings. x Displaying the setting items menu (action menu) The status appears in the right pane of the window.
C:\data\Projector\AirShot\AirShot_FMData\2634400112_VPLCX8676_AirShot\2634400112_VPLCX8676_AirShot\2634400112\2634400112VPLCX8676WW\02C01.fm masterpage: Left x Changing the settings When you select [Setup] from the action menu, the [Network Setting] window of the selected mode is displayed, where [Internet Protocol(IP)], [Wireless Network], and [802.1x Authentication] settings can be changed. Select the desired item and press the ENTER (or right) key to activate its setting items.
C:\data\Projector\AirShot\AirShot_FMData\2634400112_VPLCX8676_AirShot\2634400112_VPLCX8676_AirShot\2634400112\2634400112VPLCX8676WW\02C01.fm Items Key* masterpage: Right Functions When WEP is used for [Data Encryption], enter the WEP key. Enter the same key as that of the computer or access point.
masterpage: Left C:\data\Projector\AirShot\AirShot_FMData\2634400112_VPLCX8676_AirShot\2634400112_VPLCX8676_AirShot\2634400112\2634400112VPLCX8676WW\02C01.fm Setting the System Setup When [System Setup] is selected in the initial display of Air Shot 2 setting menu, the [System Setup] window is displayed. Select the desired item and press the ENTER (or right) key to activate its setting items. To input the desired value for the items, press the ENTER (or right) key.
masterpage: Right C:\data\Projector\AirShot\AirShot_FMData\2634400112_VPLCX8676_AirShot\2634400112_VPLCX8676_AirShot\2634400112\2634400112VPLCX8676WW\02C01.fm Setting the computer 1 Click the [ ] icon in the task tray and select [Open]. The main window of Projector Station for Air Shot Version 2 opens. Using the [Option Setting] Dialog Box This is used for the settings of Projector Station for Air Shot Version 2.
C:\data\Projector\AirShot\AirShot_FMData\2634400112_VPLCX8676_AirShot\2634400112_VPLCX8676_AirShot\2634400112\2634400112VPLCX8676WW\02C01.fm masterpage: Left The [Basic Setting] tab provides the basic setting items. [Simple Mode Setting] tab The [Simple Mode Setting] tab provides the settings on Simple Mode. [Profile Setting] tab The [Profile Setting] tab provides the profile settings for connecting to the projector when [Manual Mode] is selected.
C:\data\Projector\AirShot\AirShot_FMData\2634400112_VPLCX8676_AirShot\2634400112_VPLCX8676_AirShot\2634400112\2634400112VPLCX8676WW\02C01.fm masterpage: Right Setting/Operating via Web You can check the information of the projector from the computer or operate the projector on the computer. Check the connection and turn on the equipment. Accessing from the Computer You can access the Web page of the projector by either of the following two ways.
C:\data\Projector\AirShot\AirShot_FMData\2634400112_VPLCX8676_AirShot\2634400112_VPLCX8676_AirShot\2634400112\2634400112VPLCX8676WW\02C01.fm After access, the following display appears. masterpage: Left Operating the Projector on the Computer (Control) Click [Control]. You can control the projector on the computer. The functions of each button provide the same functions the button of the identical name. Confirming the State of Projector Settings (Information) Click [Information].
masterpage: Right C:\data\Projector\AirShot\AirShot_FMData\2634400112_VPLCX8676_AirShot\2634400112_VPLCX8676_AirShot\2634400112\2634400112VPLCX8676WW\02C01.fm Owner information This information is used for the Mail Report function. Setting Up the Projector Click [Setup]. The Setup menu dialog box appears. You can set the Owner information, Password, Date and Time, Mail Report, etc. Click [Apply] in the lower part of each window to update the projector to the data input in each window.
C:\data\Projector\AirShot\AirShot_FMData\2634400112_VPLCX8676_AirShot\2634400112_VPLCX8676_AirShot\2634400112\2634400112VPLCX8676WW\02C01.fm masterpage: Left Time Server Enter the address of the time server when the time is set by a timer server. Setting passwords for “Administrator” and “User” You can set passwords for each “Administrator” and “User.” The name of the “Administrator” account is preset to “root” at the factory. It cannot be changed.
masterpage: Right C:\data\Projector\AirShot\AirShot_FMData\2634400112_VPLCX8676_AirShot\2634400112_VPLCX8676_AirShot\2634400112\2634400112VPLCX8676WW\02C01.fm x Maintenance Report Lamp Reminder: Select this check box and enter the limit for the number of hours the projector lamp is to be used in the text box. This information will be used to send e-mail informing you that replacement is required for the projector lamp when the preset time has been reached. You can specify a time between 1 and 9999 hours.
C:\data\Projector\AirShot\AirShot_FMData\2634400112_VPLCX8676_AirShot\2634400112_VPLCX8676_AirShot\2634400112\2634400112VPLCX8676WW\02C01.fm masterpage: Left Advanced setting Click “Advanced Menu” to display the Advertisement button, PJ Talk button and SNMP button. These settings are mainly for administrative use. For details, consult with qualified Sony personnel.
C:\data\Projector\AirShot\AirShot_FMData\2634400112_VPLCX8676_AirShot\2634400112_VPLCX8676_AirShot\2634400112\2634400112VPLCX8676WW\02C01.fm masterpage: Right Others Troubleshooting Symptom The computer is not displayed in the PC list. (Projector) Cause and Remedy • Projector Station for Air Shot Version 2 is not installed in the computer nor started. c Install it. c Start Projector Station for Air Shot Version 2.
C:\data\Projector\AirShot\AirShot_FMData\2634400112_VPLCX8676_AirShot\2634400112_VPLCX8676_AirShot\2634400112\2634400112VPLCX8676WW\02C01.fm Symptom masterpage: Left Cause and Remedy The computer and projector are connected in the main window of Projector Station for Air Shot Version 2 but the image cannot be projected on the projector. • The projector is set to a picture muting. c Press the PIC MUTING key on the remote commander to release the muting.
C:\data\Projector\AirShot\AirShot_FMData\2634400112_VPLCX8676_AirShot\2634400112_VPLCX8676_AirShot\2634400112\2634400112VPLCX8676WW\02C01.fm Symptom masterpage: Right Cause and Remedy When the computer is connected to the projector, the mouse moves more slowly. • The computer is logged on with other than administrator privileges (Windows XP/2000 only). c The mouse moves slowly when the computer is logged on with other than administrator privileges.
masterpage: Left C:\data\Projector\AirShot\AirShot_FMData\2634400112_VPLCX8676_AirShot\2634400112_VPLCX8676_AirShot\2634400112\2634400112VPLCX8676WW\02C01.fm 28 Message PC PJ Unable to configure Simple Mode. a Cause and Remedy • Simple Mode Setting cannot be done successfully. c Click the [Close] button to close the main window and then open it and make the Simple Mode Setting. c Remove and then insert the USB wireless LAN module, and make Simple Mode Setting.
C:\data\Projector\AirShot\AirShot_FMData\2634400112_VPLCX8676_AirShot\2634400112_VPLCX8676_AirShot\2634400112\2634400112VPLCX8676WW\02C01.fm masterpage: Right Message PC PJ Projector connection established already. a Cause and Remedy • The computer cannot communicate with the projector as the other computer has already established communications with the projector. c After the projector is disconnected from the computer, communicate with the projector again.
masterpage: Left C:\data\Projector\AirShot\AirShot_FMData\2634400112_VPLCX8676_AirShot\2634400112_VPLCX8676_AirShot\2634400112\2634400112VPLCX8676WW\02C01.fm 30 Message PC PJ System error/Quit Air Shot v2 a The same IP Address already exists. a Cause and Remedy • Because of the lack of system resources in the computer, you cannot start the Air Shot Version 2 properly. c Restart Windows and start the Air Shot Version 2. a • The set IP address is already in use. c Input a new IP address.
C:\data\Projector\AirShot\AirShot_FMData\2634400112_VPLCX8676_AirShot\2634400112_VPLCX8676_AirShot\2634400112\2634400112VPLCX8676WW\02C01.fm Technical Terms Access point mode The mode using the wireless access point in a wireless LAN. Ad-hoc(Peer-to-peer) mode The mode not using the wireless access point in a wireless LAN. Air Shot Version 2 The function to connect the computer and the projector in wireless mode. Channel Channel allotted to a wireless LAN to avoid interference.
C:\data\Projector\AirShot\AirShot_FMData\2634400112_VPLCX8676_AirShot\2634400112_VPLCX8676_AirShot\2634400112\2634400112VPLCX8676WW\02C01.fm masterpage: Left WEP (Wired Equivalent Privacy) The security system to communicate the encrypted data. Register the same key as that of the connected computer to communicate. WPA (Wi-FI Protected Access) Security standards for wireless LAN. The WPA supports the strong TKIP encryption and the IEEE 802.1x Authentication. Although the IEEE 802.
C:\data\Projector\AirShot\AirShot_FMData\2634400112_VPLCX8676_AirShot\2634400112_VPLCX8676_AirShot\2634400112\2634400112VPLCX8676WW\03BCO.