READ BEFORE USE LIRE AVANT UTILISATION LEA ANTES DE USAR Visit www.hamiltonbeach.com for our complete line of products and Use and Care Guides – as well as delicious recipes, tips, and to register your product online! Rendez-vous sur www.hamiltonbeach.ca pour notre liste complète de produits et de nos manuels utilisateur – ainsi que nos délicieuses recettes, nos conseils et pour enregistrer votre produit en ligne ! Toaster Oven Four grille-pain Horno de la Tostadora ¡Visite www.hamiltonbeach.com.
wWARNING Fire Hazard. • If contents ignite, do not open oven door. Unplug oven and allow contents to stop burning and cool before opening door. • Do not operate unattended while in Toast or Broil modes. • Do not use with oven cooking bags. • Always allow at least one inch between food and heating element. • Always unplug toaster oven when not in use. • Regular cleaning reduces risk of fire hazard.
19. Do not place any of the following materials in the oven: paper, cardboard, plastic, and the like. 20. Do not cover crumb tray or any part of the oven with metal foil. This will cause overheating of the oven. 21. To turn oven off, turn timer to OFF position. See “Parts and Features” section. 22. Do not place eyes or face in close proximity with tempered safety glass door, in the event that the safety glass breaks. 23. Always use appliance with crumb tray securely in place. 24.
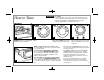
Parts and Features HIGH RACK POSITION: broiling and toasting ON SELECT MODELS: Convection Baking Function Nonstick Oven Interior NOTE: DO NOT place oven rack on very top ledge.
w WARNING Fire Hazard. How to Toast • If contents ignite, do not open oven door. Unplug oven and allow contents to stop burning and cool before opening door. • Do not leave appliance unattended when in operation. • Always unplug toaster oven when not in use. Medium 1 Place oven rack in HIGH RACK POSITION (shown) for toast, English muffins, bagels, and waffles. 5 2 Turn Temperature Dial to BROIL/ TOAST. 3 4 Place food in oven. Turn Function Dial to TOAST.
w WARNING Fire Hazard. How to Bake 1 Place oven rack on MIDDLE RACK POSITION or LOW RACK POSITION (depending on food to be cooked). LOW RACK POSITION shown. 5 6 • If contents ignite, do not open oven door. Unplug oven and allow contents to stop burning and cool before opening door. 2 • Do not use oven cooking bags. • Always allow at least one inch (2.5 cm) between food and heating element. • Always unplug toaster oven when not in use. 3 Turn Temperature Dial to desired temperature.
Convection Bake w WARNING Fire Hazard. (on select models) 1 Place oven rack on MIDDLE RACK POSITION or LOW RACK POSITION (depending on food to be cooked). LOW RACK POSITION shown. 5 2 • Always allow at least one inch (2.5 cm) between food and • If contents ignite, do not open heating element. oven door. Unplug oven and allow contents to stop burning • Always unplug toaster oven and cool before opening door. when not in use. • Do not use oven cooking bags.
w WARNING Fire Hazard. How to Broil 1 Place the oven rack on the baking pan, and then insert both into the same slot. HIGH RACK POSITION in the upper slot is for faster broiling times. MIDDLE RACK POSITION in the lower slot is for foods needing longer broiling times, like chicken breasts. Place food on oven rack. Place in oven. DO NOT PREHEAT OVEN. 8 • If contents ignite, do not open oven door. Unplug oven and allow contents to stop burning and cool before opening door.
How to Broil (cont.) 5 FOOD APPROX. BROIL TIME Cook beef and pork to at least 160°F (71°C). Hamburgers 25 minutes Cook chicken to at least 165°F (73°C). Hot Dogs 15 minutes Sausage Links or Patties (pierce casings before cooking) 15 to 20 minutes Cook fish until at least 145°F (63°C) or until opaque or flakes with a fork. Fish 15 minutes Visit foodsafety.gov for more safe cooking temperature information. These cooking times are an average and should be adjusted to individual preferences.
Cleaning w WARNING Electrical Shock Hazard. Do not clean with metal scouring pads. Pieces can break off pad and touch electrical parts. Your toaster oven should be cleaned regularly for best performance and long life. Regular cleaning will also reduce the risk of fire hazard. Oven Rack 1 2 3 4 Baking Pan To clean inside of oven, wipe oven walls, bottom of oven, and glass door with a damp, soapy cloth. Repeat with a damp, clean cloth. For stubborn stains, use a plastic scouring pad.
Troubleshooting PROBLEM PROBABLE CAUSE Oven will not heat. • Check to make sure electrical outlet is working and the oven is plugged in. Turn Temperature Dial to 350°F (177°C). Turn Function Dial to BAKE; then turn Timer to STAY ON. Moisture forms on inside of oven door when toasting. • This is normal when toasting in a toaster oven. Moisture is slower to escape from a toaster oven than from a toaster. The amount of moisture will differ between fresh bread, bagels, and frozen pastries.
Limited Warranty This warranty applies to products purchased in the U.S. and Canada. This is the only express warranty for this product and is in lieu of any other warranty or condition. This product is warranted to be free from defects in material and workmanship for a period of one (1) year from the date of original purchase.
wAVERTISSEMENT Danger d’incendie. • Si le contenu de votre grille-pain se met à brûler, n’ouvrez jamais la porte du grille-pain. Débranchez l’appareil et laissez le contenu s’arrêter de brûler avant d’ouvrir la porte. • Ne faites jamais fonctionner en modes TOAST ou BROIL sans surveillance. • N’utilisez jamais avec des sacs de cuisson au four. • Laissez toujours au moins un pouce libre entre les aliments et l’élément de chauffage. • Débranchez toujours votre grille-pain quand vous ne l’utilisez pas.
16. Un incendie peut survenir si le four grille-pain est recouvert, touche ou est près de matériaux inflammables, y compris rideaux, tentures, murs et autres articles semblables, lorsqu’il fonctionne. Ne pas remiser des articles sur le dessus de l’appareil lorsqu’il est utilisé, ou avant le refroidissement de l’appareil. 17. Une grande précaution doit être prise lors de l’utilisation de contenants construits en matériaux autre que le métal ou le verre. 18.
Pièces et caractéristiques POUR LES MODÈLES SÉLECTIONNÉS : Cuisson par convection Intérieur antiadhésif POSITION SUPÉRIEURE DE LA GRILLE : grillage et brunissage NOTE : NE PAS placer la grille du four sur le très premier rebord.
Le grillage w AVERTISSEMENT Risque d’incendie. • Si les aliments s’enflamment, ne pas ouvrir la porte du four. Débrancher le four et laisser les aliments s’éteindre et refroidir avant d’ouvrir la porte. • Ne pas laisser l’appareil sans surveillance pendant le fonctionnement. • Toujours débrancher le four grille-pain dès la fin de l’utilisation. Moyenne 1 Placer la grille en POSITION SUPÉRIEURE DE LA GRILLE (illustrée) pour les rôties, muffins anglais, bagels, et gaufres.
Pour la cuisson 1 w AVERTISSEMENT Risque d’incendie. • Si les aliments s’enflamment, ne pas ouvrir la porte du four. Débrancher le four et laisser les aliments s’éteindre et refroidir avant d’ouvrir la porte. 2 Placer la grille en POSITION CENTRALE Tourner le sélecteur de DE LA GRILLE ou POSITION INFÉRIEURE température à la température désirée. DE LA GRILLE (selon les aliments à cuire). POSITION INFÉRIEURE DE LA GRILLE illustrée.
w AVERTISSEMENT Risque d’incendie. Cuisson par convection • Si les aliments s’enflamment, ne pas ouvrir la porte du four. Débrancher le four et laisser les aliments s’éteindre et refroidir avant d’ouvrir la porte. • Ne pas utiliser de sac de cuisson au four. • Toujours laisser 2,5 cm (1 po) libre entre les aliments et l’élément de chauffage. • Toujours débrancher le four grille-pain dès la fin de l’utilisation.
Cuisson au gril 1 Déposer la grille du four dans le plat de cuisson et insérer-les dans la même fente. La POSITION ÉLEVÉE DE LA GRILLE sur la fente supérieure est utilisée pour griller plus rapidement. La POSITION CENTRALE DE LA GRILLE sur la fente inférieure est utilisée pour des aliments nécessitant des durées de rôtissage plus longues, comme les poitrines de poulet. Placer les aliments sur la grille du four. Placer au four. NE PAS PRÉCHAUFFER. w AVERTISSEMENT Risque d’incendie.
Cuisson au gril (suite) ALIMENT TEMPS DE CUISSON AU GRIL APPROX. Hamburgers 25 minutes Hot-dogs 15 minutes Saucisses longues ou galettes 15 à 20 minutes (percer les boyaux avant de cuire) Poisson 5 15 minutes Ces temps de cuisson représentent une moyenne et doivent être modifiés pour les goûts individuels. Tourner les aliments à la mi-cuisson. Cuire le boeuf et le porc jusqu’à une température minimale de 71 °C (160 °F). Cuire le poulet jusqu’à une température minimale de 73 °C (165 °F).
Nettoyage w AVERTISSEMENT Risque d’électrocution. Ne pas utiliser de tampon à récurer métallique pour le nettoyage. Des débris métalliques peuvent se détacher et tomber sur des composants électriques. Nettoyer périodiquement le four grille-pain pour un rendement optimal et prolonger la durée de vie. Le nettoyage périodique diminue également le risque d’incendie.
Dépannage PROBLÈME CAUSE POSSIBLE Le four ne chauffe pas. • Assurer le fonctionnement de la prise murale et le branchement du four. Tourner le sélecteur de température à 177 °C (350 °F). Tourner la commande par cadran à BAKE (cuisson) puis tourner la minuterie à STAY ON (continue). Formation de condensation sur l’interieur de la porte du four pendant le brunissage. • Ceci est normal pendant le brunissage dans un four grille-pain.
Notes 23
Garantie limitée Cette garantie s’applique aux produits achetés aux É.-U. et au Canada. C’est la seule garantie expresse pour ce produit et est en lieu et place de tout autre garantie ou condition. Ce produit est garanti contre tout défaut de matériaux et de main-d’oeuvre pour une période de un (1) an à compter de la date d’achat d’origine.
wADVERTENCIA Peligro de Incendio. • Si los contenidos se prenden fuego, no abra la puerta del horno. Desenchufe el horno y espere que los contenidos dejen de quemarse y que se enfríen antes de abrir la puerta. • No haga funcionar sin atención mientras se encuentre en el modo Toast (tostar) o el modo Broil (asar). • No utilice con bolsas de cocción para horno. • Siempre deje por lo menos una pulgada entre los alimentos y el elemento calentador. • Siempre desenchufe la tostadora cuando no la esté usando.
17. Puede ocurrir un incendio si el horno eléctrico se cubre, toca o se encuentra cerca de materiales inflamables, incluyendo cortinas, colgaduras, paredes y superficies similares cuando esté funcionando. No guarde ningún artículo sobre el aparato cuando esté funcionando, o antes de que se enfríe. 18. Se debe tener mucho cuidado cuando se usan envases que no sean de metal o de vidrio. 19. No guarde ningún material adentro del horno cuando no se use, exceptuando los accesorios recomendados por el fabricante.
Partes y Características EN MODELOS SELECTOS: Horneado por Convección Interior Antiadherente POSICIÓN ALTA DE LA REJILLA: asar y tostar NOTA: NO COLOQUE rejilla de horno en el saliente muy primero.
w ADVERTENCIA Riesgo de Fuego. Como Tostar • Si el contenido prende fuego, no abra la puerta del horno. Desconecte el horno y deje que el contenido deje de quemarse y se enfríe antes de abrir la puerta. • No deje el aparato desatendido cuando esté funcionando. • Siempre desconecte el horno tostador cuando no esté en uso. Intermedio 1 Coloque la rejilla en LA POSICIÓN ALTA DE LA REJILLA (como se muestra) para tostar panecillos ingleses, bagels, y waffles.
Como Cocinar 1 w ADVERTENCIA Riesgo de Fuego. • Si el contenido prende fuego, no abra la puerta del horno. Desconecte el horno y deje que el contenido deje de quemarse y se enfríe antes de abrir la puerta. 2 Coloque la rejilla en la POSICIÓN Gire el Selector de Temperatura a MEDIA DE LA REJILLA o POSICIÓN la temperatura deseada. BAJA DE LA REJILLA (dependiendo del alimento a ser cocinado). Se muestra la POSICIÓN BAJA DE LA REJILLA. • No encierre completamente el alimento en papel aluminio.
w ADVERTENCIA Riesgo de Fuego. Horneado por Convección • Si el contenido prende fuego, no abra la puerta del horno. Desconecte el horno y deje que el contenido deje de quemarse y se enfríe antes de abrir la puerta. (en modelos selectos) 1 Coloque la rejilla en la POSICIÓN MEDIA DE LA REJILLA o POSICIÓN BAJA DE LA REJILLA (dependiendo del alimento a ser cocinado). Se muestra la POSICIÓN BAJA DE LA REJILLA. 2 Gire el Selector de Temperatura a la temperatura deseada.
w ADVERTENCIA Riesgo de Fuego. Como Asar 1 Coloque la rejilla del horno en la bandeja para hornear, y luego introduzca ambas en la misma ranura. La POSICIÓN ALTA DE LA REJILLA en la ranura superior se utiliza para asar más rápidamente. La POSICIÓN MEDIA DE LA REJILLA en la ranura más baja se utiliza para alimentos que necesitan tiempos de cocción más prolongados, como pechugas de pollo. Coloque el alimento en el rejilla de horno. Coloque en el horno. NO PRECALIENTE EL HORNO.
Como Asar (cont.) 5 ALIMENTO TIEMPO DE ASADO APROX. Hamburguesas 25 minutos Hot Dogs 15 minutos Salchichas y embutidos (agujere los empaques antes de cocinar) 15 a 20 minutos Pescado 15 minutos Estos tiempos de cocción son un promedio y deben de ajustarse a las preferencias personales. Gire el alimento media vuelta a lo largo del tiempo de cocción. SI USTED VIVE EN UNA ÁREA DE ALTITUD ELEVADA: El servicio de extensión tendrá información detallada sobre cocción en su área.
Limpieza w ADVERTENCIA Peligro de Descarga Eléctrica. No limpie con estropajos metálicos. Las piezas pueden romper la almohadilla y tocar partes eléctricas. Su horno tostador debe limpiarse regularmente para un mejor desempeño y una larga vida. La limpieza regular también reducirá el riesgo de fuego. Rejilla de Horno 1 2 3 4 Sartén de Cocción Para limpiar el interior del horno, limpie las paredes, parte inferior del horno y puerta de vidrio con un trapo húmedo y jabonoso.
Resolviendo Problemas PROBLEMA PROBABLE CAUSA El horno no calienta. • Revise para asegurarse que la toma eléctrica esté funcionando y el horno esté conectado. Gire el Selector de Temperatura a 350°F (177°C). Gire el Selector de Función a BAKE (cocinar), luego gire el Programador de Tiempo a STAY ON (dejar encendido). Se forma humedad en el interior de la puerta del horno cuando tuesta. • Esto es normal cuando se tuesta en un horno tostador.
Grupo HB PS, S.A. de C.V., Monte Elbruz 124-301, Colonia Palmitas, Delegación Miguel Hidalgo, C.P. 11560, México, Distrito Federal 01-800-71-16-100 PÓLIZA DE GARANTÍA PRODUCTO: MODELO: MARCA: Grupo HB PS, S.A. de C.V.
PROCEDIMIENTO PARA HACER EFECTIVA LA GARANTÍA • • • • • Para hacer efectiva la garantía no deben exigirse mayores requisitos que la presentación del producto y la póliza correspondiente, debidamente sellada por el establecimiento que lo vendió. Para hacer efectiva la garantía, lleve su aparato al Centro de Servicio Autorizado más cercano a su domicilio (consulte la lista anexa).