MICROWAVE OVEN TIME COOK TIME DEFROST WEIGHT DEFROST POWER CLOCK KITCHEN TIMER POPCORN POTATO PIZZA BEVERAGE REHEAT FROZEN VEGETABLE EXPRESS COOK 1 2 3 4 5 6 7 8 9 0 MEMORY Model No. EM925AJW-P1 EM925AJW-P2 Hamilton Beach is a registered trademark of Hamilton Beach Brands, Inc. used under license by Wal-Mart Stores, Inc.
PRECAUTIONS TO AVOID POSSIBLE EXPOSURE TO EXCESSIVE MICROWAVE ENERGY (a) Do not attempt to operate this oven with the door open as this can result in harmful exposure to microwave energy. It is important not to defeat or tamper with the safety interlocks. (b) Do not place any object between the oven front face and the door or allow soil or cleaner residue to accumulate on sealing surfaces. (c) Do not operate the oven if it is damaged.
IMPORTANT SAFEGUARDS When using electrical appliances basic safety precautions should always be followed, including the following: WARNING- To reduce the risk of burns, electric shock, fire and/or injury to persons, or exposure to excessive microwave energy: • Read all instructions before using the should not be heated in the containers. appliance. • Use this appliance only for its intended • Read and follow the specific: "PRECAUuses as described in this manual.
• Liquids, such as water, coffee, or tea may overheat beyond the boiling point without appearing to be boiling. Visible bubbling or boiling when the container is removed from the microwave oven is not always present. THIS COULD RESULT IN VERY HOT LIQUIDS SUDDENLY BOILING OVER WHEN THE CONTAINER IS DISTURBED, OR A SPOON OR OTHER UTENSIL IS INSERTED INTO THE LIQUID. i) Do not overheat the liquid. ii) Stir the liquid both before and halfway through heating it.
Power Supply Cord 1. A short power-supply cord is provided to reduce the risks resulting from becoming entangled in or tripping over a longer cord. 2. Longer cord sets or extension cords are available and may be used if care is exercised in their use. 3. If a long cord set or extension cord is used: 1) The marked electrical rating of the cord set or extension cord should be at least as great as the electrical rating of the appliance. 2) The extension cord must be a grounding-type 3-wire cord.
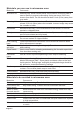
Materials you can use in microwave oven Materials Comments Aluminum foil Shielding only. Small smooth pieces can be used to cover thin parts of meat or poultry to prevent overcooking. Arcing can occur if foil is too close to oven walls. The foil should be at least 1 inch (2.5cm) away from oven walls. Follow manufacturer's instructions. The bottom of browning dish must be at least 3/16 inch (5mm) above the turntable. Incorrect usage may cause the turntable to break. Microwave-safe only.
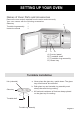
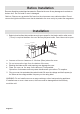
SETTING UP YOUR OVEN Names of Oven Parts and Accessories Remove the oven and all materials from the carton and oven cavity. Your oven comes with the following accessories: Glass tray 1 Turntable ring assembly 1 Instruction manual 1 D C A B A) Control panel B) Turntable shaft C) Turntable ring assembly D) Glass tray Turntable Installation Hub (underside) a. Never place the glass tray upside down. The glass tray should never be restricted. b.
Before Installation Remove all packing material and accessories. Examine the oven for any damage such as dents or broken door. Do not install if oven is damaged. Cabinet: Remove any protective film found on the microwave oven cabinet surface. Do not remove the light brown Mica cover that is attached to the oven cavity to protect the magnetron. Installation 1. Select a level surface that provides enough open space for the intake and/or outlet vents. (7.
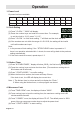
OPERATION Control Panel and Features (1) (2) (3) (4) TIME COOK TIME DEFROST WEIGHT DEFROST (7) POWER CLOCK KITCHEN TIMER (8) POPCORN POTATO PIZZA FROZEN VEGETABLE BEVERAGE REHEAT (5) EXPRESS COOK (6) (9) 1 2 3 4 5 6 7 8 9 0 (11) MEMORY (10) (1) (2) (3) (4) (5) Time Cook Time Defrost Power Clock Auto menu: Popcorn, Potato, Pizza, Frozen Vegetable, Beverage, Reheat (6) (7) (8) (9) Number Buttons: 0-9 Weight Defrost Kitchen Timer function Stop/Clear: clears all previous sett
Operation 1. Power Level 10 power levels are available. Level 10 9 8 7 6 5 4 3 2 1 Power 100% 90% 80% 70% 60% 50% 40% 30% 20% 10% Display PL10 PL9 PL8 PL7 PL6 PL5 PL4 PL3 PL2 PL1 2. Clock Setting (1) Press " CLOCK ," "00:00" will display. (2) Press the number keys and enter the current time. For example, to set the clock to 10:12, press "1,0,1,2". (3) Press " CLOCK " to finish clock setting. ":" will flash and the clock will be lit.
Example: to cook the food with 50% microwave power for 15 minutes. a. Press "TIME COOK" once. "00:00" displays. b. Press "1","5","0","0" in order. c. Press "POWER" once, then press "5" to select 50% microwave power. d. Press "START/+30SEC." to start cooking. Note: 1. In the process of setting, if the " STOP/CLEAR" or " START/+30 SEC" operation button is pressed within 1 minute, the oven will go back to the previous setting automatically. 2.
8. POPCORN (1) Press " POPCORN " repeatedly until the package size of your popcorn appears in the display, "1.75", "3.0", "3.5" will display in order. For example, press "POPCORN" once, "1.75" appears. (2) Press "START/+30 SEC." to cook, buzzer sounds once. When cooking finished, . times buzzer will sound five 9. POTATO (1) Press " POTATO " repeatedly until the number you wish appears in the display, "1","2","3" will display in order.
12. DINNER PLATE (1) Press " REHEAT " repeatedly until the number you wish appears in the display, "9.0","12.0","18.0" oz will display in order. For example, press "REHEAT" once, "9.0" appears. (2) Press "START/+30 SEC." to cook, buzzer sounds once. When cooking is finished, a buzzer sounds five times. 13. PIZZA (Reheat) (1) Press " PIZZA " repeatedly until the weight of your pizza appears in the display, "4.0", "8.0", "14.0" oz will display in order. For example, press "PIZZA" once, "4.0" appears.
15. Multi-stage Cooking At most, 2 stages can be set for cooking. In multi-stage cooking, if one stage is defrosting, then defrosting shall be placed at the first stage automatically. Note: Auto cooking cannot work in the multi-stage cooking. Example: if you want to cook with 80% microwave power for 5 minutes + 60% microwave power for 10 minutes.
Troubleshooting Check your problem by using the chart below and try the solutions for each problem. TROUBLE POSSIBLE CAUSE Oven will not start a. Electrical cord for oven is not plugged in. b. Door is open. c. Wrong operation is set. a. Plug into the outlet. b. Close the door and try again. c. Check instructions. Arcing or sparking a. Materials to be avoided in microwave oven were used. b. The oven is operated when empty. c. Spilled food remains in the cavity. a. Use microwave-safe cookware only. b.
ONE YEAR LIMITED WARRANTY This is the only express warranty for this product and is in lieu of any other warranty. This product carries a warranty that it will be free from defects in material and workmanship for a period of one year from the date of purchase. This warranty is valid for the original retail purchaser or gift recipient from the date of initial retail purchase and is not transferable. Keep your original sales receipt as proof of purchase is required to make a warranty claim.