READ BEFORE USE LIRE AVANT UTILISATION LEA ANTES DE USAR Visit www.hamiltonbeach.com for our complete line of products and Use and Care Guides – as well as delicious recipes, tips, and to register your product online! Rendez-vous sur www.hamiltonbeach.ca pour notre liste complète de produits et de nos manuels utilisateur – ainsi que nos délicieuses recettes, nos conseils et pour enregistrer votre produit en ligne ! ¡Visite www.hamiltonbeach.com.
wWARNING Fire Hazard. • If contents ignite, do not open oven door. Unplug oven and allow contents to stop burning and cool before opening door. • Do not operate unattended while in Toast or Broil modes. • Do not use with oven cooking bags. • Always allow at least one inch between food and heating element. • Always unplug toaster oven when not in use. • Regular cleaning reduces risk of fire hazard.
17. Extreme caution should be exercised when using containers constructed of materials other than metal or glass. 18. Do not store any materials, other than manufacturerrecommended accessories, in this oven when not in use. 19. Do not place any of the following materials in the oven: paper, cardboard, plastic, and the like. 20. Do not cover crumb tray or any part of the oven with metal foil. This will cause overheating of the oven. 21. To turn oven off, turn timer to O (OFF) position.
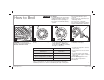
Parts and Features Oven Door HIGH RACK POSITION: broiling Temperature Dial ON Indicator Light Timer LOW RACK POSITION: baking and toasting Slide-Out Crumb Tray Oven Rack Baking Pan 4 840220601 ENv01.
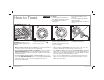
How to Toast 1 Place oven rack in LOW RACK POSITION (shown) for toast, English muffins, bagels, and waffles. w WARNING Fire Hazard. • If contents ignite, do not open oven door. Unplug oven and allow contents to stop burning and cool before opening door. 2 Turn Temperature Dial to maximum temperature ( ). Place food in oven. • When toasting only two slices of bread, place bread in middle of oven rack to get even toasting on top and bottom.
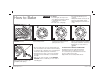
How to Bake 1 Place oven rack on LOW RACK POSITION (shown). 5 When finished, turn Timer dial to O (OFF) and unplug. w WARNING Fire Hazard. 2 Turn Temperature Dial to desired temperature. • If contents ignite, do not open oven door. Unplug oven and allow contents to stop burning and cool before opening door. • Do not use oven cooking bags. 3 4 Rotate Timer past 10 and let preheat for 5 minutes prior to placing food in oven. • Do not totally enclose foods in aluminum foil.
How to Broil 1 Slide oven rack into HIGH RACK POSITION. Insert baking pan under oven rack and add food. DO NOT PREHEAT OVEN. w WARNING Fire Hazard. • If contents ignite, do not open oven door. Unplug oven and allow contents to stop burning and cool before opening door. • Do not leave oven unattended during operation. 2 3 Turn Temperature Dial to (broil). 4 Rotate Timer past 10 and then to the desired broiling time or rotate Timer to (ON). Turn foods when browned or halfway through cooking time.
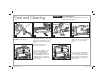
Care and Cleaning w WARNING Electrical Shock Hazard. Do not clean with metal scouring pads. Pieces can break off pad and touch electrical parts. Oven Rack Baking Pan 1 When finished, turn Timer dial to O (OFF) and unplug. 5 2 3 To clean inside of oven, wipe oven walls, bottom of oven, and glass door with a damp, soapy cloth. Repeat with a damp, clean cloth. For stubborn stains, use a plastic scouring pad. To remove door: Open door; gently pull straight up and remove to clean with hot, soapy water.
Troubleshooting PROBLEM PROBABLE CAUSE Oven will not heat. • Check to make sure electrical outlet is working and the oven is plugged in. Turn Temperature Dial to 350°F (177°C) and turn Timer to (ON). Moisture forms on inside of oven door when toasting. • This is normal when toasting in a toaster oven. Moisture is slower to escape from a toaster oven than from a toaster. The amount of moisture will differ between fresh bread, bagels, and frozen pastries. An odor and smoke come from oven.
Limited Warranty This warranty applies to products purchased and used in the U.S. and Canada. This is the only express warranty for this product and is in lieu of any other warranty or condition. This product is warranted to be free from defects in material and workmanship for a period of one (1) year from the date of original purchase.
wAVERTISSEMENT Danger d’incendie. • Si le contenu de votre grille-pain se met à brûler, n’ouvrez jamais la porte du grille-pain. Débranchez l’appareil et laissez le contenu s’arrêter de brûler avant d’ouvrir la porte. • Ne faites jamais fonctionner en modes TOAST ou BROIL sans surveillance. • N’utilisez jamais avec des sacs de cuisson au four. • Laissez toujours au moins un pouce libre entre les aliments et l’élément de chauffage. • Débranchez toujours votre grille-pain quand vous ne l’utilisez pas.
16. Un incendie peut survenir si le four grille-pain est recouvert, touche ou est près de matériaux inflammables, y compris rideaux, tentures, murs et autres articles semblables, lorsqu’il fonctionne. Ne pas remiser des articles sur le dessus de l’appareil lorsqu’il est utilisé, ou avant le refroidissement de l’appareil. 17. Une grande précaution doit être prise lors de l’utilisation de contenants construits en matériaux autre que le métal ou le verre. 18.
Pièces et caractéristiques Porte du four POSITION SUPÉRIEURE DE LA GRILLE : grillage Sélecteur de température Témoin lumineux « MARCHE » Minuterie POSITION INFÉRIEURE DE LA GRILLE : cuisson brunissage and toasting Ramasse-miettes amovible Grille du four Plat de cuisson 13 840220601 FRv01.
w AVERTISSEMENT Risque d’incendie. Le grillage 1 Placer la grille en POSITION INFÉRIEURE DE LA GRILLE (illustrée) pour les rôties, muffins anglais, bagels, et gaufres. • Si les aliments s’enflamment, ne pas ouvrir la porte du four. Débrancher le four et laisser les aliments s’éteindre et refroidir avant d’ouvrir la porte. 2 Tourner le sélecteur de température à la température maximale ( ). Placer les aliments dans le four.
Pour la cuisson 1 Placer la grille du four à la POSITION INFÉRIEURE DE LA GRILLE (illustré). 5 Lorsque terminé, tourner le sélecteur de minuterie à O (arrêt) et débrancher le four. 840220601 FRv01.indd 15 w AVERTISSEMENT Risque d’incendie. 2 Tourner le sélecteur de température à la température désirée. • Si les aliments s’enflamment, ne pas ouvrir la porte du four. Débrancher le four et laisser les aliments s’éteindre et refroidir avant d’ouvrir la porte. • Ne pas utiliser de sac de cuisson au four.
Cuisson au gril w AVERTISSEMENT Risque d’incendie. • Si les aliments s’enflamment, ne pas ouvrir la porte du four. Débrancher le four et laisser les aliments s’éteindre et refroidir avant d’ouvrir la porte. • Ne pas laisser l’appareil sans surveillance pendant le fonctionnement. • Ne pas utiliser de sac de cuisson au four. 2 1 Insérer et glisser la grille du four à la POSITION SUPÉRIEURE DE LA GRILLE. Insérer le plat de cuisson et y déposer les aliments. NE PAS PRÉCHAUFFER.
Entretien et nettoyage w AVERTISSEMENT Risque d’électrocution. Ne pas utiliser de tampon à récurer métallique pour le nettoyage. Des débris métalliques peuvent se détacher et tomber sur des composants électriques. Plat de cuisson 1 Lorsque terminé, tourner le sélecteur de minuterie à O (arrêt) et débrancher le four. 5 2 3 Pour le nettoyage intérieur du four, essuyer toutes les parois internes et la porte de verre avec un linge imbibé d’eau savonneuse. Répéter avant un linge propre et humide.
Dépannage PROBLÈME PROBABLE CAUSE Le four ne chauffe pas. • Assurer le fonctionnement de la prise murale et le branchement du four. Tourner le sélecteur de température à 177 °C (350 °F) et Tourner le bouton de minuterie à (marche) Formation de condensation sur l’interieur de la porte du four pendant le brunissage. • Ceci est normal pendant le brunissage dans un four grille-pain. L’humidité s’échappe plus lentement d’un four grille-pain qu’un grille-pain.
Notes 19 840220601 FRv01.
Garantie limitée Cette garantie s’applique aux produits achetés et utilisées aux É.-U. et au Canada. C’est la seule garantie expresse pour ce produit et est en lieu et place de tout autre garantie ou condition. Ce produit est garanti contre tout défaut de matériaux et de main-d’oeuvre pour une période de un (1) an à compter de la date d’achat d’origine.
wADVERTENCIA Peligro de Incendio. • Si los contenidos se prenden fuego, no abra la puerta del horno. Desenchufe el horno y espere que los contenidos dejen de quemarse y que se enfríen antes de abrir la puerta. • No haga funcionar sin atención mientras se encuentre en el modo Toast (tostar) o el modo Broil (asar). • No utilice con bolsas de cocción para horno. • Siempre deje por lo menos una pulgada entre los alimentos y el elemento calentador. • Siempre desenchufe la tostadora cuando no la esté usando.
17. Puede ocurrir un incendio si el horno eléctrico se cubre, toca o se encuentra cerca de materiales inflamables, incluyendo cortinas, colgaduras, paredes y superficies similares cuando esté funcio-nando. No guarde ningún artículo sobre el aparato cuando esté funcionando, o antes de que se enfríe. 18. Se debe tener mucho cuidado cuando se usan envases que no sean de metal o de vidrio. 19.
Partes y Características Puerta del Horno POSICIÓN ALTA DE LA REJILLA: asar Selector de Temperatura Luz Indicadora de ENCENDID Programador de Tiempo POSICIÓN BAJA DE LA REJILLA: cocer y tostar Charola de Migajas Deslizante Rejilla de Horno Sartén de Cocción 23 840220601 SPv01.
Como Tostar 1 Coloque la rejilla en LA POSICIÓN BAJA DE LA REJILLA (como se muestra) para tostar panecillos ingleses, bagels, y waffles. w ADVERTENCIA Riesgo de Fuego. • Si el contenido prende fuego, no abra la puerta del horno. Desconecte el horno y deje que el contenido deje de quemarse y se enfríe antes de abrir la puerta. 2 Gire el Selector de Temperatura a la temperatura máxima ( ). Coloque el alimento en el horno.
Como Cocinar 1 Coloque la rejilla del horno en la POSICIÓN BAJA DE LA REJILLA (indicado). 5 Cuando haya finalizado, gire el Programador de Tiempo a O (apagado) y desenchufe. 840220601 SPv01.indd 25 w ADVERTENCIA Riesgo de Fuego. • Si el contenido prende fuego, no abra la puerta del horno. Desconecte el horno y deje que el contenido deje de quemarse y se enfríe antes de abrir la puerta. • No use bolsas para cocinar en el horno. 2 Gire el Selector de Temperatura a la temperatura deseada.
Como Asar 1 Deslice la rejilla del horno en la POSICIÓN ALTA DE LA REJILLA. Introduzca la sartén de cocción debajo de la rejilla del horno y agregue los alimentos. NO PRECALIENTE EL HORNO. 26 840220601 SPv01.indd 26 w ADVERTENCIA Riesgo de Fuego. • Si el contenido prende fuego no abra la puerta del horno. Desconecte el horno y deje que el contenido deje de quemarse y se enfríe antes de abrir la puerta. • No deje el horno desatendido mientras está en operación.
Cuidado y Limpieza w ADVERTENCIA Peligro de Descarga Eléctrica. No limpie con estropajos metálicos. Las piezas pueden romper la almohadilla y tocar partes eléctricas. Sartén de Cocción 1 Cuando haya finalizado, gire el Programador de Tiempo a O (apagado) y desenchufe. 5 2 3 Para limpiar el interior del horno, limpie las paredes, parte inferior del horno y puerta de vidrio con un trapo húmedo y jabonoso. Repita con un trapo húmedo y limpio. Para manchas persistentes, use un estropajo de plástico.
Resolviendo Problemas PROBLEMA PROBABLE CAUSA El horno no calienta. • Revise para asegurarse que la toma eléctrica esté funcionando y el horno esté conectado. Gire el Selector de Temperatura a 350°F (177°C) y gire el Programador de Tiempo a (encendido). Se forma humedad en el interior de la puerta del horno cuando tuesta. • Esto es normal cuando se tuesta en un horno tostador. La humedad se escapa más lentamente en un horno tostador que de un tostador.
Notas 29 840220601 SPv01.
Grupo HB PS, S.A. de C.V. Monte Elbruz 124-301 Colonia Palmitas, Delegación Miguel Hidalgo C.P. 11560, México, Distrito Federal 01-800-71-16-100 PÓLIZA DE GARANTÍA PRODUCTO: MODELO: MARCA: Grupo HB PS, S.A. de C.V.
PROCEDIMIENTO PARA HACER EFECTIVA LA GARANTÍA • • • • • Para hacer efectiva la garantía no deben exigirse mayores requisitos que la presentación del producto y la póliza correspondiente, debidamente sellada por el establecimiento que lo vendió. Para hacer efectiva la garantía, lleve su aparato al Centro de Servicio Autorizado más cercano a su domicilio (consulte la lista anexa).
Modelo: 31334 Tipo: O57 Características Eléctricas: 120V~ 60Hz 1200W Los modelos incluídos en el instructivo de Uso y Cuidado pueden ir seguidos o no por un sufijo correspondiente a una o varias letras del alfabeto y sus combinaciones, separadas o no por un espacio, coma, diagonal, o guión. Como ejemplos los sufijos pueden ser: “Y” y/o “MX” y/o “MXY” y/o “Z”. 840220601 840220601 SPv01.