Quick Start Guide 1
Congratulations! If this is your first Hammond, Welcome to the Hammond Family! If you are already one of us, Welcome Home! This "Quick Start Guide" for the HAMMOND XK 5 is intended to get you up and running as quickly as possible on your new axe. The greatest feature of the XK 5 is its ability to be molded into your dream Hammond, regardless of genre. Follow this Guide closely and youll be able to lift your XK 5 out of its box and hit the stage directly with confidence.
HERE ARE THE THINGS YOU NEED TO KNOW AND DO TO GET STARTED RIGHT AWAY! 1. Basic Hook Up A. AC Power The grounded power cord attaches on the rear of the Organ. Be sure to plug into a GROUNDED AC outlet. It is not recommended to use Power cords from other instruments. B. Expression Pedal The recommended Expression (or SWELL) Pedal for the XK 5 is the Hammond EXP 100F (available from your Hammond Dealer).
2. "Out-of-the-Box" Out Of The Box," the XK 5 is already set to use the EXP 100F, so you can just connect it to the jack marked for it on the rear of the XK 5. If youre using the EXP 50, EXP 20 or EXP 30, connect it to the CONTROL 1 Foot Controller jack and set the adjacent Polarity switch to NORM.
3. INFORMATION CENTER In order to get the most out of your XK 5, youll want to master the basic controls that help you navigate through the settings which will transform the XK 5 into your DREAM HAMMOND. 1. INFORMATION DISPLAY: This is like your Computer Monitor. All your information is going to appear here, and plenty of it. The screen is Organic L.E.D. type (or OLED) so youll have no trouble seeing it in any lighting condition, indoors or out.
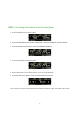
4. Setting the Expression Pedal If youre using the HAMMOND EXP 50, EXP 20, EXP 30 or a 3rd party Expression Pedal: *MENU* - For setting the Expression Pedal: 1. Touch the MENU/EXIT Touch Button. 2. Touch the PAGE RIGHT Touch Button THREE times. The word "CONTROL" should now blink. 3. Touch the ENTER Touch Button to select the CONTROL Edit Menu. 4. Use the VALUE Rotary Knob to select EXPRESSION under CTRL1 MODE. 5. Touch the PAGE UP Touch Button once. 6.
5. Using a Pedal to Select the LESLIE™ Speed Many players like to use a foot switch to control the speed of the LESLIE. It doesnt matter if youre using the onboard Digital Leslie or connected to a Leslie Speaker Cabinet, you can use a foot switch to control the speed. The recommended foot switch is the HAMMOND FS 9H (available from your Hammond Dealer). but you may use any good quality foot switch. Some players use a Piano Damper pedal, which works fine.
*MENU* - For setting a Foot Switch to control Leslie Speed: 1. Touch the MENU/EXIT Touch Button ONCE. 2. Touch the PAGE RIGHT Touch Button THREE times. The word "CONTROL" should now blink. 3. Touch the ENTER Touch Button to select the CONTROL Edit Menu. 4. Touch the PAGE RIGHT Touch Button ONCE. 5. Use the VALUE Knob to select LESLIE S/F ALT if it is not already displaying. 6. Touch the PLAY Touch Button to return to PLAY Mode and proceed.
6. Using a CU-1 (“Half-Moon”) switch to control Leslie Speed The traditional switch for controlling Leslie speed is the Half Moon found on Vintage Hammonds everywhere. This classic accessory (called the CU 1) is available for the XK 5 from your Hammond Dealer. Follow the instructions provided with the CU 1 to mount it to your XK 5. After the switch is securely mounted, connect it to the dedicated CU 1 jack located in the recessed panel on the underside of the XK 5. No MENU adjustments are necessary.
7. Connecting to a Keyboard Amplifier When not using a Leslie Speaker Cabinet, we recommend, if possible, you use a STEREO configuration to amplify your XK 5. This will give the best response when applying the Digital Leslie. The XK 5/Digital Leslie will sound excellent in mono, as well. We recommend HAMMOND ROAD WARRIOR MATCHED CABLES. With both the XK 5 and the Amp powered off," connect the Left and Right Line Output jacks of the XK 5 to an appropriate amplifier.
8. Connecting to an 11-pin Leslie Speaker Cabinet When you connect to a Leslie Speaker Cabinet via the 11 pin Socket on the rear of the XK 5, the Digital Leslie circuitry inside is automatically bypassed. The Leslie Controls, including the CU 1 Half Moon switch, The Foot Switch mounted on the EXP 100F Expression Pedal, and the Foot Switch (if installed) will all control the Rotor Speed of the Leslie Speaker Cabinet.
You can use the XK 5 with a large variety of Vintage Leslie Speaker Cabinets, but you will need the appropriate Kit to allow the 11 pin XK 5 to communicate with a Vintage Leslie. Contact your Hammond Dealer. If you are using an old style "Leslie Combo Pre amp" (such as the one shown below) to connect to a vintage Leslie Speaker Cabinet, you can use 1/4" cables . Attach a cable from the LEFT/MONO jack on the XK 5 to the appropriate input on the Combo Pre amp.
NOW THAT YOU'RE ALL HOOKED UP, YOU'RE READY TO START MAKING MUSIC! First, let's get "oriented" to the XK-5 with some Basic Hammond Knowledge. These are the playing controls of a B-3. These are the playing controls of your XK-5. From the factory and Out Of The Box," the XK 5 is set up to play and behave like a BRAND NEW B 3, with the settings and tolerances as prescribed in the original Blueprints dating back over 50 years.
1. Drawbars Some people call them sliders some call them tonebars," but the array in front of you, the Hammond Harmonic Drawbars, are the heart and soul of the Hammond Organ. They are the tools by which you create your tone. There are reasons for the numbers and colors, but for now lets just say there are 2 sets of 9 for the Upper (or Swell) Manual, 2 sets of 9 for the Lower (or Great) Manual and 2 Drawbars for the Bass (or Pedal).
There are different sounds for each Manual. Whereas the Vintage Hammonds Preset Keys locked down when you pressed them, the XK 5s do not. Instead, there are indicator LEDs at the head of each key. A Red light indicates the current UPPER preset, and a Green light indicates the current LOWER preset. If you see a mix of both colors, that means both UPPER and LOWER preset keys are the same. (example: Upper A and Lower A selected simultaneously).
5. PRESET SELECTOR Touch Buttons When using the XK 5 as a single manual instrument, you have only ONE set of Preset Keys. If you wish to split the Manual, how can you select the LOWER presets? Easy! Look to the left of the Manual and find the PRESET SELECTOR Touch Buttons. Touch the UPPER Tab to make the Preset Keys active for the UPPER part, and touch the LOWER button to make them active for the LOWER part. Touch them both and you will register BOTH the Upper and Lower with each press.
7. TOUCH-RESPONSE PERCUSSION B-3 Percussion Controls XK-5 Percussion Controls The great innovation of the Mighty B 3, the Hammond Touch Response Percussion Control, is that little Plink or Attack you hear at the beginning of many B 3 sounds. As welcome in ballads as it is in rhythmic music, Percussion adds character to your sound. The XK 5 is configured as a Vintage B 3, meaning its Percussion is only available on the UPPER Manual, and only when the B Preset Key is selected.
8. LESLIE The traditional partner of the Hammond Organ is the LESLIE SPEAKER. Its that big wooden box with stuff whirling around in it youve seen onstage at concerts. It looks like this: The sound it imparts is unforgettable and dramatic. Modern times have given us a Digital Version of it, and it lives right inside your XK 5. You also may have a physical Leslie Speaker Cabinet hooked up to your XK 5.
Leslie Controls The switches shown above will control a Leslie Speaker Cabinet in the same manner as the Digital Leslie. (provided such cabinet is connected via the 11 pin cable on the back of the XK 5). You may also have a CU 1 Half moon switch attached to your organ. Set the CU 1 in the MIDDLE or Brake position. Take a look at the switches on the lower left of the manual. The BYPASS Touch Button removes the Digital Leslie from the signal chain. Lets make sure that LED is NOT lit.
NOW THAT YOU'RE ACCLIMATED TO THE SOUNDS AND CONTROLS, LET'S PERSONALIZE YOUR SOUND! 1. SPLIT The organ is traditionally played with two hands. Melody or Lead Parts on the Upper Manual, Accompaniment on the Lower Manual. Also, Jazz players often use the Lower Manual to play bass lines.
2. PEDAL TO LOWER Coupler (or: MANUAL BASS) Many players dont kick bass pedals, rather they play bass notes with their left hand on the Lower Manual. Its easy to do this on the XK 5. 1. Turn on the SPLIT mode as described on the previous page. This time, however, instead of selecting a Preset or setting the Drawbars using one of the Adjust Presets, After touching the LOWER tab in the Preset Selector Area, choose the C preset which silences the Lower Manual. 2.
*MENU* - For adding Pedal Sustain 1. Touch and hold the PEDAL SUSTAIN Touch Button. Doing this will "shortcut" the display into the PEDAL SUSTAIN parameters. In this screen, use the PAGE LEFT and PAGE RIGHT Touch Buttons to move back and forth among the parameters, which are described below. DCY adjusts the decay of the pedal note as you hold the key. Use the VALUE Rotary Knob to select. At 1 The decay is shortest, like a plucked string. As you progress to 5 the decay grows longer.
4. Transposition Occasionally, players need to shift the key in which the Organ is sounding to be something different than the key they are playing in, such as when accompanying a vocalist, soloist or choir. Heres how to do it: 1. Touch and Hold the TRANSPOSE Touch Button. 2. While touching and holding the TRANSPOSE Touch Button, use the adjacent UP and DOWN Touch Buttons to shift the sounding range of the organ +/ 6 semitones.
5. Key Click The XK 5s Virtual Multi Contact keying system provides the classic Hammond Feel." On Vintage Hammonds, the metal on metal contacts beneath each key yielded that unique, essential morsel of noise so beloved by all who lay their hands on the King Of Instruments. Each one had their own voice. Here is how to dial in exactly how much of this noble imperfection you desire. The Key click Parameters are Patch Parameters, they are unique to each Patch.
6. Real Tube Preamp and Overdrive The XK 5s Tonal Path closely follows that of Vintage Hammonds, but in the Digital realm. This includes the Modeled MATCHING TRANSFORMER. Helping the sophisticated Digital Circuitry are two REAL Vacuum Tubes. The sound of an overdriven Hammond Organ is evocative, and there are many flavors of Overdrive. The Tubes here are not intended for Ultra High Gain Distortion as you might expect, but are here to duplicate the Warm sound of Vintage Hammonds.
*MENU* - For adding “ Crunch” to the sound 1. Touch and Hold the OVERDRIVE Touch Button until the display jumps to the OVERDRIVE page: 2. Make sure the value under "OD" is "ON." ." If it isnt, use the VALUE Rotary Knob to make it so. After it is, proceed. 3. Touch the PAGE RIGHT Touch Button TWICE. The word underneath "EXP." should now blink.
7. Creating and Saving Your Own Presets On a vintage Hammond Organ such as a B 3, changing a Preset from the factory setting to one to your liking was a bit of a production. You had to open up the back of the organ to reveal the Preset Setter Board, which looked like this: Then you had to use a screwdriver to loosen and re tighten the colored wires, one for each Drawbar and 9 sets of wires for each Preset.
To create and save your own Presets, do the following: 1. Decide whether you want to change an Upper Manual or Lower Manual Preset. NOTE! If you have the single manual XK 5, use the UPPER or LOWER PRESET SELECTOR Touch Tabs to select Upper or Lower Presets. 2. Make whatever changes you want to the sound. You may use Drawbars, Percussion, Vibrato/Chorus, Leslie, Overdrive, etc. 3. Touch and Hold the red RECORD Touch Button. 4.
8. Naming your Preset 1. Touch the MENU/EXIT Touch Button ONCE. 2. Touch the PAGE RIGHT Touch Button TWICE. The word "PATCH" should now blink. 3. Touch the ENTER Touch Button You arrive at the UPPER Patch Name area. Use the PAGE LEFT and PAGE RIGHT Touch Buttons to move the cursor to the character to be edited. Turn the VALUE Rotary Control to the right to scroll forward through the characters. Turn the VALUE Rotary Control to the left to scroll backward through the characters.
9. REVERB The Reverb (controls in the upper right portion of the control panel) is set Out of the Box to a general Reverb flavor." Just touch the REVERB Touch Button and dial in as much as you need. Consult the Owner's Playing Guide to learn further Reverb tailoring tips. 10. EQUALIZER The Equalizer has shelf Lows and Highs, with a Sweepable MID setting.
ADDENDUM: GETTING THAT “RIGHT” SOUND The HAMMOND XK 5 leads a double life." You can turn it on, adjust the Drawbars, Chorus, and Percussion just like a Vintage B 3, and youre on your way. OR You can go under the hood and fine tune nearly every aspect of the instrument to create the Hammond Of Your Dreams. The Menus are deep, and the possibilities are endless. So far in this Quick Start Guide, we have helped you tweak the things that many in the Hammond Family have found to be of immediate importance.
GOSPEL MENU: Custom Tone Wheel: 1. 2. 3. 4. 5. 6. 7. Touch the MENU/EXIT Touch Button Touch the PAGE UP Touch Button ONCE TONEWHEEL FLASHING Touch the [ENTER] Touch Button Using the VALUE Rotary Knob, select B 3 Touch the PAGE UP Touch Button ONCE Using the VALUE Rotary Knob, select U2:Rumbless Touch the PLAY Touch Button to return to PLAY Mode. Custom Contact: 1. 2. 3. 4. 5. 6.
CLEAN MENU: Custom Tone Wheel: 1. 2. 3. 4. 5. 6. 7. Touch the MENU/EXIT Touch Button Touch the PAGE UP Touch Button ONCE TONEWHEEL FLASHING Touch the [ENTER] Touch Button Using the VALUE Rotary Knob, select Mellow Touch the PAGE UP Touch Button ONCE Using the VALUE Rotary Knob, select U1:Full Flats Touch the PLAY Touch Button to return to PLAY Mode. Custom Contact: 1. 2. 3. 4. 5. 6.
JAZZ MENU: Custom Tone Wheel: 1. 2. 3. 4. 5. 6. 7. Touch the MENU/EXIT Touch Button Touch the PAGE UP Touch Button ONCE TONEWHEEL FLASHING Touch the [ENTER] Touch Button Using the VALUE Rotary Knob, select B 3 Touch the PAGE UP Touch Button ONCE Using the VALUE Rotary Knob, select U1:B 3 Normal Touch the PLAY Touch Button to return to PLAY Mode. Custom Contact: 1. 2. 3. 4. 5. 6.
ROCK MENU: Custom Tone Wheel: 1. 2. 3. 4. 5. 6. 7. Touch the MENU/EXIT Touch Button Touch the PAGE UP Touch Button ONCE TONEWHEEL FLASHING Touch the [ENTER] Touch Button Using the VALUE Rotary Knob, select B 3 Touch the PAGE UP Touch Button ONCE Using the VALUE Rotary Knob, select U3:Mixture Touch the PLAY Touch Button to return to PLAY Mode. Custom Contact: 1. 2. 3. 4. 5. 6.
FEELING CONFIDENT? This set is a bit more complex. Take your time and you’ll “Go back in time!” OLD SCHOOL MENU: Custom ToneWheel: 1. 2. 3. 4. 5. 6. 7. Touch the MENU/EXIT Touch Button Touch the PAGE UP Touch Button ONCE TONEWHEEL FLASHING Touch the [ENTER] Touch Button Using the VALUE Rotary Knob, select C 3 Touch the PAGE UP Touch Button ONCE Using the VALUE Rotary Knob, select U3:Mixture Touch the PLAY Touch Button to return to PLAY Mode. Key Click and Leakage 1. 2. 3. 4. 5. 6. 7. 8.
Chorus: 1. 2. 3. 4. 5. Touch and Hold [Vibrato Upper] Button until Display jumps to Chorus/Vibrato Menu Using the VALUE Rotary Knob, select 55 57 Touch the PAGE UP Touch Button ONCE Using the VALUE Rotary Knob, select D21 Touch [PLAY] Percussion: Touch ALL FOUR Percussion buttons on Overdrive: 1. Touch and hold the [Overdrive] Button until Display jumps to Overdrive Menu. LED for Overdrive should be Lit 2. Touch the PAGE RIGHT Touch Button ONCE 3.
SPECIAL SECTION: 1. Using the XK-5 with the XLK-3 Lower Manual If you have a Hammond XK SYSTEM and you want to use an XK 5 in place of the XK 3c Drawbar Keyboard, you can do so. The XLK 3 Lower Manual will work in conjunction with the XK 5. However, there are two things you should know: 1. The XLK 3 is a single contact manual. Therefore, all the Drawbar tones will sound simultaneously you won't hear the individual harmonics play one after the other.
2. Connecting the XPK-250 Pedal Clavier using the H-BUS If you are using the XPK 250 25 note Pedal Clavier with the attached EXP 250 Expression Pedal, place it underneath your XK 5 in the most comfortable playing position for yourself. Connect the XPK 250 to the MIDI IN1 (PEDAL) jack (on either the XK 5 or the XLK 5 Lower Manual unit) using the H Bus connectors and cables. No Menu Adjustment is required.
*MENU* - For connecting other Pedal Claviers to the XK-5 1. Touch the MENU/EXIT Touch Button once. 2. Touch the PAGE UP Touch Button THREE Times 3. Touch the PAGE RIGHT Touch Button THREE Times. The word "MIDI should now blink. 4. Touch the ENTER Touch Button to select the MIDI Edit Menu. If you are using Pedals with the XK 5 as a single manual Instrument, Use the VALUE Rotary Knob to select BASIC If you are using the XK 5 with expanded keyboards: Use the VALUE Rotary Knob to select 2or3 KBD 6.
39
This "Quick Start Guide" barely scratches the surface of the many features of you new Hammond XK-5. Please consult the Owner' Playing Guide to learn more. For 81 years, Hammond has been The Sound, The Soul, The One! Hammond Europe B.V. Hammond.eu 40 FM2326 0916 V1.