*# 1 Model :- 5[UVGO Thank you, and congratulations on your choice of a Hammond XKSystem. The XK-System is the lower keyboard unit (XLK-B3) and pedalboard (XPK-3) for Hammond XK-3. In order to get the most out of this instrument for many years to come, first take the time to read this manual in full.
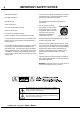
IMPORTANT SAFETY NOTICE 2 Read these instructions. Protect the power cord from being walked on or pinched, particularly at plugs, convenience receptacles, and the point where they exit from the apparatus. Keep these instructions. Heed all warnings. Only use attachments/accessories specified by the manufacturer. Follow all instructions. Do not use this apparatus near water. Clean only with dry cloth. Do not block any ventilation openings. Install in accordance with the manufacturer's instructions.
CAUTION This symbol indicates information that, if ignored or applied incorrectly, creates the possibility of death or serious personal injury. Follow instructions: Damage Requiring Service: All operation and user instructions should be followed.
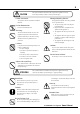
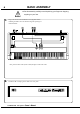
NAMES AND FUNCTIONS 4 XLK-B3 Lower Preset Power Keys Switch Lower Keyboard Headphone Jack The XLK-B3 cabinet functions as Music Rack the Lower Keyboard and the Lower Preset Keys. The System Power Switch and the Extension Headphone Jack are built in.
XK-SYSTEM STRUCTURE *# 1 :- 5[UVGO Owner’s 5 Manual
BASIC ASSEMBLY 6 Do this assembly carefully to avoid pinching your fingers or dropping anything on your feet. 1. Plug-in the cables of the XLK-B3 to the equipment before installing the XK-3. Pass the cables through the openings as indicated below. Also, pass the audio cable (Leslie cable) through as well at this time. 2. Install the XK-3 and plug in the cables to its rear jacks.
3. Plug in the key scan cable from the Pedal Keyboard to the Expression Pedal. Note that the connector is polarized and only plugs in one way. Lock 4. Insert into the opening Mount the Expression Pedal on the Pedal Keyboard using the Screw (knob bolt). Screw 5. Plug in the 8-Pin cable to the Expression jack and the MIDI cable to the MIDI out jack.
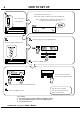
HOW TO SET UP 8 Then all of the system turns on. After a little while, the PLAY screen will be displayed. Turn on the power of the XLK-B3. Note: If this screen does not appear, check the hook-up and that the power switch of the XK-3 is “On”. Select the page D using the [PAGE] button. Touch the [MENU/EXIT] button. Touch the [2]MIDI button. You can return to the PLAY screen using the [PLAY] button. Select "Seq. Record" by the [1] PARAM button. Now the set up is comlete.
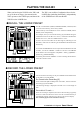
PLAYING THE XLK-B3 When you hook up the XLK-B3 to the XK-3 and set up as shown on Page 6, the manual on the XK-3 operates as the UPPER part, and that of the XLK-B3 as the LOWER Part. 9 The XK-3 can recall the Combination Preset for the LOWER Part (including the PEDAL), independently of the UPPER Part in the same BANK. RECALL THE LOWER PRESET UPPER: Lights LOWER: Blinks Slowly Touch The XK-3 recalls all Parts (UPPER, LOWER and PEDAL) combined, when you touch the Preset Keys, as the factory default.
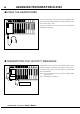
ADVANCED FEATURES FOR XLK-B3 10 USING THE HEADPHONES To use the headphones, connect the plug to the headphone jack. Sound is sent out from the LINE-OUT and the LESLIE 11-PIN, also when this jack is used. The built-in LESLIE is only on L (the left), when the LESLIE SPEAKER is connected. TRANSMITTING THE VELOCITY MESSAGES The XLK-B3 senses no velocity. The maximum value is transmitted in default.
PLAYING THE XPK-3 11 EXPRESSION PEDAL ASSIGNMENT The Expression Pedal is used for expressing the volume and adding intonation to make your music more expressive. To enable the Expression Pedal on the XPK-3, select the “EXP100” for the Experssion - Source. To come to this mode: Touch the [MENU/EXIT] button and display the MENU and select PAGE A by the [PAGE] button, and then touch the [4] CONTROL button, touch [PAGE UP] 3 times.
ADVANCED OPERATION FOR THE XPK-3 REBOUND TIME If you play pedals with a staccato action or the leaf spring used on the pedal keyboard may happen to change its characteristic, it may cause “key bounce” on the key when you release it. You can avoid it by adjusting the “Rebound Time”. To change the value, turn on the power while pressing the highest B and the key corresponding to its value. (See the left figure.
TROUBLE SHOOTING 13 In such cases as follows: The XK-3 does not turn on when the XLK-B3 is switched on. The power switch of the XK-3 turned off. >> Turn on the power switch of the XK-3. Check the LED on the rear of XLK-B3. The LED lights during it is operating. The Manual Bass does not function on the XLK-B3 manual. The setting of the XK-3 is not correct. >> Set the MIDI template correctly in the XK-3 “MIDI” function screen.
MIDI IMPLEMENTATION (XLK-B3) 14 [Hammond MIDI Keyboard] Model: XLK-B3 Function Default Basic Channel Changed Default Mode Messages Altered Note Number : True Voice Note ON Velocity Note OFF Key's After Ch's Touch Pitch Bender MIDI Implementation Chart Transmitted 2 X 3 X ***** 36 - 96 ***** O *1 X X X X X Date: 11-Feb-2005 Version: 1.
MIDI IMPLEMENTATION (XPK-3) [Hammond MIDI Keyboard] Model: XPK-3 Function Default Basic Channel Changed Default Mode Messages Altered Note Number : True Voice Note ON Velocity Note OFF Key's After Ch's Touch Pitch Bender MIDI Implementation Chart Transmitted 3 1 - 16 3 X ***** 36 - 60 ***** X X X X X X Recognized 15 Date: 23-Dec-2004 Version: 1.
SPECIFICATIONS 16 XLK-B3 XPK-3 Keyboard Keyboard 73 (61 + 12 Preset keys) Water Fall shape 25 keys Panel Controls Controls Power on/off Expression, Foot Switch Terminals Terminals MIDI out AC input, output Headphones, Expression (From Organ, To Exp.