HA XPK-10 0 MIDI PEDALBOARD Quick Features Guide HAMMOND SUZUKI, LTD.
IMPORTANT - READ THIS FIRST Your Hammond XPK-100 MIDI Pedalboard is designed to interface with a great variety of keyboards, synthesizers and sound modules to further enhance your playing and real-time performance. This Guide is designed to explain the operating features of your Hammond XPK-100 as simply and graphically as possible.
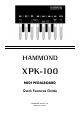
Introduction 1 INTRODUCTION Basic Hook-Up All connections are found on the Accessory Panel on the back of the XPK-100. Ë A.C. Power To connect the XPK-100 to A.C. power: 1. Locate the A.C. Power Supply that came with your XPK-100. 2. Plug the female end of the Power Cord into the receptacle on the XPK-100 marked, “DC IN.” 3. Plug the other end of the Power Supply into an A.C. power outlet. Since the XPK-100 has no Power Switch, A.C.
2 Introduction Connecting the XPK-100 to a Hammond Drawbar Keyboard The XPK-100 is designed to interface directly with any current single-manual Hammond Drawbar Keyboard. Simply connect the MIDI OUT of the XPK-100 into the MIDI IN of the Hammond Drawbar Keyboard. Connecting the XPK-100 to another keyboard instrument The XPK-100 can also interface with other keyboard instruments - simply connect the MIDI OUT of the XPK-100 into the MIDI IN of the other keyboard.
Introduction 3 MIDI Merge - Connecting the XPK-100 to the Hammond XM-1 Drawbar Module Your XPK-100 is equipped with MIDI Merge technology, thereby making it easier to connect multiple keyboards to it in order to play “organ style”: i.e., two manuals and pedals.
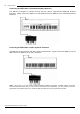
4 Introduction Using a Sequencer with the XPK-100 and MIDI Keyboards The bottom diagram shows you how to connect a Sequencer to two manuals and the XPK-100: Channel 1 Upper Manual (Hammond Keyboard) Channel 2 Lower Manual Channel 3 Ped als Use the above settings for recording your Sequence. Also, be sure to enable your Hammond Drawbar Keyboard’s MIDI SOFT THRU function so that all the parts can be recorded. When you are ready to play back your Sequence, be sure to: 1.
Introduction 5 Ë Basic Controls The basic controls on your Hammond XPK-100 include the Switches and an Information Center Display. Ë Switches Switches are the large buttons on either side of the Information Center Display. The basic functions of these Switches are: 1. 2. 3. 4. Turning something "ON" or "OFF.” Modification of parameters - increasing or decreasing. Selecting among multiple functions. Confirmation - YES, NO or OK.
6 Information Center Display Ë Information Center Display The Information Center Display is an LED (Light-Emitting Diode) display located in the center of the front panel. The Information Center Display has two modes: (1) the PLAY Mode, and (2) the EDIT Mode. The PLAY Mode allows you to see which Preset is selected and is the normal mode used in live performance. The EDIT Mode allows you to change and edit the XPK-100's software parameters such as MIDI Channel, Volume, etc.
Information Center Display 7 EDIT Mode If you touch the PLAY/EDIT Switch once from any of the PLAY screens, the Information Center Display will alternate between two messages as shown below: Current Parameter Current Value You are now in EDIT Mode. You can now use the PRESET/EDIT Switches to select from among the different Advanced Features. Use the “” Switch to scroll up through the Advanced Feature selections. Use the “” Switch to scroll down through the Advanced Feature selections.
8 Advanced Features ADVANCED FEATURES Your Hammond XPK-100 has a number of special functions, called Advanced Features, that allow you to further enhance your playing and create exactly the musical performance you want. A list of the Advanced Features can be affixed to the XPK-100 itself to make them easier to remember. The above picture shows the decal which can be affixed to the XPK-100. Notice that the Advanced Features appear in two groups.
Advan ced Fea tures 9 E09 CONTROL Sw. Mode - Allows you to select how the CONTROL Switch works. (See page 25.) E10 Program Number - Allows you to transmit a Program Number from the XPK-100 to a connected MIDI device, or select a Program Number for each Preset. (See page 26.) E11 Bank No. MSB - Allows you to select different Bank numbers for voices. You can select the “MSB” (Most Significant Bit) for each Bank selection. (See page 27.) E12 Bank No.
10 Advanced Features Ë Advanced Feature - E00 PK MIDI Channel This Advanced Feature allows you to select the MIDI Channel on which the XPK-100 will transmit. You can select from “1" through “16.” The default setting is “3.” TRY THIS: 2. From PLAY Mode, press the PLAY/EDIT Switch once. The Information Center Display should alternate between two messages as shown below: Current Parameter 2.
Advan ced Fea tures 11 MIDI CHANNEL OPTIONS MIDI Channel Number 4.
12 Advanced Features Ë Advanced Feature - E01 Transpose This Advanced Feature allows you to transpose the XPK-100 into another key. You can select from “-5" (down 5 half-steps) through “6” (up 6 half-steps). The default setting is “0.” NOTE: The TRANSPOSE LED to the right of the Information Center Display will light whenever the XPK-100 is set to play in any octave other than “0.” You can transpose the XPK-100 using two methods: 1. Using the TRANSPOSE/LOCK Switch. 2. Using EDIT Mode.
Advan ced Fea tures 13 TRY THIS - To transpose the XPK-100 using EDIT Mode: 1. From PLAY Mode, press the PLAY/EDIT Switch once. The Information Center Display should alternate between two messages as shown below: Current Parameter 2.
14 Advanced Features Ë Advanced Feature - E02 Octave This Advanced Feature allows you to select the Octave in which the XPK-100 will sound. You can select from “-1" (down 1 octave) through “4” (up 4 octaves). The default setting is “0.” NOTE: The OCTAVE LED to the right of the Information Center Display will light whenever the XPK-100 is set to play in any octave other than “0.” TRY THIS: 1. From PLAY Mode, press the PLAY/EDIT Switch once.
Advan ced Fea tures 4. When you have made your selection, then press the Hi “C” Pedal once. The Information Center Display will show you the current parameter alternating with your selected value: Current Parameter 5. 15 Your Selected Value To exit the EDIT Mode and return to PLAY Mode, press the “Hi C” Pedal again. The XPK100 is now set to the value you selected. NOTE: After doing the above, you will notice a small red dot between the first and second characters of the Information Center Display.
16 Advanced Features Ë Advanced Feature - E03 Poly/Mono Mode This Advanced Feature allows you to select either “Poly” (polyphonic - more than one pedal note will play at the same time) or “Mono” (monophonic - only one pedal note will sound if two or more pedal keys are pressed together) Mode. The default setting is “Mono.” TRY THIS: 1. From PLAY Mode, press the PLAY/EDIT Switch once. The Information Center Display should alternate between two messages as shown below: Current Parameter 2.
Advan ced Fea tures 17 Ë Advanced Feature - E04 PK Hold ON/OFF This Advanced Feature allows you to select whether you want the pedal notes to continuously play. The default setting for this Advanced Feature is “OFF.” TRY THIS: 1. From PLAY Mode, press the PLAY/EDIT Switch once. The Information Center Display should alternate between two messages as shown below: Current Parameter 2.
18 Advanced Features Ë Advanced Feature - E05 PK Volume This Advanced Feature allows you to select the maximum volume or loudness of the pedal notes. You can select from “0" through “127.” The default value is “127.” TRY THIS: 2. From PLAY Mode, press the PLAY/EDIT Switch once. The Information Center Display should alternate between two messages as shown below: Current Parameter 2.
Advan ced Fea tures 19 Ë Advanced Feature - E06 Fixed Vel. Value This Advanced Feature allows you to transmit a fixed Velocity number from 0 through 127 from the XPK100 to a connected MIDI device. This is useful if you are transmitting to a sound module or synthesizer which has specific sounds for different Velocity values. You can select from “1" through “127.” The default setting is “100.” TRY THIS: 1. From PLAY Mode, press the PLAY/EDIT Switch once.
20 Advanced Features Ë Advanced Feature - E07 Control Channel This Advanced Feature allows you to select the MIDI Channel on which Controller information will be transmitted. You can select from “1" through “16,” or “Pdl,” (the Control Channel will automatically be the same as the PK MIDI Channel). The default setting is “1.” TRY THIS: 1. From PLAY Mode, press the PLAY/EDIT Switch once. The Information Center Display should alternate between two messages as shown below: Current Parameter 2.
Advan ced Fea tures 21 Using the Pedal keys from “Lo C” through “A”: You can use the other Pedal keys to select MIDI Channels. The data chart below shows how to do this. MIDI CHANNEL OPTIONS MIDI Channel Number 4.
22 Advanced Features Ë Advanced Feature - E08 CONTROL Sw. Function This Advanced Feature allows you to select the function for the CONTROL Switch. NOTE: The CONTROL LED to the right of the Information Center Display will light whenever the CONTROL Switch is active. TRY THIS: 1. From PLAY Mode, press the PLAY/EDIT Switch once. The Information Center Display should alternate between two messages as shown below: Current Parameter 2.
Advan ced Fea tures 23 CONTROL SWITCH FUNCTIONS Function *Pedal Sustain LONG Description Adds a LONG release to the Pedal tones. This is the default setting. *Pedal Sustain MEDIUM Adds a MEDIUM release time to the Pedal tones. *Percussion 3rd Harmonic Turns on the Percussion THIRD HARMONIC Touch Tab. *Percussion 2nd Harmonic Turns on the Percussion SECOND HARMONIC Touch Tab. *Leslie SLOW/FAST *Leslie OFF *Leslie BRAKE Turns on the LESLIE FAST Touch Tab. Turns on the LESLIE ON Touch Tab.
24 Advanced Features 4. When you have made your selection, then press the Hi “C” Pedal once. The Information Center Display will show you the current parameter alternating with your selected value: Current Parameter 5. Your Selected Value To exit the EDIT Mode and return to PLAY Mode, press the “Hi C” Pedal again. The CONTROL Switch will now control the function you have selected.
Advan ced Fea tures 25 Ë Advanced Feature - E09 CONTROL Sw. Mode This Advanced Feature allows you to select how the CONTROL Switch operates . You can select either "Alt" (Alternate - pressing and releasing the CONTROL Switch toggles between “ON” and “OFF”) or “Mom” (Momentary - pressing the CONTROL Switch turns its function “ON,” while releasing the CONTROL Switch turns the selected function “OFF”). The default setting is “Alt.
26 Advanced Features Ë Advanced Feature - E10 Program Number This Advanced Feature allows you to select the Program Number that will be transmitted. You can select from “1" through “128.” The default setting is the same as the selected Preset number (“P01" is Program Number 1, “P02" is Program Number2, etc.). NOTE: You can also select “OFF,” meaning that no Program Number data will be sent. TRY THIS: 1. From PLAY Mode, press the PLAY/EDIT Switch once.
Advan ced Fea tures 27 Ë Advanced Feature - E11 Bank No. MSB (Most Significant Bit) This Advanced Feature allows you to select different Bank numbers for voices. You can select the “MSB” (Most Significant Bit) for each Bank selection. This is so that you have access to the great number of voices available on modern sound modules. Please refer to the documentation for your module to determine the Bank numbers for specific voices. You can select from “0" through “127.” The default setting is “0.
28 Advanced Features You can select numbers by pressing the Pedals representing numbers in succession. For example, if you want the number “73,” press the “G” Pedal, then the “D<” Pedal: + = If you want a three-digit number (up to 127), press three numbered Pedals. For example, the number “115" would be selected like this: + 4. + = When you have made your selection, then press the Hi “C” Pedal once.
Advan ced Fea tures 29 Ë Advanced Feature - E12 Bank No. LSB (Least Significant Bit) This Advanced Feature allows you to select different Bank numbers for voices. You can select the “LSB” (Least Significant Bit) for each Bank selection. This is so that you have access to the great number of voices available on modern sound modules. Please refer to the documentation for your module to determine the Bank numbers for specific voices. You can select from “0" through “127.” The default setting is “0.
30 Advanced Features You can select numbers by pressing the Pedals representing numbers in succession. For example, if you want the number “73,” press the “G” Pedal, then the “D<” Pedal: + = If you want a three-digit number (up to 127), press three numbered Pedals. For example, the number “115" would be selected like this: + 4. + = When you have made your selection, then press the Hi “C” Pedal once.
Advan ced Fea tures 31 Ë Advanced Feature - E13 System This Advanced Feature allows you to perform certain functions associated with the basic system or setup of the XPK-100. TRY THIS: 1. From PLAY Mode, press the PLAY/EDIT Switch once. The Information Center Display should alternate between two messages as shown below: Current Parameter 2.
32 Advanced Features Ë Advanced Feature - LOCK Feature This Advanced Feature is designed to make the XPK-100 easier to use in live-performance situations by greatly reducing the possibility of accidental changes in sounds or setups. When using the XPK-100 in performance, it may be possible that you would accidentally touch one of the Switches with your foot and change, say, a Preset when you did not intend to do so. This Advanced Feature is designed to minimize the possibility of this happening.
Presets 33 PRESETS Your Hammond XPK-100 contains 15 pre-programmed Advanced Feature settings called Presets. The factory-programmed settings can be changed and programmed with your own registrations. The factory Presets can be restored by doing the RESET ALL procedure. Ë Selecting a Preset You must be in PLAY Mode to select Presets. When you first connect the XPK-100 to AC power, the PLAY Mode will display.
34 Prese ts Ë Saving to a Preset After you have made changes to the instrument using the Advanced Features in EDIT Mode, you can save your changes to a Preset for later use. TRY THIS: 1. From PLAY Mode, press the PLAY/EDIT Switch once to enter EDIT Mode. 2. Make whatever changes you wish to the XPK-100 by using the Advanced Features. 3. When you have finished editing, then press the Hi “C” Pedal once.
Specifications 35 SPECIFICATIONS ! ! ! ! ! ! ! 13-note pedalboard, fixed velocity LED display: 7 segments, 3 characters Panel Switches: PLAY/EDIT, PRESET/EDIT Plus and Minus, TRANSPOSE/LOCK, CONTROL Jacks, DC power input, MIDI IN 1, MIDI IN 2, MIDI OUT Accessories, AC power supply, MIDI cable Weight: 8.
36 Specifications Ë Appendix C - MIDI Implementation Chart FUNCTION Date: 4-16-99 Version 1.
37 Hammond maintains a policy of continuously improving and upgrading its instruments and therefore reserves the right to change specifications without notice. Although every attempt has been made to insure the accuracy of the descriptive contents of this Guide, total accuracy cannot be guaranteed. Should the player require further assistance, inquiries should first be made to your Authorized Hammond Dealer.
HAMMOND SUZUKI, LTD.
HA XPK-100 Version 1.20 Addendum The contents of page 1, 6, 7 are changed as follows: 1 Introduction Basic Hook-Up The display of the Accessory Panel has been changed as shown below, and the Adaptor AD1-1508 or AD3-1508 is possible to use.