
Use and Care Manual

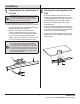
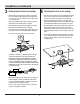
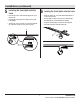
Table Of Contents

5 HAMPTONBAY.COM
Please contact 1-855-HD-HAMPTON for further assistance.
Installation
1
Connecting the live end connector to
the track
CAUTION: When the oating live-end connector is twisted
into position, ensure that the two copper tabs at the base
of the connector align with the two copper bars inside the
track. This is necessary to maintain polarity.
The track (C) and oating live end connector (E) must be
assembled so that polarity between the conductors is maintained.
□ Remove the oating power canopy (A) from the mounting
plate (D) and oating power connector (E).
□ Align the connector tab (1) of the oating live end
connector (E) with the indentation (2) on the track (C).
Insert the live end connector into the track (C) so that the
base of connector (E) ts ush against the track (C).
□ Twist the connector (E) clockwise one-quarter turn so that
the connector tab (1) ts snugly against the track (C).
IMPORTANT: The oating live end connector (E) should
be positioned along the track (C) so that it will align with
the outlet box after the track is installed to the ceiling. The
canopy (A) must enclose the oating live-end connector (E)
and cover the outlet box. The plastic canopy (A) should not
cover the track mounting attachment holes. It should attach
to the mounting plate (D) with the two setscrews after the
electrical connections are made.
E
1
2
C
D
2
Attaching the mounting plate to the
track
□ Place the mounting plate (D) on the back side of the
track (C) so that the preassembled setscrews (1) on the
mounting plate (D) will t over the ridges on both sides of
the track (C). This will ensure grounding continuity.
□ Remove the preassembled setscrews (1) from the
mounting plate (D).
□ Center the mounting plate (D) with the oating live end
connector (E), position the oating power canopy (A) over
the connector (E) and mounting plate (D), and install the
setscrews (1) on both sides of the track (C).
□ Pass the wires from the oating live end connector (E)
through the hole in the mounting plate (D) up toward the
ceiling outlet box.
E
1
A
D
C