
Use and Care Manual

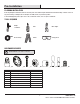

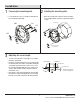

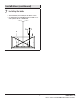


Table Of Contents

6
Installation (continued)
4
Hanging the xture
NOTE: During this step, determine the hanging length
of your xture by adding or removing stems (FF/GG). The
electrical and ground wire may also optionally be cut to
length.
WARNING: Do NOT cut electrical or ground wires
until this length is determined. Leave AT LEAST 6 inches
MINIMUM of wire past the canopy (A) to allow for easy
connections in step 6.
□ Once hanging length is determined, pass the wires through
stems (FF/GG) and nipples (HH), tightening stems to
assembly as you go to avoid twisting the wires.
□ Pass the wires through the canopy (A) and tighten the
canopy (A) to the stem assembly (HH).
A
FF
GG
HH
B
5
Connecting the wries
□ Strip 3/8 in. of insulation from the electrical wire ends.
Using wire nuts (AA), connect RIBBED xture wire to
the WHITE supply wire from the outlet box; connect the
SMOOTH xture wire to the BLACK supply wire.
□ Connect the xture ground wire and supply ground wire
using a wire nut or by fastening to the ground screw on the
round mounting plate. Push all wire connections into the
outlet box.
Smooth
Ribbed
AA
AA
6
Mounting the xture
□ Pass the screws (CC) through the two holes in the canopy
(A). Secure the canopy (A) to the screws (CC) using the two
cylinder nuts (EE). Tighten securely.
EE
A
CC