
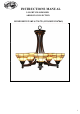
Instructions / Assembly


6
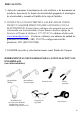
ASSEMBLY AND INSTALLATION INSTRUCTIONS:
1. Shut down the main electrical supply from the fuse box or circuit breaker in your house or building.
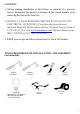
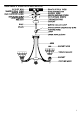
2. Fasten the mounting strip onto the outlet box using 2 outlet box screws.
3. Thread the threaded tube into center hole of mounting strip about 4 complete turns. Lock in place with
lock washer and hex nut. The threaded tube should extend long enough to protrude through the canopy
when it is mounted. Adjust as necessary.
4. Guide fixture wire through the loop and tighten the loop to upper nipple joint of fixture body.
5. Using a pair of pliers, twist open one chain link at the end of chain links. Hook it to the loop and close the
chain link. Place a piece of cloth between the jaws of pliers and the chain link to prevent scratching the
finish.
6. Tighten the screw collar loop to the threaded tube on the mounting strip. Place the ring and canopy over
the chain on the fixture. Using pliers, twist open the chain link at the other end of the chain. Hook the
whole fixture to the screw collar loop on the ceiling and close the chain link
7. Weave the fixture wires and bare copper ground wire up through the chain links, ring, canopy, screw
collar loop and the threaded tube in the mounting strip and then into outlet box. Position both the supply
wires and the fixture wires outside of the outlet box to facilitate connection.
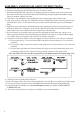
8. Connect the wire from the fixture to the power supply wire from outlet box. Cover with wire connectors.
A. Twist together glossy / live wire from the fixture with black wire from outlet box. Cover with wire
connector.
B. Twist together rough / neutral wire from the fixture with white wire from outlet box. Cover with wire
connector.
C. The bare copper grounding wire from the fixture must loop one turn under the head of green screw
on mounting strip before it is connected to the grounding conductor of the supply circuit.
Note: The Glossy/Live wire has the text printed on it; the Rough/Neutral wire has the ridge on it.
9. Carefully position all wiring inside outlet box.
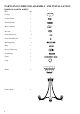
10. Place the canopy all the way to the ceiling and tighten the ring onto the screw collar loop until the canopy
11. Unscrew the socket rings from sockets. Set shades onto each socket and secure using socket rings.
12. Install the bulbs (not included). Use 60-watt Maximum standard type A bulbs or MAX 13W UL
LISTED CFL bulb.
13. Turn on the electrical power in your house or building to activate the chandelier.