
Instructions / Assembly


5 HAMPTONBAY.COM
Please contact 1-855-HD-HAMPTON for further assistance.
Assembly (continued)
3
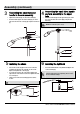
Connecting the small tube and
handle to the arm assembly
4
Connecting the small tube, handle
and arm assembly to the upper
tube
□ Tighten the small tube (E) onto the arm assembly (A).
□ Insert the handle (D) into the arm assembly (A) as shown
and secure the two hex screws (G) by using the hex wrench
(F).
□ Insert the small tube (E) into the upper tube (H) as shown
and secure the three hex screws (G) by using the hex
wrench (F).
NOTE: Do not twist the power cord (L).
5
Installing the shade
6
Installing the light bulb
□ Unscrew the socket ring (C) from the socket of the arm
assembly (A), and place the shade (B) onto the socket.
Replace and tighten the socket ring (C).
□ Loosen the knob on the side of the arm assembly (A) to
adjust the arm to the desired location then tighten the knob
to lock into place.
□ Tilt the socket on the arm assembly (A) to the desired
location.
NOTE: Remove the plastic cover on the shade before using.
□ Screw the 25W maximum 3-way SBCFL bulb (M) into the
socket assembly (A).
NOTE: You can also use one 100W maximum 3-way
standard Type A bulb (sold separately). Do not exceed
the recommended wattage.