
Installation Guide


5 HAMPTONBAY.COM
Please contact 1-855-HD-HAMPTON for further assistance.
Assembly
2
Attaching the plastic bushing
□
Place the chair base (B) on a flat, smooth surface.
Hammer the plastic bushing (CC) into the plastic sleeve of the chair base (B) until they are at the same level.
Note to allow the small end in first.
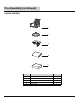
A
B
CC
BB
GG
AA
EE
FF
DD
HH
GG
1
2
C
HH
1
Attaching the T-rock to the chair
seat
□
□
IMPORTANT: You may need to loosen pre-installed bolts
to ensure chair seat (A) and chair base (B) will line up.
IMPORTANT: You may need to loosen the pre-installed
bolts to ensure the chair seat (A) and T-rock (C) will line up.
□
□
Fully tighten all bolts (BB) and nuts (DD) and pre-installed bolts
and nuts.
□
Cover all bolts (BB) and pre-installed bolts with bolt caps (GG).
Cover all nuts (BB) and pre-installed nuts with nut caps (HH).
Align the T-rock (C) to the U-bar (1) of the chair seat (A) from
above the U-bar. (Viewing the chair seat when it is upside down.)
Clamp the rocking plates (2) of the T-rock (C) and the U-bar (1) of
the chair seat (A) together with washer plates (AA).
Secure the rocking plates (2), the U-bar (1) and the washer plates (AA)
with bolts (BB) from below the washer plates (AA), while with
washers (EE), lock washers (FF) and nuts (DD) from above
the washer plates (AA) with wrenches (II).
Place the chair seat (A) upside down on a flat, smooth surface.
□