
Installation Guide


12
Assembly - Attaching the Lights (continued)
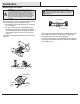
Installing the bulbs and glass shade
2
□ Remove the compressing ring (WW) from the threaded
socket of the light kit by turning the compressing ring
counter-clockwise until it unlocks.
□ Insert the glass shade (H) into the light kit cowling and turn
the compressing ring (WW) clockwise to tighten and secure
the glass shade. Repeat for the remaining shades.
□ With power off, screw the LED bulbs (I)(9.5W, provided) into
the sockets.
□ Attach the pull chain extensions (EE) provided to the light
pull chain and fan pull chain.
CAUTION: Make sure the power is off before attaching or
removing the glass shade.
WARNING: Allow the glass shade to cool completely before
removing.
D
H
WW
I
EE
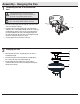
Assembly - Assembling the Fan without the Light Kit
□ Remove the three light kit mounting screws (SS) on the side
of switch cup cover (J).
□ Position the switch cup cover (J) onto the switch cup.
Make sure the notch in the switch cup cover (J) clears
the reversing switch in the switch cup of the fan-motor
assembly (D), and reinstall the light kit mounting screws
(SS).
Assembling the fan without the light kit
1
D
J
SS