
Use and Care Manual


13
HAMPTONBAY.COM
Please contact 1-855-HD-HAMPTON for further assistance.
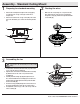
Assembly - Attaching the Lights
Installing the bulbs and shatter
resistant bowl
2
□ Remove the nial and the bottom cover from the threaded
nipple of the light kit tter assembly (E).
□ With the power off, install the two LED bulbs (I) by screwing
them into the light bulb sockets.
□ Position the shatter resistant bowl (H), re-install the bottom
cover over the threaded nipple, and direct the fan pull chain
through the side hole of the bottom cover.
□ Re-install the nial over the threaded nipple and direct the
light pull chain through the hole of the nial, and tighten the
nial securely.
□ Attach the pull chain extensions (GG) provided to the light
pull chain and fan pull chain.
CAUTION: Make sure the power is off before attaching or
removing the shatter resistant bowl.
WARNING: Allow the shatter resistant bowl to cool completely
before removing.
I
D
E
H
GG
CAUTION: Do not over tighten the hex nut, overtightening the
hex nut may cause the shatter resistant bowl to break.
D
WW
V V
FF
GG
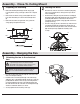
Assembly - Assembling the Fan Without the Light Kit
Assembling the fan without the
light kit
1
□ In order to use the fan without the light kit, remove the
switch cup cover (WW) from the top of the light kit tter
assembly (E) by removing the center hex nut inside the
switch cup cover (WW), and then thread the switch cup
cover (WW) off of the threaded nipple on the top of the
light kit tter assembly (E).
□ Press the plastic plug (FF) into the center hole of the
switch cup cover (WW).
□ Remove the three screws (V V) on the switch cup cover
(WW).
□ Align the three holes in the switch cup cover (WW)
with the three holes in the switch cup of the fan-motor
assembly (D). Make sure the notch in the switch cup
cover (WW) clears the reversing switch in the switch cup
of the fan-motor assembly (D).
□ Re-install the three screws (V V) that were removed in
rst step to secure the switch cup cover (WW).