
Installation Guide


12
Assembly - Attaching the Light Kit
Attaching the light kit
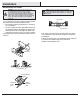
1
□ Remove the three screws (QQ) from the light kit tter
assembly (F).
□ Connect the wires exiting the bottom of the motor assembly
(E) by connecting the molded adaptor plugs together (blue to
blue, and white to white).
□ Slide the light kit (F) and secure it to the switch housing
using the three screws (QQ) that were removed in the rst
step.
WARNING: To reduce the risk of electric shock, disconnect
the electrical supply circuit to the fan before installing the
light kit.
Installing the bulbs and attaching
the lamp shade
2
□ Gently slide the lamp shade (G) over the lamp holder. Make
sure the lamp shade (G) is fully inserted into the socket for
a secure t. Repeat for the remaining lamp shades (G).
□ With the power off, insert and tighten the light bulbs (K)
(included) into light kit sockets. Use 9W LED bulbs.
□ Attach the pull chain extensions (BB).
CAUTION: Over lamping the fan will result in the fan lights
shutting down until the proper wattage bulbs are installed.
Reset the lights by turning off the power, replacing the bulbs
with the correct wattage bulbs, and turn the power on.
CAUTION: Make sure the power is off before attaching or
removing the
lamp shade (G).
WARNING: Allow the lamp shade (G) to cool completely
before removing.
E
F
QQ
BB
F
G
K