
Use and Care Manual


11
HAMPTONBAY.COM
Please contact 1-855-HD-HAMPTON for further assistance.
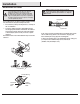
Assembly - Attaching the Light Kit
□ Remove the three screws (HH) from the light kit tter assembly (F).
□ Connect the wires exiting the bottom of the motor assembly (E)
by connecting the molded adaptor plugs together (II) (blue to blue,
white to white).
□ Slide the light kit (F) and secure it to the switch housing using the
three screws (HH) that were removed in the rst step.
Attaching the light kit
1
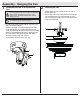
Assembly - Attaching the Blades (continued)
Attaching the fan blades
2
□ Mount the fan blade (H) to the blade bracket (I) by aligning the
three key-slot holes in the blade (H) with the three posts on
the top of the blade brackets (I).
□ Hold the blade (H) close to the blade bracket (I) and press the
blade (H) down rmly. Ensure the key-slot holes are properly
seated on the blade arm posts.
□ While still holding the blade (H) down, rmly slide the blade (H)
away from the bracket (I) side until the blade (H) engages in
the locking mechanism.
□ Make sure the locking mechanism at the rear of the blade
bracket (I) springs upward and butts against the edge of the
blade (H) indicating a secure connection.
□ Visually inspect the top of the blade bracket (I) to ensure the
locking mechanism is securely in place.
□ Repeat for the remaining blades (H).
NOTE: Your fan features revolutionary advancements for quick
and easy blade installation.
E
H
I
CAUTION: To reduce the risk of electric shock,
disconnect the electrical supply circuit to the fan
before installing the light kit.
E
II
HH
F