
Installation Guide


1
HAMPTONBAY.COM
Please contact 1-855-HD-HAMPTON for further assistance.
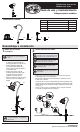
PACKAGE CONTENTS
NOTE: Do not use a hammer. If the ground is
hard, use water to soften or a trowel to loosen
the soil.
Attaching and installing the
light
Connecting the wires
□ Attach the light shade (A) to the xture head
(B) by inserting it to the xture head (B) and
twisting clockwise.
□ Attach the xture head (B) to the post (C) by
inserting the xture head (B) to the upper
end of the post (C) and twisting clockwise.
□ Attach the post (C) to the stake (D) by
inserting the bottom of the post (C) into the
top of the stake (D) and twisting clockwise.
□ Push the stake assembly into the ground by
grasping the post. Do not push on the light.
□ Detach and place the wire connector (E) on opposite sides of the low voltage cable
where the xture will be located.
□ Align and t the main low voltage cable vertically in the slot of the wire connector as
shown.
□ Press the wire connector (E) together until fully seated and locked around the cable. Pre-
set prongs will pierce the cable insulation and establish contact. Turn on the power unit.
If the light xture does not turn on, repeat operations 2 and 3.
□ Once the clip-on connector is in place, wrap it with electrical tape (not included) for
additional protection.
1 2
IMPORTANT: Protect the wiring by routing it in
close proximity to the light, tting, or next to a
building structure such as a house or a deck.
IMPORTANT: Do not bury the wiring by more
than 6 in. (15.24 cm) in order to connect to the
main secondary wire.
IMPORTANT: Do not submerge in water. This
product could be damaged.
IMPORTANT: Do not install the light within 10 ft.
(3 m) of a pool, spa, or fountain.
A
B
C
D
E
E
CAUTION: The wire from the low voltage power
unit shall be 12-16 AWG type underground Low
Energy Circuit Cable.
Assembly and Installation
Path Light
Use and Care Guide
Item #xxxx xxx xxx
Model #21413
A C D EB
Part Description Quantity
A Light shade 1
B Fixture head 1
C Post 1
D Stake 1
E Connector 1