
Instructions / Assembly


9
Installation
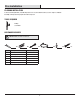
1
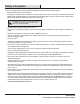
Attaching the casters to the mantel
NOTE: To avoid scratching the finish, assemble the
product on a soft, non-abrasive surface, such as carpet or
cardboard.
□ Lay the mantel (A) on its back.
□ Screw a front caster (B) into the pre-drilled hole in the
front-right corner of the mantel (A) base.
□ Screw a rear brake caster (C) into the pre-drilled hole in
the right-rear corner of the mantle (A) base.
□ Repeat this process for the left side of the mantel (A) base.
□ Tighten all of the casters with the wrench (AA) provided.
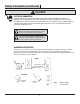
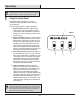
2
Attaching the mounting bracket to
the mantel
□ Attach a mounting bracket (BB) to the top edge of the back
of the mantel (A) by inserting two screws (FF) through the
mounting bracket (BB) and into the pre-drilled holes in the
mantel (A). Tighten with a screwdriver.
3
Attaching the mounting bracket to
the wall
□ Attach a mounting bracket (BB) to the wall in the location
you have selected to put the mantel (A) by positioning the
mounting bracket (BB) at approximately the same height
as the mounting bracket (BB) previously attached to the
mantel (A).
□ Insert screws (CC) through the mounting bracket (BB) and
into a wall stud. If there is no stud present, insert wall
anchors (EE) before inserting the screws (CC). Tighten with
a screwdriver.
4
Attaching the nylon strap
DANGER: This product is only a deterrent. It is not a
substitute for proper adult supervision.
□ Set the mantel (A) 2-3 inches from the wall with both
mounting brackets (BB) aligned.
□ Slip the nylon strap (DD) through the openings in each of
the mounting brackets (BB) and secure the nylon strap
(DD). This will help prevent the mantel from tipping.
CC
DD
BB
FF
BB
EE
BB
CC
FF
BB
FF
A
BB
HAMPTONBAY.COM
PLEASE CONTACT 855-HD-HAMPTON FOR FURTHER ASSISTANCE.
AA
C
A
C
B
B
AA
NOTE: Installing casters is highly recommended as using fireplace
without casters could impede air flow and cause fan heater failure.