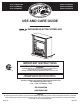
Item # 1001801709, Item # 207000472, Item # 207000982 Model # 25-803-68 Model # 25-804-68 Model # 25-805-50 USE AND CARE GUIDE INFRARED ELECTRIC FIREPLACE IMPORTANT INSTRUCTIONS PLEASE READ THIS MANUAL BEFORE INSTALLING AND USING APPLIANCE WARNING! C US IF THE INFORMATION IN THIS MANUAL IS NOT FOLLOWED EXACTLY, AN ELECTRICAL SHOCK OR FIRE MAY RESULT CAUSING PROPERTY DAMAGE, PERSONAL INJURY OR LOSS OF LIFE. INSTALLER: Leave this manual with the appliance.
Table of Contents Table of Contents. . . . . . . . . . . . . . . . . . . . . . . . . . . . . . . . . . . . 2 Operation. . . . . . . . . . . . . . . . . . . . . . . . . . . . . . . . . . . . . . . . . 10 Safety Information. . . . . . . . . . . . . . . . . . . . . . . . . . . . . . . . . . . 3 Maintenance. . . . . . . . . . . . . . . . . . . . . . . . . . . . . . . . . . . . . . . 12 Warranty. . . . . . . . . . . . . . . . . . . . . . . . . . . . . . . . . . . . . . . . . . . 6 Care and Cleaning . . . .
Safety Information Please read and understand this entire manual before attempting to assemble, operate or install the product. □ Read all instructions before using this appliance. □ This appliance is hot when in use. To avoid burns, do not let bare skin touch hot surfaces. If provided, use handles when moving this appliance. Keep combustible materials, such as furniture, pillows, bedding, papers, clothes and curtains at least 3 ft.
Safety Information (continued) DANGER ELECTRICAL CONNECTION A 15-Amp, 120-Volt, 60 Hz circuit with a properly grounded outlet is required. Preferably, the item will be on a dedicated circuit, as other appliances on the same circuit may cause the circuit breaker to trip or the fuse to blow when the heater is in operation. The unit comes standard with a 6 ft. (1.8 m) long three wire cord, exiting the right side of the item. Always plug the unit into a wall outlet/receptacle.
Safety Information (continued) REMOTE CONTROL This Class (B) device complies with Part 15 of the FCC Rules and Canadian ICES-003. Operation is subject to the following two conditions: (1) This device may not cause harmful interference, and (2) this device must accept any interference received, including interference that may cause undesired operation. There is no guarantee that interference will not occur in a particular installation.
Warranty 1-YEAR WARRANTY WHAT IS COVERED The manufacturer warrants that your new electric fireplace is free from manufacturing and material defects for a period of one year from date of purchase, subject to the following conditions and limitations. Variations in actual wood color and finishes which may result from natural characteristics of the wood, such as grain patterns, mineral streaks and the like, are not considered defects.
Pre-Installation PLANNING INSTALLATION To avoid scratching the finish, assemble the product on a soft, non-abrasive surface, such as carpet or cardboard. Assembly of this product may require more than one person. TOOLS REQUIRED Phillips screwdriver PACKAGE CONTENTS AA Anti-tip Device QTY. 1 A Part Description Quantity A Mantel (with fireplace insert) 1 AA Anti-tip Device 1 7 HAMPTONBAY.COM PLEASE CONTACT 855-HD-HAMPTON FOR FURTHER ASSISTANCE.
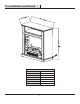
Pre-Installation (continued) Specifications Voltage Frequency Heater Rating Max. Amps 120 V AC 60 Hz 1350 W 12.5 A 31.5 in. (800 mm) 13 in. (330 mm) 32.5 in.
Installation 1 2 Attaching the mounting bracket to the mantel □ Attach a mounting bracket to the top edge of the back of the mantel (A) by inserting two shirt screws through the mounting bracket and into the pre-drilled holes in the mantel (A). Tighten with a screwdriver.
Operation NOTE: When the heat function is used for the first time, a slight odor may be present. This is normal and should not occur again unless the heater is not used for an extended period of time. 1 Using the Control Panel □ Check that the heater outlet grill is not covered or obstructed in anyway, and make sure the power to the unit is switched on. □ Press the appropriate button to operate your fireplace: 1. Main Power Button: This button supplies power to all the functions of the log set.
Operation (continued) The infrared remote control relies on a line of sight and must be pointed at the controls of the log set to work. The remote control unit has the controls required to turn ON/OFF both the main power and the heater. If you prefer to use the control buttons on the log set unit itself, they are on the lower right corner of the unit. The layout of the buttons and remote control unit can be seen in Figures 2 and 3, respectively. □ Plug your log set into a 15-amp, 120-volt power outlet.
Maintenance GLASS INFORMATION □ Under no circumstances should this product be operated with broken glass. □ Do not strike or slam the glass. □ Do not use abrasive cleaners to clean the glass. □ This product uses tempered glass. Replacement of the glass supplied by the manufacturer should be done by a qualified service person. LIGHT BULB INSPECTION AND REPLACEMENT WARNING: Light bulbs become very hot during use. Allow at least 10 minutes for the bulbs to cool before touching.
Maintenance (continued) DANGER Disconnect power before servicing. Any electrical re-wiring of this appliance must be done by a qualified electrician. This wiring must be done in accordance with local codes and/or in Canada with the current CSA C22.1 Canadian Electrical Code, and for US installations, the National Electrical Code ANSI/NFPA NO 70. If repairing or replacing any electrical component or wiring, the original wire routing, color coding and securing locations must be followed.
Troubleshooting If you have any questions regarding the product, please call Hampton Bay Customer Service, 855-HD-HAMPTON, 8 a.m. –6 p.m. EST, Monday – Friday. Problem The fireplace does not operate. The power light is ON but the flame effect is not visible. The heater is not operating. There is excessivee noise when the heater is operating. Possible Cause Solution □ The fireplace is not plugged in. □ Make sure the fireplace is plugged in to a standard 120V outlet.
Service Parts 1 3 2 4 8 5 7 6 9 10 11 16 12 13 18 17 15 14 20 19 21 22 Part Description Part # Part Description Part # 1 Back Panel EF237916501AC 16 Power Cord & Connector EF24900015AC 2 Flame Panel EF237916502AC 17 Synchronous Motor EFES323020ST 3 Glass EF237916503AC 18 Lamp Socket & Bracket EFES323021ST 4 Screen EF237916504AC 19 Fan Heater 5 Front Decorative Panel 6 Front Panel 7 EF23022501X-14 EF237916505AC 20 Access Panel EFES323008ST EF237916506A
Questions, problems, missing parts? Before returning to the store, call Hampton Bay Customer Service 8 a.m.-6 p.m., EST, Monday-Friday 855-HD-HAMPTON HAMPTONBAY.COM Retain this manual for future use. Manufactured by: GHP Group, Inc. • 6440 W. Howard St.
Núm. de medelo 25-803-68 Núm. de medelo 25-804-68 Núm. de medelo 25-805-50 Núm. de artículo 1001801709, Núm. de artículo 207000472, Núm.
Tabla de contenido Tabla de contenido. . . . . . . . . . . . . . . . . . . . . . . . . . . . . . . . . . . 2 Operación. . . . . . . . . . . . . . . . . . . . . . . . . . . . . . . . . . . . . . . . . 10 Información de seguridad . . . . . . . . . . . . . . . . . . . . . . . . . . . . . 3 Mantenimiento. . . . . . . . . . . . . . . . . . . . . . . . . . . . . . . . . . . . . 12 Garantía. . . . . . . . . . . . . . . . . . . . . . . . . . . . . . . . . . . . . . . . . . . 6 Cuidado y limpieza. . . . . . . .
Información de seguridad Por favor, lea y comprenda este manual completo antes de intentar ensamblar, operar o instalar el producto. □ Lea todas las instrucciones antes de usar este aparato. □ Este dispositivo se calienta cuando está en uso. Para evitar quemaduras, no permita que la piel desnuda toque las superficies calientes. Si se proporcionan, use manijas cuando mueva este dispositivo.
Información de seguridad (continuación) PELIGRO CONEXIÓN ELÉCTRICA Se requiere un circuito de 15 Amp, 120 Voltios, 60 Hz con un tomacorriente aterrizado adecuadamente. De preferencia, el artículo estará en un circuito dedicado, ya que otros dispositivos en el mismo circuito podrían hacer que el disyuntor de circuito se active o el fusible explote cuando el calefactor esté en funcionamiento. La unidad viene estándar con un cable de tres alambres de 6 pies (1.
Información de seguridad (continuación) CONTROL REMOTO Este dispositive cumple con las reglas de Ia FCC parte 15. La operaci6n esta sujeta a las siguientes dos condiciones: (1) Este dispositivio no puede causar interferencias perjudiciales, y (2) este dispositive debe aceptar cualquier interferencia recibida, incluyendo interferencias que pueda causar funcionamiento no deseado. No existe garantía de que no ocurra interferencia en una instalación en particular.
Garantía GARANTÍA DE 1 AÑO LO QUE ESTÁ CUBIERTO El fabricante garantiza que su nueva chimenea eléctrica está libre de defectos de fabricación y materiales por un periodo de un año a partir de la fecha de compra, sujeto a las siguientes condiciones y limitaciones. Las variaciones en el color real de la madera y los acabados que pueden resultar de las características naturales de la madera, como patrones de grano, marcas minerales y cosas semejantes, no son considerados defectos.
Pre-instalación PLANIFICACIÓN DE LA INSTALACIÓN Para evitar rayar el acabado, ensamble este producto sobre una superficie suave no abrasiva, como una alfombra o cartones. El ensamblaje de este producto puede requerir más de una persona. HERRAMIENTAS REQUERIDAS Destornillador Phillips CONTENIDO DEL PAQUETE Pieza Descripción Cantidad A Marco de la chimenea 1 AA Soporte de montaje 1 7 HAMPTONBAY.COM PÓNGASE EN CONTACTO CON EL 855-HD-HAMPTON PARA ASISTENCIA ADICIONAL.
Pre-instalación (continuación) Especificaciones Voltaje Frecuencia Capacidad nominal del calefactor Máx. Amps Anchura Profundidad Altura 8 120 V AC 60Hz 1350W 12.5A 31.5 pulg. (800 mm) 13 pulg. (330 mm) 32.5 pulg.
Instalación 1 2 Instalación del soporte de montaje en el marco □ Instale un soporte de montaje en el borde superior de la parte trasera del marco (A) insertando dos tornillos a través del soporte de montaje y en los agujeros preperforados en el marco (A). Apriete con un destornillador.
Operación NOTA: Cuando la función de calor es usada por primera vez, se puede presentar un ligero olor. Esto es normal y no debe ocurrir otra vez a menos que el calefactor no se use por largo tiempo. 1 Uso del panel de control □□ Compruebe que la rejilla de salida del calefactor no esté cubierta ni obstruida en ninguna manera y asegúrese de que la energía de la unidad esté encendida. □□ Presione el botón apropiado para operar su chimenea: 1.
Operación (continuación) El control remoto infrarrojo depende de una línea de visión y debe ser apuntado a los controles del conjunto de leños para que funcione. La unidad de control remoto tiene los controles requeridos para encender/apagar tanto la energía principal como el calefactor. Si prefiere usar los botones del control en la unidad misma del conjunto de leños, estos se encuentran en la esquina inferior derecha de la unidad.
Mantenimiento INFORMACIÓN DEL VIDRIO □ Bajo ninguna circunstancia se debe operar este producto con el vidrio roto. □ No golpee ni cierre de golpe el vidrio. □ No use limpiadores abrasivos para limpiar el vidrio. □ Este producto usa vidrio templado. El reemplazo del vidrio suministrado por el fabricante debe ser hecho por una persona de servicio calificada. INSPECCIÓN Y REEMPLAZO DE LA BOMBILLA ADVERTENCIA: Las bombillas se calientan mucho durante su uso.
Mantenimiento (continuación) PELIGRO Desconecte la energía antes de dar servicio. Cualquier renovación de cableado de este dispositivo debe ser hecho por un electricista calificado. Este cableado debe ser hecho de acuerdo con códigos locales y/o en Canadá con el Código Eléctrico Canadiense actual CSA C22.1 y para instalaciones en los EE. UU., el Código Eléctrico Nacional ANSI/NFPA NO 70.
Resolución de fallas Si tiene preguntas respecto al producto, llame a Servicio al Cliente de Hampton Bay, al 855-HD-HAMPTON, de 8 a.m. a 6 p.m., hora local del Este de lunes a viernes. Problema La chimenea no funciona. La luz de energía está encendida pero el efecto de la llama no es visible. El calefactor no está funcionando. Causa posible □□ La chimenea no está enchufada. □□ Asegúrese de que la chimenea esté enchufada en un tomacorriente estándar de 120V.
Piezas de servicio 1 3 2 4 8 5 7 6 9 10 11 16 12 13 18 17 15 14 20 19 21 22 Pieza Descripción Núm.
¿Tiene preguntas, problemas, o faltan piezas? Antes de regresar a la tienda, llame a Servicio al Cliente de Hampton Bay de lunes a viernes de 8 a.m. a 6 p.m., hora local del Este 855-HD-HAMPTON HAMPTONBAY.COM Conserve este manual para uso futuro. Fabricado por: GHP Group, Inc. • 6440 W. Howard St.