
Installation Guide

INSTALLATION INSTRUCTIONS
For Item#25105, 25106 (03/02/2009)
READ AND SAVE THESE INSTRUCTIONS
WARNING! SHUT POWER OFF AT FUSE OR CIRCUIT BREAKER.
Fig. 1
Fig. 2
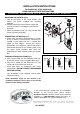
MOUNTING THE FIXTURE (Fig.1)
1. Shut off the power at the circuit breaker and
remove old fixture, including the mounting
hardware.
2. Carefully remove the fixture from the carton and
check that all parts are included as shown in the
illustration.
3. Attach the Mounting Plate (A) using Junction Box
Screws (B) to the Outlet Box.
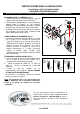
CONNECTING THE WIRES (Fig. 2)
4. At this point, connect the electrical wires as shown
in Fig. 2, making sure that all wire connectors are
secured. If your outlet box has a ground wire
(green or bare copper), connect the fixture’s
Ground Wire to it. Otherwise, connect the fixture’s
Ground Wire directly to the mounting plate using
the Green Screw provided.
A
fter wires are
connected, tuck them carefully inside the Junction
Box.
FINISHING THE INSTALLATION (Fig.1)
5. Place Fixture Body (D) over Mounting Plate (A),
fasten with Screws (C) by using Allen Wrench (H).
6. Place Glass Shade (E) and Metal Ring (F) over
socket and secure with Screw Shell (G).
7. Install light bulbs in accordance with fixture
specifications. (DO NOT EXCEED THE MAXIMUM
WATTAGE RATING!)
Your installation is now complete. Return power
and test the fixture.
Note: Illustration (Fig.1) on this manual is for
installation purposes only. It may or may not be
identical to the fixture purchased.
LA-1300E/S
FIXTURE
WIRES
Black or
Smooth
H
O
USE
WIRES
Black
(Hot)
FIXTURE
WIRES
White or
Ribbed
H
O
USE
WIRES
White
(Neutral)
FIXTURE
WIRES
Green or
Bare
Copper
(Ground)
H
O
USE
WIRES
Green
(Ground)
A
B
C
D
E
G
F
H
In the event that you should have any installation
question or are missing parts, please contact
Customer Service. Customer service may be reached
weekdays a 1-800-527-0998 between the hours o
f
8:00am and 5:00pm PST (Pacific Standard Time).