
Use and Care Manual


8
Assembly (continued)
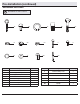
Assembly - Hanging the Fan
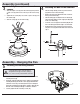
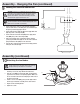
Installing the coupler cover and
canopy
□ Slide the coupler cover (D) onto the downrod (B) and push the
coupler cover (D) until it rests on the top of the motor housing
(G).
□ Tighten the set screw (ZZ) to secure the coupler cover (D) onto
the downrod (B).
□ Slide the canopy (C) onto the downrod (B).
3
D
B
ZZ
G
C
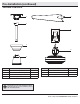
Installing the ball on the downrod
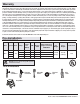
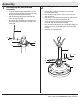
Installing the mounting bracket
□ Pass the 120-Volt supply wires through the center hole in the
mounting bracket (A).
□ Install the ceiling mounting plate on the outlet box by sliding the
mounting bracket (A) over the two screws (TT) provided with the
outlet box. If necessary, use leveling washers (not included) be-
tween the mounting bracket (A) and the outlet box. Note that the
at side of the mounting bracket (A) is toward the outlet box.
□ Securely tighten the two mounting screws (TT).
4
5
WARNING: To reduce the risk of re, electric shock
or personal injury, mount to outlet box marked
“Acceptable for fan support of 35lbs. (15.9kg) or
less”, and use screws provided with the outlet box.
TT
A
TT
□ Slide the hanger ball (H) onto the top of the downrod
(B) past the holes in the downrod (B).
□ Replace the support pin (RR) into the holes located at
the top of the downrod (B).
□ Slide the ball (H) up and align the holes in the ball (H)
and downrod (B). Make sure the support pin (RR) aligns
in the slot of the ball (H).
□ Screw the set screw (PP) and lockwasher (QQ) into the
hole in the ball (H) and downrod (B) to secure the ball.
□ Reattached the green ground wire (I) to the downrod
using the screw (SS) and washer that were removed in
step 1.
I
PP
B
QQ
H
SS
RR