
Instructions / Assembly


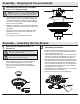
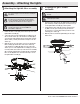
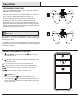
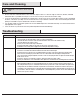
Table Of Contents

12
Attaching the blade brackets to
the motor
Attaching the blades
1 2
□ Mount the fan blade (F) to the blade bracket (G) by aligning
the three key-slot holes in the blade (F) with the three posts
on the top of the blade bracket (G).
□ Hold the blade (F) with both hands close to the blade bracket
(G) and press the blade (F) down rmly. Ensure the key-slot
holes are properly seated on the blade bracket (G) posts.
□ While still holding the blade (F) down with both hands, rmly
slide the blade (F) away from the fan-motor (D) housing until
the blade (F) engages in the locking mechanism. Make sure
the steel locking mechanism at the rear of the blade bracket
(G) springs upward and butts against the edge of the blade
(F), indicating a secure connection.
□ Visually inspect the top of the blade bracket (G) to ensure the
locking mechanism is securely in place.
□ Repeat this procedure for the remaining blades (F).
D
G
F
□ Carefully unhook the fan from the mounting bracket (A) and
align the locking slots of the ceiling canopy (C) with the two
screws in the mounting bracket (A). Push up to engage the
slots and turn clockwise to lock in place. Immediately tighten
the two mounting screws rmly.
□ Install the two mounting screws (saved from Assembly Step 1
“Preparing for mounting” into the holes in the canopy (C) and
tighten rmly.
□ Install the decorative canopy ring (L) by aligning the ring’s
slots with the screws in the canopy (C). Rotate the ring
clockwise to lock in place.
□ You may now proceed to attaching the fan blades.
WARNING: The locking slots of ceiling canopy are provided only
as an aid to mounting. Do not leave the fan assembly unattended
until all four canopy screws are engaged and rmly tightened.
NOTE: Your fan features revolutionary advancements for
quick and easy blade installation.
NOTE: Your fan blades are reversible. Select the blade side
nish which best accentuates your decor.
□ Fasten the blade bracket (G) to the fan-motor (D) by insert-
ing the alignment post into the slot on the bottom of the
fan-motor (D) and tightening the fan-motor screws.
□ The fan-motor screws are pre-attached to the blade
bracket (G). Repeat this procedure for the remaining four
blade brackets (G).
D
G
Mounting the fan-motor assembly
(close-to-ceiling mount)
8
Assembly - Hanging the Fan (continued)
Assembly - Attaching the Fan Blades
D
C
A
JJ
L