
Installation Guide


4
Installation
1
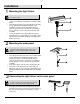
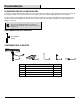
Mounting the light fixture
NOTE: Do not use a hammer. If the ground is hard,
use water to soften.
□ Locate area in which you would like to install your light
fixture.
□ Insert the ground stake (H) of the light fixture (A) firmly
into the ground at the installation location. If the
ground is too hard, soak the ground with water to
soften the ground or drive a metal rod or screwdriver
into the ground to create a hole for the ground stake
assembly.
□ Loosen the thumb screws (G) to adjust the angle of
the lamp body (F) so that it will face to the wall or other
objects that you would like to light up, then tighten the
thumb screws (G).
F
G
H
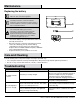
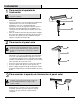
2
Mounting the solar panel
NOTE: Approximately 6 feet cord extended from the
light fixture. Ensure the light fixture and the solar
panel are located enough together for the cord to
reach.
□ Insert the ground stake (D) of the solar assembly firmly
into the ground at the installation location. If the
ground is too hard, soak the ground with water to
soften the ground or drive a metal rod or screwdriver
into the ground to create a hole for the ground stake
assembly.
□ Connect the upper stake (C) to the ground stake (D).
□ Connect the solar panel (B) to the upper stake (C).
□ Adjust the angle of solar panel (B) so that it will receive
maximum amount of direct sunlight during the daylight
hours.
B
C
D
3
Connecting the light fixture to the solar panel
NOTE: Prior to use, set the AUTO/OFF switch
located on the back of the solar panel to the AUTO
position and allow it to charge a full sunny day.
□ Carefully route the wire from the light fixture (A) and
plug it into the female connector located on the back of
the solar panel (B). Make sure the plug is securely
connected.