
Use and Care Manual


4
Installation
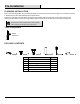
Installing the light
NOTE: Do not use a hammer. If the ground is hard,
use water to soften.
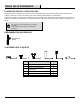
□ Insert the ground stake (E) firmly into the ground at the installation location. If the ground is too hard, soak the
ground with water to soften the ground or drive a metal rod or screwdriver into the ground to create a hole for the
ground stake (E).
□ Connect the pole (D) to the ground stake (E).
□ Connect the lamp housing assembly (A & B & C) to the pole (D).
Operation
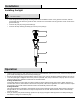
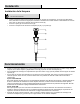
□ Hold the lamp housing (C) and rotate the top cap (A) counterclockwise until it is loose. Then, remove the top cap and
glass shade assembly (A & B) from the lamp housing (C).
□ Rotate the glass shade (B) counterclockwise until it is loose. Then, remove the glass shade (B) from the top cap (A).
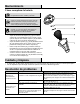
□ Your solar path light is equipped with a 3-way selector (ON+PIR, OFF, PIR) on the back of top cap. Prior to use, the
selector must be set to ON+PIR or PIR mode as described below.
Setting: ON+PIR mode
This setting allows to turn the light on in about 15 lumens output at dusk and off after 8 hours. Motion detection is
activated after 8 hours, when motion is detected in this period, it will turn the light back on in about 15 lumens output
for a period of 30 seconds. Motion detection mode is automatically turned off at dawn.
Setting: PIR mode
This setting allows the solar light to automatically go into motion detection mode at dusk. When motion is detected
the light will turn on in about 50 lumens output for a period of 30 seconds. Motion detection mode is automatically
turned off at dawn.
□ After you choose your preferred setting, replace the top cap (A) and glass shade (B) back to the lamp housing (C)
and allow it to charge for a full sunny day.