
Installation Guide


4
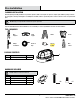
Installation
WARNING: RISK OF ELECTRIC SHOCK. Ensure the electricity to the wires you are working on is shut off. Either remove the fuse or turn off
the circuit breaker before removing the existing light fixture or installing the new one.
With power disconnected to the electrical box, remove the existing fixture. Make a sketch of how the current fixture is wired (by wire color)
or mark the wires with masking tape and a pencil so you will know how to properly reconnect the wires to the new LED light fixture.
1
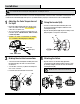
Adjusting the Color Temperature of
the Light
□ Remove the rubber plug by hand, then open the screw
of the color switch cover with a cross screwdriver and
remove the color switch cover.
□ Choose your favorite correlated color temperature (CCT)
from three options: 2700k Warm White, 3000k Soft White,
or 4000k Bright White.
□ Install the color switch cover, then fix the screw with a
cross screwdriver, and finally plug the rubber plug.
2
Fixing the bracket (AA)
□ Pass the hot and neutral (black and white) wires from
the electrical outlet box through the middle hole of the
mounting bracket (AA).
□ Align the mounting bracket (AA) using the mounting screws
(BB) and tighten securely to the electrical box.
3
Making the electrical connections
□ Connect the hot and neutral (black and white) wires from
the fixture body (A) to the same color wires from the
electrical box.
□ Cover the wire connectors (CC) with electrical tape for a
more secure connection.
□ Position the wires back inside the electrical box.
4
Attaching the fixture
□ Align the side slots on the fixture body (A) with the
mounting bracket (AA) and fix the fixture body (A) securely
by carefully rotating in clockwise the side slots inside the
mounting bracket (AA).
NOTE: the arrow on the front of the shield is up.
A
A
CC
AA
AA
A
Side slot
BB
AA
Switch cover
2700K 3000K 4000K
Rubber plug